

- dot2 User Manual
- New in the Manual
- Introduction
- Intended Use
- System Requirements dot2 onPC
- Installation of dot2 onPC
- What are...
- System Colors
- Command History
- Executor
- Values
- Background
- Programmer
- Groups
- Presets
- Tracking
- Cues
- Executors
- Chasers
- Effects
- Preview and Blind
- Network
- IPv6
- DMX Tester
- System Colors
- How to...
- Turn the console on and off
- Update the console
- Add, patch, change, and delete fixtures
- Save and load your show
- Use the command line
- Use Encoders in the onPC
- Work with groups
- Work with presets
- Work with cues
- Work with chasers
- Work with effects
- Connect nodes, wings, 3D and onPC
- Use external input triggers
- Use MIDI and MIDI Show Control (MSC)
- Use the external screen
- Use web remote
- Reset the console
- Keys
- Align
- At
- Backup
- Blind
- B.O.
- Clear
- Copy
- Cue
- Delete
- DMX
- [dot]
- Down
- Edit
- Effect
- [Encoder]
- Esc
- Exec (Executor)
- [Exec Flash]
- [Exec Go]
- Fix
- Fixture
- Flash
- Full
- Go-
- Go- (Large)
- Go+
- Go+ (Large)
- [GoFastBack] <<<
- [GoFastForward] >>>
- Goto
- Group
- Help
- Highlt (Highlight)
- Label
- If
- MA
- Macro
- Magic
- [Minus] -
- Move
- Next
- [Numeric keys]
- Off
- On
- Oops
- Page
- Page+
- Page-
- Pause
- Pause (Large)
- Please
- [Plus] +
- Preset
- Prev (Previous)
- Prvw (Preview)
- Select
- Set
- Setup
- Speed
- Store
- Thru
- Time
- Toggle
- Tools
- Up
- Update
- View [Eye]
- Views & Windows
- Control Elements
- Command Line
- Encoder Bar
- Executor Bar
- Preset Type Bar
- Title Bar
- View Bar
- Icons
- Add New Fixtures
- Backup
- Beam Preset Type
- Calculator
- Calibrate Screens
- Change Functions of Executor
- Choose Clone Method
- Choose Copy Method
- Choose Delete Method
- Choose Store Method
- Choose Update Method
- Clock
- Color Preset Type
- Command Line
- Configure Slot
- Control Preset Type
- Cues
- Dimmer Preset Type
- DMX
- Edit Cue Number(s)
- Effects
- Empty Executor
- Enter Name for
- Executor Bar
- Executor Pool
- Fixtures
- Fixture Schedule Overview
- Focus Preset Type
- Gobo Preset Type
- Global Settings
- Groups
- Help
- Import Fixture Type
- Key Backlight
- Leaving Patch & Fixture Schedule...
- Load Show
- Macros Pool
- Magic Speeds
- MIDI Configuration
- MIDI Monitor
- MIDI Show Control
- Network Interface
- Network Protocols Configuration
- Network Setup
- New Show
- Off...
- Oops
- Page Pool
- Patch and Fixture Schedule
- Position Preset Type
- Presets Pools
- Remote Inputs Configuration
- Save Show As...
- Select DMX Address...
- Select DMX Ports
- Select Fixtures ID(s)
- Select Fixture Type...
- Select Function for Remote Inputs Configuration
- Select Function of Executor
- Select Language...
- Select Session Number
- Select Station...
- Select Trig
- Select Type
- Select View
- Select View for External Screen
- Select Wing...
- Session Collision
- Settings of Executor
- Setup
- Shapers Preset Type
- Software Update via USB
- Sound Input Configuration
- Status and Messages
- System Clock
- System Information
- Time defaults
- Timecode Configuration
- Tools
- Video Preset Type
- Virtual Playbacks
- Window Settings
- Wings
- Wings & Nodes Diagnosis
- Control Elements
- Commands
- >>> [GoFastForward]
- <<< [GoFastBack]
- - [Minus]
- + [Plus]
- Assign
- At
- Black
- Blind
- Call
- Clone
- Copy
- Cue
- Default
- Delay
- Delete
- Dmx
- DmxUniverse
- Edit
- Effect
- Executor
- Fade
- Fix
- Fixture
- Flash
- Full
- FullHighlight
- Go
- GoBack
- Goto
- Group
- Help
- If
- IfOutput
- Invert
- Label
- Learn
- Macro
- MidiNote
- Move
- Off
- On
- OutDelay
- OutFade
- Page
- Park
- Pause
- Preset
- PresetType
- Preview
- Rate
- Record
- Release
- Remove
- Replace
- Select
- Selection
- SetIP
- SnapPercent
- Solo
- Stomp
- Store
- StoreLook
- SyncEffects
- Temp
- Thru
- Toggle
- Top
- Unpark
- Update
- View [Eye]
- Zero
- Hints for Operating
- Error Handling
- CrashLogCopy
- CrashLogDelete
- CrashLogList
- Error Messages
- Glossary
- dot2 Quick Start Guide
- dot2 3D
- dot2 Release Notes
Cues View
To go to the Cues View for the main executor on screen 1: Press Cue on the console.
To go to the cues view for the main executor on screen 2: Tap Cues on the view bar.
To go to the cues view for any other executors: Press  and then the respective executor button on the console.
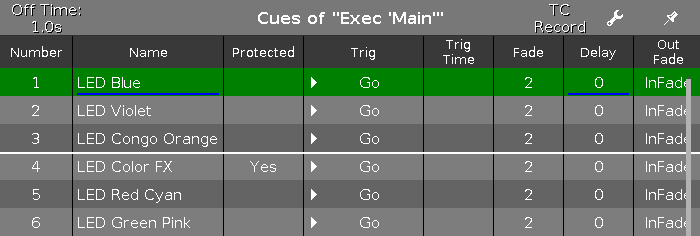
In this view, you see all cues of the respective executors and their settings.
Every store, update, or copy function makes an automatically unblock for the cue list. The values being identical with the value of the previous cue will not be stored again in the cue list. This provides a clean tracking list. For more information, refer to What is Tracking?.
If an off time is set for this executor, it is displayed in the title bar.
To change the off time, tap at Off Time in the title bar. The settings of executor window opens.
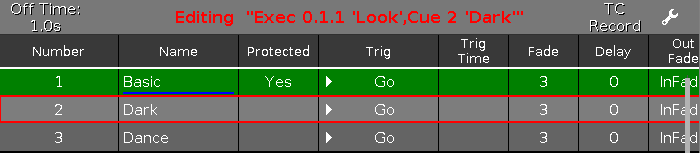
If a certain cue is edited, it is displayed in a red frame in the view. Furthermore, the title bar of the view is displayed in a red and bold font. The corresponding executor is also displayed in a red frame. For more information see Executor Bar.
To start a timecode record for the executor, tap at TC Record (= timecode) in the title bar. The record icon  is flashing in the title bar of the cues view and in the executor bar. Only available if at least one timecode source is turned on in the timecode configuration window. If no timecode source is turned on, the TC Record button is showed grayed out and the timecode trigger icon is displayed in red.

To open the executor settings, tap the tool  in the title bar. It opens the settings of executor window.
To pin the view and deactivate the dynamic view mode, tap on the pin  in the title bar.
Below the title bar is the cue table. In this table you can edit the
- Number. The edit cue number(s) window opens.
- Cue Name
- Protected
- Trig (Trigger). The select trig window opens.
- Trigger Time
- Fade
- Delay
- Out Fade
- Out Delay
- Preset Type Timings
- Cmd (Command)
- Snap Percent
- Info
To edit the cells of the cue table, press and hold the cell. The corresponding edit window opens.
A selected cell in the cue table has blue background with a white frame around.
The current executed cue in the cue table has a green background.
The blue bar in the name column of a running cue displays the fade time from 0% to 100%.
For more information about cues, refer to What is a Cue? and How to work with Cues?.
If a cue is set to protected, a white line is displayed to see where the tracking stops. For more information, refer to What is Tracking?
If the assigned fade or delay time is overwritten by the exec time master, it is indicated by an equal sign in front of the fade or delay time.

Chaser
If the executor is set to a chaser, all cue functions and timings which are not active in the chaser mode are shown gray out. For more information about chasers, refer to What is a Chaser? and How to work with Chasers?.
Additional is the chaser bar visible.

Forward (chaser direction mode):
Tap at  to select the direction mode of the chaser.
There are four directions modes available
- Forward
- Backward
- Bounce (e.g. starts with cue 1 to 4 and goes back from 4 to 1)
- Random
Endless (chaser run mode):
Tap at to select the run mode of the chaser.
There are three run modes available.
- Endless
- Shoot-Off
The chaser starts at the selected cue, e.g cue 1, and stops at the end of cue 5. The executor is off after the last cue. - Shoot-On
The chaser starts at the selected cue, e.g. cue 1, and stops at the end of cue 5. The executor is on after the last cue.
Play:
Tap to start the chaser.
Pause:
Tap to set the chaser to pause.
Half Speed:
Tap to set the chaser to half of the current speed.
1:1 Speed:
Tap to set the speed to the adjusted speed. To adjust the speed, use the encoder.
Double Speed:
Tap to set the speed to the double of the entered speed.
Encoder Bar Functions

Fade (only available if the executor is a chaser):
With this encoder you set the fade percent from one cue to another cue.
The default is 0% and it goes up to 400%.
To set the fade percent without decimal places, turn the encoder left or right.
To set the fade percent with decimal places, press  and then turn the encoder left or right. The encoder speed is slow.
Speed (only available if the executor is a chaser):
To set the speed of the chaser higher or lower, turn the encoder left or right.
Scroll:
To scroll in the cues view up or down, turn the encoder left or right.
To scroll in the cues view left or right, press and turn the encoder left or right.