- dot2 User Manual
- New in the Manual
- Introduction
- Intended Use
- System Requirements dot2 onPC
- Installation of dot2 onPC
- What are...
- System Colors
- Command History
- Executor
- Values
- Background
- Programmer
- Groups
- Presets
- Tracking
- Cues
- Executors
- Chasers
- Effects
- Preview and Blind
- Network
- IPv6
- DMX Tester
- System Colors
- How to...
- Turn the console on and off
- Update the console
- Add, patch, change, and delete fixtures
- Save and load your show
- Use the command line
- Use Encoders in the onPC
- Work with groups
- Work with presets
- Work with cues
- Work with chasers
- Work with effects
- Connect nodes, wings, 3D and onPC
- Use external input triggers
- Use MIDI and MIDI Show Control (MSC)
- Use the external screen
- Use web remote
- Reset the console
- Keys
- Align
- At
- Backup
- Blind
- B.O.
- Clear
- Copy
- Cue
- Delete
- DMX
- [dot]
- Down
- Edit
- Effect
- [Encoder]
- Esc
- Exec (Executor)
- [Exec Flash]
- [Exec Go]
- Fix
- Fixture
- Flash
- Full
- Go-
- Go- (Large)
- Go+
- Go+ (Large)
- [GoFastBack] <<<
- [GoFastForward] >>>
- Goto
- Group
- Help
- Highlt (Highlight)
- Label
- If
- MA
- Macro
- Magic
- [Minus] -
- Move
- Next
- [Numeric keys]
- Off
- On
- Oops
- Page
- Page+
- Page-
- Pause
- Pause (Large)
- Please
- [Plus] +
- Preset
- Prev (Previous)
- Prvw (Preview)
- Select
- Set
- Setup
- Speed
- Store
- Thru
- Time
- Toggle
- Tools
- Up
- Update
- View [Eye]
- Views & Windows
- Control Elements
- Command Line
- Encoder Bar
- Executor Bar
- Preset Type Bar
- Title Bar
- View Bar
- Icons
- Add New Fixtures
- Backup
- Beam Preset Type
- Calculator
- Calibrate Screens
- Change Functions of Executor
- Choose Clone Method
- Choose Copy Method
- Choose Delete Method
- Choose Store Method
- Choose Update Method
- Clock
- Color Preset Type
- Command Line
- Configure Slot
- Control Preset Type
- Cues
- Dimmer Preset Type
- DMX
- Edit Cue Number(s)
- Effects
- Empty Executor
- Enter Name for
- Executor Bar
- Executor Pool
- Fixtures
- Fixture Schedule Overview
- Focus Preset Type
- Gobo Preset Type
- Global Settings
- Groups
- Help
- Import Fixture Type
- Key Backlight
- Leaving Patch & Fixture Schedule...
- Load Show
- Macros Pool
- Magic Speeds
- MIDI Configuration
- MIDI Monitor
- MIDI Show Control
- Network Interface
- Network Protocols Configuration
- Network Setup
- New Show
- Off...
- Oops
- Page Pool
- Patch and Fixture Schedule
- Position Preset Type
- Presets Pools
- Remote Inputs Configuration
- Save Show As...
- Select DMX Address...
- Select DMX Ports
- Select Fixtures ID(s)
- Select Fixture Type...
- Select Function for Remote Inputs Configuration
- Select Function of Executor
- Select Language...
- Select Session Number
- Select Station...
- Select Trig
- Select Type
- Select View
- Select View for External Screen
- Select Wing...
- Session Collision
- Settings of Executor
- Setup
- Shapers Preset Type
- Software Update via USB
- Sound Input Configuration
- Status and Messages
- System Clock
- System Information
- Time defaults
- Timecode Configuration
- Tools
- Video Preset Type
- Virtual Playbacks
- Window Settings
- Wings
- Wings & Nodes Diagnosis
- Control Elements
- Commands
- >>> [GoFastForward]
- <<< [GoFastBack]
- - [Minus]
- + [Plus]
- Assign
- At
- Black
- Blind
- Call
- Clone
- Copy
- Cue
- Default
- Delay
- Delete
- Dmx
- DmxUniverse
- Edit
- Effect
- Executor
- Fade
- Fix
- Fixture
- Flash
- Full
- FullHighlight
- Go
- GoBack
- Goto
- Group
- Help
- If
- IfOutput
- Invert
- Label
- Learn
- Macro
- MidiNote
- Move
- Off
- On
- OutDelay
- OutFade
- Page
- Park
- Pause
- Preset
- PresetType
- Preview
- Rate
- Record
- Release
- Remove
- Replace
- Select
- Selection
- SetIP
- SnapPercent
- Solo
- Stomp
- Store
- StoreLook
- SyncEffects
- Temp
- Thru
- Toggle
- Top
- Unpark
- Update
- View [Eye]
- Zero
- Hints for Operating
- Error Handling
- CrashLogCopy
- CrashLogDelete
- CrashLogList
- Error Messages
- Glossary
- dot2 Quick Start Guide
- dot2 3D
- dot2 Release Notes
How to work with cues
Table of contents of this topic
Cues contain values for some or all fixtures. If you are looking for more general knowledge about the what cues are, then please have a look at the What are cues help page.
In this help page we are going to have look at how to work with the cues.
Create cues
Cues are organized in a cue list on an executor. You can store cues on any executor that isn't a group master or a special master.
You need some fixtures and some values in your programmer. If you don't know what I'm talking about please have a look at the What is the Programmer and How to add and patch fixtures help pages.
With some active values in your programmer you can choose to store this information in a cue. This can be on the main executor or on one of the other executors. If you don't know what executors are please read the What are executors help page.
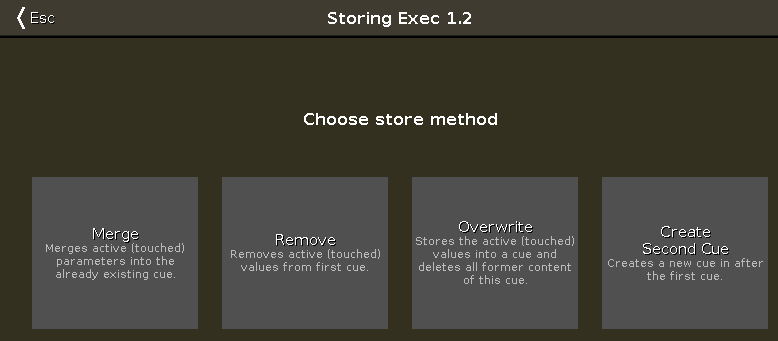
If you want to store your values in a cue on the main executor press Store Please. This will store the first available cue number. If you don't have anything on the main executor before doing this then you'll now have cue number 1. If you have cue number 1, then you'll not store the values directly. Instead you'll be asked what you want to do. This is generally the case the second time you store a cue on an executor. You'll get this Choose Store Method window:
Figure 1: Choose store method.
There are four options here:
- Merge - This option will add the values to the existing values in the cue.
- Remove - This will remove the existing values of the same type that you currently have active in your programmer.
- Overwrite - This will delete the current content of the cue and add your active value to the cue.
- Create Second Cue - This option is only available when you have a cue list with only one cue. Pressing this will add your currently active values to a new cue number 2.
If you want to store a specific cue number then you can use a more precise command input. E.g. you want to store cue number 5. Then you can use the follow key presses: Store Cue 5 Please. You can even add a cue timing while storing it. E.g. you want to store cue number 5 with a fade time of 3 seconds. To do this press the following keys: Store Cue 5 Time (= Fade command) 3 Please.
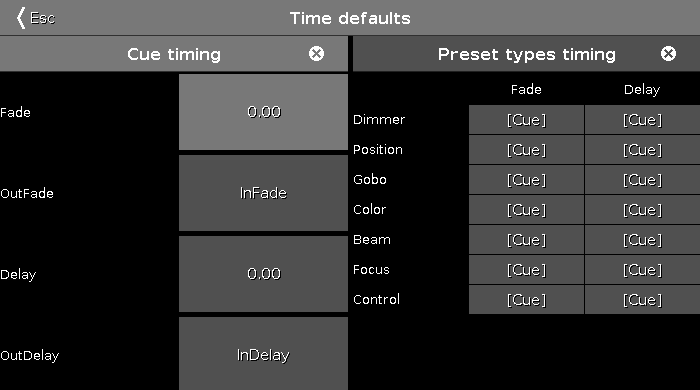
If you don't specify the cue timing when you store the cue, then it uses the default times set in the Time Defaults window. You can set these by pressing the Time key (with an empty command line). It could look like this:
Figure 2: Time defaults window.
If you want to store your cue on a different executor (not the main executor), the you need to press a key associated with the executor. E.g. you want to store cue number 2 on a specific executor. Then you'll need to press the following keys: Store Cue 2 and then press one of the keys associated with the executor where you want the cue.
Storing a cue will do an Auto Unblock. This means that after you have stored a cue all unchanged values are removed. Please use the Protect function (read below) if you want to "block" a cue.
The dot2 is a tracking console. If you don't know what this means please have a look at the What is tracking help page.
Update a cue
You can always store your current active programmer content into any cue you want.
But if you have an active cue running, then you have the possibility to use the Update key. It's a faster work flow. If you press Update Please, then you update the active cue on the main executor.
If you press Update followed by a key on one of the other executors, then you update the active cue on that executor. If there isn't an active cue, then nothing happens.
Update will give you a windows asking how to update. There are two modes called Normal and Cue Only. Normal will do a tracking update and Cue only will preserve the values in the following cue.
Updating the cue will do an Auto Unblock. This means that after an update all stored, but unchanged values are removed. Please use the Protect function (read below) if you want to "block" a cue.
Naming a cue
Right after you store a cue there's the Label pop-up. If you press this, then you are taken to the Enter Name for window.
If you need to label a cue after it's created, then you can use the Label key. E.g. you want to label cue number 2 in the main executor: Label Cue 2 Please.
You can also open a Cues view and press in the cue name you want to change. If you keep pressing it for around 2 seconds, then you also get the Enter Name for window.
Change the cue timing
There are many different timings in a cue. They can be seen in the Cue view.
The usual (In)Fade and Out Fade values set the times used respectively by the attributes going up in value and the attributes going down in value. The factory default is that the Out Fade is set to the Fade (or InFade) time. So no matter what you set the fade time to, then the OutFade will be the same. But you have the possibility to separate them.
You can also set a delay for the OutFade. This is a time that the console will wait before beginning the OutFade.
All available Preset Types have their own timings for fade and delay. Setting this will overwrite the set cue timing for the values changing in that Preset Type.
Default timing
You can press the Time key to open the Time Defaults window. Here you can set the times that will be used as a default when you create new cues.
Set a time when storing
You can overwrite the default timing when you store a cue. E.g. you want to store cue 3 with a fade time of 5 seconds: Store Cue 3 Time (= Fade command) 5 Please.
The Time key have a special function when you use it in a command. In the above example you can keep pressing the Time key to change between the different available timings in the cue - although not the preset type timings.
Change timing in Cues view
When you have a Cues view visible then you can press and hold on a value in the view to change the time value.
You can also use the scroll encoder to select the time field you want to change and then tap the encoder. This will give you the Calculator view. Use this to set the new value.
You can also press the Edit key and then the field in the Cues view that you want to change, this also gives you the Calculator view.
Cue triggers
Each cue have a trigger. This is what makes the cue run. There are several triggers:
- Go - The cue only triggers when it gets a Go command.
- Time - When you select Time, then you need to specify the time in the Trig Time column. The time you set will begin to count down when the previous cue is triggered.
- Follow - A follow cue will trigger when the previous cue is done with all the fades.
- Sound - The sound trigger is triggering the cue when the console receives sound spikes. You'll find different sound options in the "Trig Time" column. The options called "Snd" and then a number is different set frequencies. You can see the incoming sound in the Sound Input Configuration view, found in the Tools Menu.
- BPM - The cue can be triggered based on the measured BPM from the sound input. This can also be seen in the Sound Input Configuration view.
- Timcode - Your cue can be triggered by incoming time code signal. You need to set the trigger time in the "Trig Time" column. The timecode used can be set in the Settings of Executor view. The timecode can be recorded - please read more about this in the Cue view.
When a cue is triggered by timecode then the cue is always Asserted. This means that all tracked values are asserted when the cue is triggered.
Protect a cue
You can protect your cues from tracking values changing the look of the cue.
There's a protected column in the Cue view. This will draw a white line above the cue to indicate that tracking stops here.
A protected cue functions as a "block" or "mark" cue. This means that it will assert values (including tracked values) from the cue, when you run it.
If you run backwards out of a protected cue, then fixtures will fade back to the values they had in the previous cues. If this is a tracked value then it' will use the fade time from the cue where they originally got the values. E.g. Fixture 1 get s a values of 100% in cue 1 and 50% in cue 2 (fade time 5 seconds). You also have cue 3 (fade time 1 second) with no changes for fixture 1. Then you store cue 4 with fixture 1 at 0% and a fade time of 0 seconds. Cue 4 is a protected cue. If you are in cue 4 and press Go- and fade to cue 3, then fixture 1 will fade to 50% (from cue 2) and it'll use the fade time from cue 2. So other fixtures stored in cue 3 will use the fade time from cue 3 but Fixture 1, that have tracked values, will use 5 seconds.
Go to a specific cue in a cue list
You can go to a specific cue by pressing the Goto key. You go to the cue as soon as you execute the command (with Please)
E.g. you want to go to cue number 3, but you don't want to run through the other cues to get there: Goto Cue 3 Please.
This can also be done using a specific fade time. E.g. you want to go to cue number 10, but cue 10 have a 2 minute fade time. You just need to be in cue 10, so you would like to overwrite the cue fade: Goto Cue 1 0 Time (= Fade command) 1 Please. Now you fade into cue 10 in 1 second.
Copy a cue
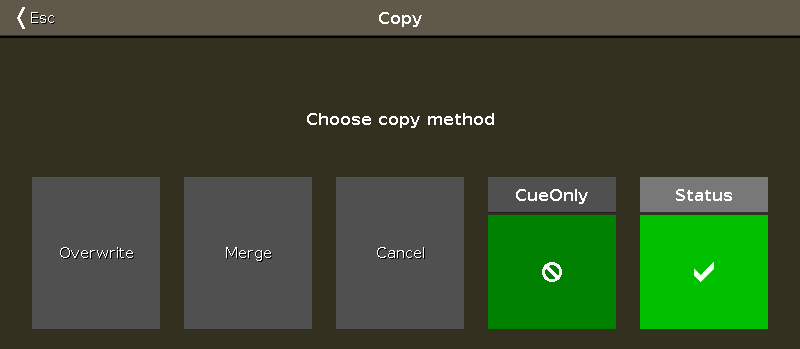
You can copy a cue to a different cue by using the Copy key. The copy operation can have two copy options. "CueOnly" will copy your cue without tracking the copied values, but leaving the cues following the new cue without changing their look. "Status" is used to include tracked values in the source cue. If this isn't activated, then you'll only copy the attribute values that are actually stored in the source cue.
Depending on your copy destination, then you also have some different options. If you are copying to a new, not already existing, cue then you can just copy the cue. If you copy to an already existing cue, then you can choose to merge the new values into the destination or you can choose to overwrite the existing values with the new ones - this will delete all the existing values and apply the new values.
E.g. you want to copy your cue 2 at a new location. It's going to be cue number 3.5 - you want the tracked values from cue number 1 to be included and you don't want to change cue number 4: Copy Cue 2 At 3 . 5 Please. Then you get a Choose Copy method window like this:
Figure 3: Choose copy method.
This might look a little different depending on if you already got a cue 3.5 or if its a new cue we are creating. Make sure status have a checkmark, and if you can see the "CueOnly" option, then make sure it also have a checkmark. Now tap Copy or Merge depending on your options.
Coping a cue will do an Auto Unblock. This means that after the copy all unchanged values are removed. Please use the Protect function (read above) if you want to "block" a cue.
Move a cue
You can move a cue by using the Move key. E.g. you want to move cue 2 at cue 6 (doesn't exist right now): Move Cue 2 At 6 Please. This will move the cue without asking any question.
If you move a cue to an already existing cue then you are asked if you really want to. The existing values in the destination cue will be overwritten.
Renumber the cue list
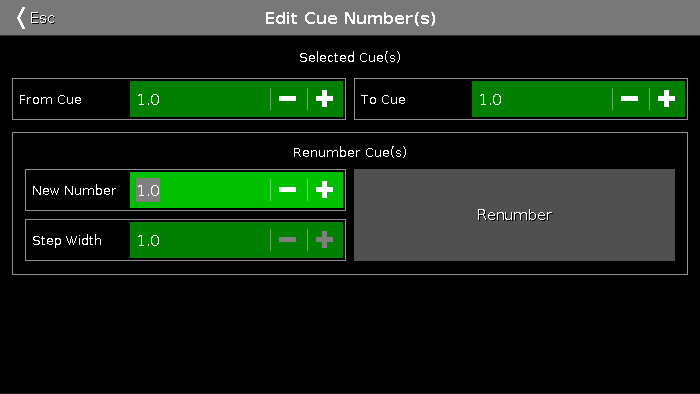
You can renumber a single cue or a range of cues. Press and hold a cue number in the Cues view. This opens the Edit Cue Number(s) window. It could look like this:
Figure 4: Edit Cue Number window.
At the top of this window you can set the range of cue you want to renumber. Then you set the new beginning number and the step width for the cues. When you are happy with your settings, then you tap the Renumber button.
You can't use renumber to move a cue - and the cue list always have to be in numeric order. So you can only renumber the cue(s) inside the boundaries of any cues before and or after the set range.
Deleting a Cue
You can delete a cue by using the Delete key. When you delete a cue, you might be asked if you want to delete the cue the "Normal" way or using "Cue Only". You are only asked if you delete a cue that isn't the last cue. "Normal" will result in values tracking from the previous cue into the next. Values that might been changed in the cue you are deleting. "Cue Only" will leave the following cues looking the way they did before you delete the cue.


