

- dot2 User Manual
- New in the Manual
- Introduction
- Intended Use
- System Requirements dot2 onPC
- Installation of dot2 onPC
- What are...
- System Colors
- Command History
- Executor
- Values
- Background
- Programmer
- Groups
- Presets
- Tracking
- Cues
- Executors
- Chasers
- Effects
- Preview and Blind
- Network
- IPv6
- DMX Tester
- System Colors
- How to...
- Turn the console on and off
- Update the console
- Add, patch, change, and delete fixtures
- Save and load your show
- Use the command line
- Use Encoders in the onPC
- Work with groups
- Work with presets
- Work with cues
- Work with chasers
- Work with effects
- Connect nodes, wings, 3D and onPC
- Use external input triggers
- Use MIDI and MIDI Show Control (MSC)
- Use the external screen
- Use web remote
- Reset the console
- Keys
- Align
- At
- Backup
- Blind
- B.O.
- Clear
- Copy
- Cue
- Delete
- DMX
- [dot]
- Down
- Edit
- Effect
- [Encoder]
- Esc
- Exec (Executor)
- [Exec Flash]
- [Exec Go]
- Fix
- Fixture
- Flash
- Full
- Go-
- Go- (Large)
- Go+
- Go+ (Large)
- [GoFastBack] <<<
- [GoFastForward] >>>
- Goto
- Group
- Help
- Highlt (Highlight)
- Label
- If
- MA
- Macro
- Magic
- [Minus] -
- Move
- Next
- [Numeric keys]
- Off
- On
- Oops
- Page
- Page+
- Page-
- Pause
- Pause (Large)
- Please
- [Plus] +
- Preset
- Prev (Previous)
- Prvw (Preview)
- Select
- Set
- Setup
- Speed
- Store
- Thru
- Time
- Toggle
- Tools
- Up
- Update
- View [Eye]
- Views & Windows
- Control Elements
- Command Line
- Encoder Bar
- Executor Bar
- Preset Type Bar
- Title Bar
- View Bar
- Icons
- Add New Fixtures
- Backup
- Beam Preset Type
- Calculator
- Calibrate Screens
- Change Functions of Executor
- Choose Clone Method
- Choose Copy Method
- Choose Delete Method
- Choose Store Method
- Choose Update Method
- Clock
- Color Preset Type
- Command Line
- Configure Slot
- Control Preset Type
- Cues
- Dimmer Preset Type
- DMX
- Edit Cue Number(s)
- Effects
- Empty Executor
- Enter Name for
- Executor Bar
- Executor Pool
- Fixtures
- Fixture Schedule Overview
- Focus Preset Type
- Gobo Preset Type
- Global Settings
- Groups
- Help
- Import Fixture Type
- Key Backlight
- Leaving Patch & Fixture Schedule...
- Load Show
- Macros Pool
- Magic Speeds
- MIDI Configuration
- MIDI Monitor
- MIDI Show Control
- Network Interface
- Network Protocols Configuration
- Network Setup
- New Show
- Off...
- Oops
- Page Pool
- Patch and Fixture Schedule
- Position Preset Type
- Presets Pools
- Remote Inputs Configuration
- Save Show As...
- Select DMX Address...
- Select DMX Ports
- Select Fixtures ID(s)
- Select Fixture Type...
- Select Function for Remote Inputs Configuration
- Select Function of Executor
- Select Language...
- Select Session Number
- Select Station...
- Select Trig
- Select Type
- Select View
- Select View for External Screen
- Select Wing...
- Session Collision
- Settings of Executor
- Setup
- Shapers Preset Type
- Software Update via USB
- Sound Input Configuration
- Status and Messages
- System Clock
- System Information
- Time defaults
- Timecode Configuration
- Tools
- Video Preset Type
- Virtual Playbacks
- Window Settings
- Wings
- Wings & Nodes Diagnosis
- Control Elements
- Commands
- >>> [GoFastForward]
- <<< [GoFastBack]
- - [Minus]
- + [Plus]
- Assign
- At
- Black
- Blind
- Call
- Clone
- Copy
- Cue
- Default
- Delay
- Delete
- Dmx
- DmxUniverse
- Edit
- Effect
- Executor
- Fade
- Fix
- Fixture
- Flash
- Full
- FullHighlight
- Go
- GoBack
- Goto
- Group
- Help
- If
- IfOutput
- Invert
- Label
- Learn
- Macro
- MidiNote
- Move
- Off
- On
- OutDelay
- OutFade
- Page
- Park
- Pause
- Preset
- PresetType
- Preview
- Rate
- Record
- Release
- Remove
- Replace
- Select
- Selection
- SetIP
- SnapPercent
- Solo
- Stomp
- Store
- StoreLook
- SyncEffects
- Temp
- Thru
- Toggle
- Top
- Unpark
- Update
- View [Eye]
- Zero
- Hints for Operating
- Error Handling
- CrashLogCopy
- CrashLogDelete
- CrashLogList
- Error Messages
- Glossary
- dot2 Quick Start Guide
- dot2 3D
- dot2 Release Notes
How to add and patch fixtures
Table of contents of this topic
On this page we'll have a look at the workflow when adding and patching fixtures in our show. We'll also look at removing fixture types that we don't use.
A new and empty show
In a new and empty show we need to add some fixtures before we can do anything with the dot2. If you already have some fixtures in your show, then you can jump down to the Adding fixtures in a show with fixtures section of this help page.
Press the Setup key. This opens the Setup menu. Here you'll find a button called Patch & Fixture Schedule. Please tap this button. Now we can see a list of all the fixtures (we don't have yet) in our show. Right now it very empty; we need to add some fixtures. Tap the button called Add New Fixtures on the right side of the right screen.
This opens the Add New Fixtures view. Here we have 6 different green input fields where we need to adjust the content. The 6 different things we need to define is:
- Type - This is the fixture type we want to add to our show
- Quantity - This is the amount of the above selected fixture type we want to add.
- ID - This is the fixture ID number of the first fixture we want to add. If you add more than one fixture then they will be enumerated from this number. Two fixtures can't have the same ID number and all fixtures need to have a ID number.
- Name - This is the suggested name for the fixture. You can change this to whatever you want. If you end the name with a space and then a number, then the fixtures will be enumerated from this number - if you add more than one fixture.
- Patch - This is the DMX patch address of the first fixture you add. If you are adding more than one, then the fixtures will be patched at the next available address from this number.
- Offset - This can be used to automatically add empty DMX channels between your fixtures.
Some of the fields have three small dots  . This usually opens a drop down menu.
The plus/minus icons are used to increment or decrement the value.
The small keyboard icon  will open an on-screen keyboard.
Type
If you tap the three dots in the type field, then you can see a list of fixture types imported into our show. This usually includes a simple dimmer fixture and some different LED fixtures. You can select one of fixtures in the list. If the fixture you are trying to add isn't in the list, then you can tap the Select other... buttons next to the green input field.
This will open the fixture type library. Here you can select one of the fixture types and import it into your show. This means that you take a copy out of the library and put it into your show. You can use the encoders to change the drive. Internal is the internal drive of the dot2, If you have a USB drive connected, then you can change to the library on the USB drive.
The other encoders are used to change the fixture manufacturer, the fixture type and if the fixture have more than one mode, then you can use the right encoder to select the mode of the fixture.
You can also type something in the green search field. Here you can write the manufacturer or fixture name or just some of it in any combination. The search is done on both the manufacturer and fixtures.
Once you have located and selected the fixture you want to add you can tap the Ok button in the upper right corner.
Quantity
You can adjust the amount of fixtures you want to add. You can tap the input field and use the numeric keys to change the number or you can use the - and + on the right side of the input field to adjust the number. You can also turn the middle left encoder.
Set the quantity to the amount of fixtures you want to add.
ID
All fixtures in our show needs an unique ID number. Two fixtures can't have the same ID number and all fixtures needs to have an ID number.
You can adjust the ID number the same ways as with the quantity. And you have an extra option. If you tap the Select... button you open the Select Fixture ID(s) window. This can be used to visually see what fixture ID are available and what IDs are used. Right now you have an empty show so there aren't any ID conflicts or already used IDs. Let's return to this when we add fixture to a show that already have some fixtures.
Select the ID number of the first fixture.
Name
You can give your fixtures a name that makes it easier for you to remember what they are.
You can tap the small keyboard icon to open the onscreen keyboard or you can use an external keyboard. If you give it a name and then make a space and add a number then the fixtures will be enumerated from this number, if you are adding more than one fixture.
The name doesn't have to be unique.
Patch
The fixtures we add needs a DMX patch address for us to be able to control them. The dot2 suggest the first available address after the last patched fixture.
You have several options for adjusting this value. If you tap the three white dots in the input field gives you an drop down that allows you to adjust the universe number and the DMX address in the selected universe.
You can tap the input field and use the numeric keys to input a DMX address. If you type it in directly, then you need to separate the universe number and DMX address using a dot.
You can also tap the Select... button on the right side (next to the Offset) and open the Select DMX Address.. window. This allows you to select the universe on the left side of the window and scroll through and select an address in the selected universe on the right side of the view. You can use the left and right encoders to select the universe and the DMX address. The middle right encoder can be used to set the Offset (read about it below). When you have selected a DMX address, you can tap the Ok button in the upper right corner to confirm you choice in the Select DMX Address window.
The patch address needs to be unique. You can't have fixtures that uses the same DMX addresses.
Offset
The Offset can be used to automatically add empty DMX channels between your fixtures. If you add 10 fixtures that each use 16 DMX channels, then the console will patch then right next to each other without any gap between them. So the first will be at address 1 the next at 17, next at 34, etc. If you want a gab, then you can automatically add this. If you set the offset higher than the amount of channels that the fixture use then this will be the start address for the fixtures. E.g. we patch the 10 fixtures with 16 channels and have the offset at 20, then the first will be at 1, next will be at 21, next at 41, next at 61, etc. This can be easier to address unless you are not running out of DMX channels.
When you have adjusted the input fields to your liking, then you can tap the Ok button in the upper right corner to confirm you choices. This takes you back to the Patch and Fixture Schedule window. Now you can see the fixtures you have added. Each Fixture gets its own row and the columns allow you to edit any field you desire. To learn more about the details of the Patch and Fixture window, please follow the link above.
To finalize the changes to our show and add the fixture please tap the Done button in the upper right corner. This gives you a window that asks you to confirm that you want to apply the changes in your show. Tap the big Apply All Changes button.
You have now added some fixtures to your show.
Multipatch a fixture
You can create a multipatch fixture. It's a way to have multiple patchable DMX addresses connected to one Fixture ID.
You select the fixture you want to multipatch and then tap Create Multipatch (in Setup - > "Patch & Fixture Schedule"). Now you type how many extra DMX patch address you want.
This gives you extra lines in the Patch and Fixture Schedule under the fixture you selected. Each line can have their own name and own DMX address.
The dot2 will then mirror the DMX output on these DMX addresses. The selected fixture and the multipatches share the same Fixture ID.
Multi patch fixtures appear as extra fixtures you can position in the dot2 3D visualizer.
To accept the new multipatched fixtures you'll need to exit the Patch and Fixture Schedule window by pressing Done in the upper right corner and Apply all changes.
Add fixtures in a show that already have some fixtures
If your show already have some fixtures but you need to add new ones, then you need to pay attention to the already existing fixtures in your show. The process is nearly the same as described above, but now your show already have some fixtures, and since some of the settings for the fixtures need to be unique, then you'll need to add fixtures with unique ID and patch information.
Press the Setup key and then the Patch & Fixture Schedule button. This gives us the Patch and Fixture Schedule window. Here you can see the existing fixtures. To add more you need to tap the Add New Fixtures button.
Now you need to adjust the five input fields to match your needs.
Some of the windows will now look a little different, since we now have fixtures in the show. If you tap the Select... button next the ID field, you'll now see that some of the ID fields in the Select Fixture ID(s) window are now grayed out and there's a fixture name in the IDs that are occupied.
The same happens in the Select DMX Address.. window. Tap the Select... button next to the Patch input field. Here you can now see on the universe selector on the left side of the screen that the existing fixtures are occupying some of the DMX addresses in the universes - some of the area inside the square is filled.
You need to select available fixture ID numbers and patch addresses. This needs to be unique numbers.
When you have adjusted the green input fields to meet your requirements, then you can tap the Ok button in the upper right corner. Then exit the Patch and Fixture Schedule window by tapping the Done in the upper right corner to confirm this is your new fixture setup. And finally confirm that you want to Apply All Changes.
Change the fixture type
You can change the fixture type of your already patched fixtures. The console will do it's very best to replace the programmed values. If you change the fixture type on a fixture you have already programmed, then the console will keep as much of the data as possible. It'll try to convert the data to the nearest value. E.g. if you have programmed some LED wash lights and then replace them with something that only have a color wheel, then the console will try to select the nearest matching color on the wheel. This is not a fool proof system. So it's a good idea to program using presets. That makes it easier to correct the programming after the fixture type change.
If you want to change the fixture type then you press Setup and then Patch & Fixture Schedule. Then select the fixture(s) you want to change and tap Change Fixture Type. This will open the Select Fixture Type.. window. Here you can see all the current fixture types in your show. Here you can select one of the fixture types or you can tap where it says Import in the title bar. This will open the Import Fixture Type window - here you can import a new fixture type into your show.
When you have selected the fixture type you want then you can tap Ok in the upper right corner.
If you change the fixture type to something that uses a different amount on DMX channels, then you might need to re-patch your fixtures.
Changing fixture types to fixture types that have more DMX channels does not delete the old patch, instead it displays the invalid patch address in red.
When changing fixture types to fixture types three instance can occur and as a result a warning pop-up appears:
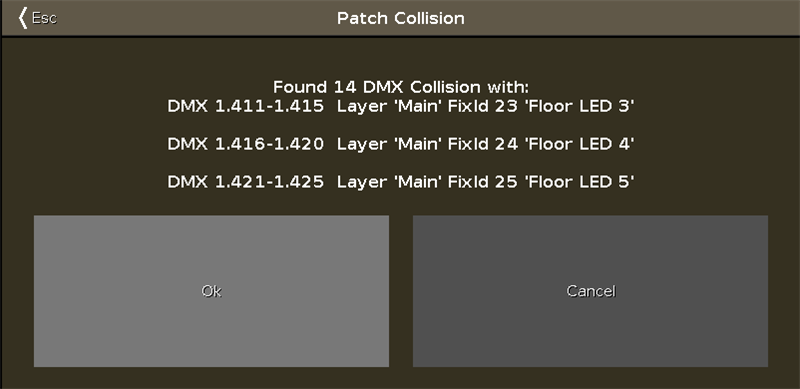
- Address overlap: Invalid patch addresses are displayed in red in the Patch and Fixture Schedule.
- Address overlap and fixture collision: If you tap Ok in the pop-up Patch Collision, the patch addresses are deleted. This is indicated by a minus in brackets.
- Fixtures collision: If you tap Cancel in the pop-up Patch Collision, fixtures that overlap are displayed in red. Fixtures that collided with other fixtures do not have patch addresses any longer. This is indicated by a minus in brackets.
Then tap Done to exit the Fixture schedule and then Apply All Changes. Now you have changed the fixture type. Now you should check your cues.
Delete unused Fixture types
When we looked at changing the fixture type, we looked at the Select Fixture Type.. window. Here we can also delete unused Fixture Types. Open it as described above. In the title bar there's a trash can icon  . If you select one of the Fixture types and then tap this icon then it will ask you if you really want to delete the fixture type. Here you can confirm it or cancel the operation.