|
grandMA3 User Manual » Windows, Views, and Menus » Menus
|
Version 2.2
|
There are many different menus in the grandMA3 software. Most are described in relevant sections. For instance, the patch menu is described in the Patch section.
There is a Menu pop-up that gives access to many of the different menus.
This pop-up can be opened in multiple ways:
- On physical hardware, there is a Menu key. Press this to open the pop-up.
-
In the Control Bar on the left side of most displays, on the onPC, there is a gear icon
 . Tap this to open the pop-up.
- It can be opened using the command line:
| User name[Fixture]>Menu "MenuSelector" |
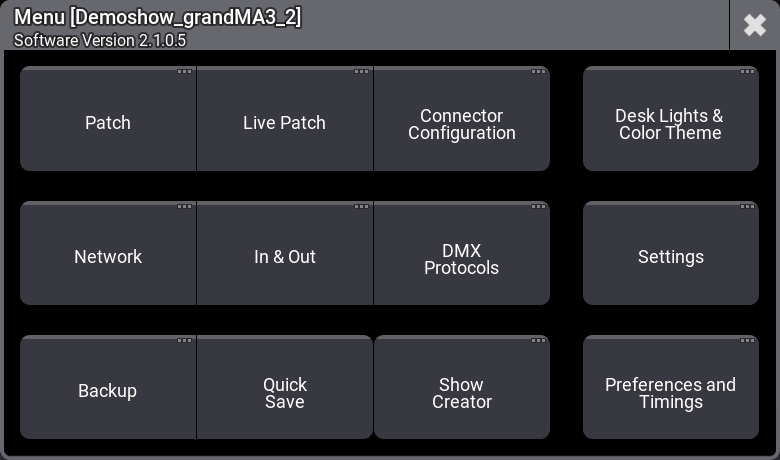
The menu pop-up gives access to the following menus:
- Patch:
This is where fixtures are added and is all about fixture setup. Read more in the Patch and Fixture Setup section. - Live Patch:
This menu gives access to the fixture setup, which can be changed without a new show upload. Read more in the Patch and Fixture Setup section. - Connector Configuration:
The connector configuration changes the local physical DMX ports on the MA equipment. - Desk Lights & Color Theme:
This opens a pop-up that gives access to customize the look of the software. - Network:
This menu is used to set up all about the network and sessions. Read more in the Networking section. - In & Out:
This opens the In & Out menu with settings for DC remote, MIDI remote, DMX remotes, OSC, and PSN. - DMX Protocols:
This menu is used to set up DMX network protocols. - Settings: This opens a small sub-menu that has these options:
- User Configuration:
This menu is used to set up users and user profiles. Read more in the Single User and Multi-User Systems section. - Date and Time:
This menu is used to change the time and date in the console. Read more in the Date and Time topic. - USB Configuration:
This is used to configure USB devices. This should normally not be changed manually. - Software Update:
This menu is used to update the software. - Touch Configuration (consoles only):
This menu is used to assign touch screens to the USB inputs. - Extension Configuration:
This menu shows the connected grandMA3 extensions. - onPC Local Settings (onPC only):
This is a pop-up with onPC settings. - Local Settings (consoles only):
This is a pop-up with settings for the local console.
- User Configuration:
- Backup:
The backup menu is used to save and load shows. Read more in the Show File Handling topic. - Quick Save:
This is not a menu but a shortcut to saving the show with the same show file name. - Show Creator:
This opens the Show Creator menu that can be used to create presets and groups. It is also possible to import and export different objects of the show file. - Preferences and Timings:
In this menu many different default and timing settings can be set. The sub-menu has the following options:
- Cues:
In this tab cue timings and MIB preferences can be set. Read more in the Cue Timing and Move In Black topic. - Sequences:
In this tab default sequence settings can be set. Read more in the Sequence Settings topic. - Presets:
In this tab default settings regarding presets can be set. Read more in the Presets topic. - Timecodes:
In this tab default settings for timecodes can be set. Read more in the Timecode Settings topic. - Layout Elements:
In this tab templates for layout elements can be adjusted. Read more in the Edit Layout topic. - Keyboard Shortcuts:
Use this tab to customize keyboard shortcuts. Read more in the Keyboard Shortcuts topic. - Executor Config.:
This tab allows setting default executor configurations for each object type, except for quickeys. Read more in the Executor Configurations topic. - Timings:
In this tab playback timings and MIB timings can be set. Read more in the Assign Object to an Executor and Move In Black. - Masters:
In this tab, all masters are represented by a swipe button and can be set to Always On, Toggle, or Disabled. Read more in the Masters topic. - Groups:
Here group masters default settings and store settings can be set. Read more in the Group Masters topic. - Global:
In this tab global and miscellaneous settings can be set.
- Cues:
|
|
Important: |
| It depends on the setting and the object itself when the defaults are applied. For example, for cues, sequences, presets, and timecodes, the defaults are applied when a new object is created. Changing the default action of a layout element immediately changes a linked layout element action. Be sure to check the topics linked to each tab for more information on how and when defaults are applied. |
Display Overlay
Opening the Menu pop-up also opens a Display overlay.
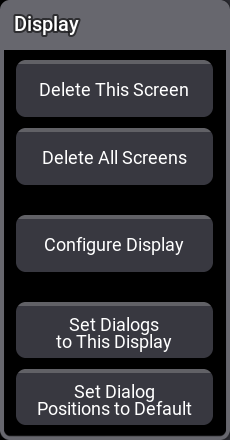
This pop-up appears on all screens except the letterbox screens.
Most of the actions performed using this pop-up relate to the specific screen where the menu is touched. For instance, deleting a screen (removing the windows from the screen).
- Delete This Screen:
This clears all windows from this screen. Read more in the Remove Windows from a Screen topic. - Delete All Screens:
This clears all windows from screens. Read more in the Remove Windows from a Screen topic. - Configure Display:
This opens the Configure Display pop-up. Read more in the Configuration of Displays topic. - Set Dialogs to This Display:
This makes all menus open on this screen. Read more in the Change Menu Locations topic. - Set Dialog Positions to Default:
This resets all menus to open on the default screen. Read more in the Change Menu Locations topic.