Create Appearances
|
grandMA3 User Manual » Appearances » Create Appearances
|
Version 2.2
|
Edit an empty pool object in the Appearance Pool to create a new appearance.
To edit an appearance pool object, use one of these 3 options:
- Press Edit and then tap an appearance in the pool.
- Open the swipey commands on the pool object and select Edit.
- Use the command line: Edit Appearance ["Appearance_Name" or Appearance_Number].
If you edit an existing pool object, the editor will open with the current state of the appearance.
This is the Appearance Editor:
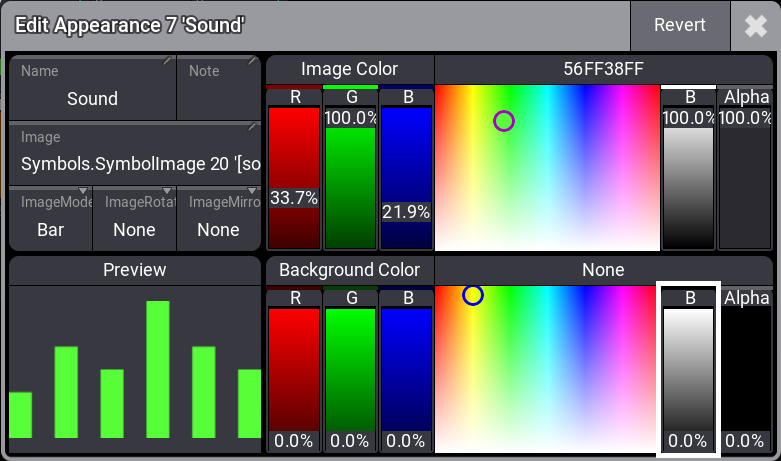
There are six input boxes, two sets of faders with a color picker and the hex color code to adjust the color, and a preview area displaying a preview of the appearance.
Set a Background Color
The Background Color fader and color picker can be used to change the background of the appearance. The default background is transparent (Alpha fader at 0%, B fader at 0%).
Increase the Alpha value and use the R (red), G (green), and B (blue) faders to mix any color in the RGB range. You can also tap in the color picker area to select a color or edit the hex color code above the color picker.
Label the Appearance
To edit the name, use the Label keyword or tap Name in the Appearance Editor.
Appearances can be labeled like any other pool object.
Add an Image to the Appearance
Appearances can use an image. The image is placed in front of the background but behind the label.
- Tap the Image input box to add an image. The Select Image dropdown opens with a list of all images.
- Tap ImageSource in the title bar to display different objects stored in the Images, Videos, Gobos, or Symbols pool.
- Tap the desired image in the pop-up.
| Hint: | |
| Appearances that use an image will not display the name on the appearance object in the
pool if the name is the default name. |
Media objects (images, videos, symbols, and gobos) can be assigned to an appearance. Assigning images to an empty appearance will create a new object in the Appearances pool.
|
|
Hint: |
| Assigning an appearance to another one creates a copy of the first appearance. |
The images have different modes. Their modes define how the image is adapted to the aspect ratio.
These are the different modes:
- Stretch
The image is stretched to fit the appearance area.
- Bar
The entire image is displayed and fitted to the appearance area without changing the aspect of the image.
- Crop
The image is fitted to fill the entire appearance area. The aspect of the image is kept, but it is cropped.
- Tile
The image is tiled. This means that the image is repeated in its original size to fill the entire appearance area. The aspect of the image is kept.
- Center
The image is displayed in its original size with the center of the image aligned with the center of the appearance area. The aspect of the image is kept.
To change the mode:
- Tap the ImageMode button. This toggles through the different modes. You can also swipe the button to open the Select ImageMode dropdown.
- Select a mode in the dropdown.
Change the Image Color and Orientation
Adjust the color of the image using the top set of faders and
color picker in the Appearance Editor. It is also possible to edit the hex color code
directly.
To edit the hex color code, tap the input field above the color picker
and adjust the hex code in the Edit ImageRGBA pop-up.
This means that the same image can be used on different appearances with different color hues and transparency.
|
|
Restriction: |
| Color can only be added to an image, not removed from it. This means that black areas in
an image cannot be changed, but white areas can be. |
To rotate the image, tap ImageRotation in the Appearance Editor. The image can be rotated by 90°, 180°, or 270°.
To mirror the image, tap ImageMirror in the Appearance Editor. The image can be mirrored vertically or horizontally or both.
Tap the video below to see the example.
Revert Changes
To revert the changes made in the latest editing process:
- Tap Revert. A pop-up opens.
- Tap OK. The changes are reverted.