Select Fixtures
|
grandMA3 User Manual » Operate Fixtures » Select Fixtures
|
Version 2.1
|
First, fixtures must be selected to operate and change the values of attributes (for example, dimmer, pan, tilt, or zoom).
To select fixtures, use one of the following ways:
- Type the fixture ID in the command line using the numeric keys.
- Tap at the fixtures in a Fixture Sheet.
- Draw a lasso around the fixtures in the 3D Viewer.
- Tap a Group Pool object. See Create Groups.
- Tap a Preset Pool object. See Create New Presets.
|
|
Hint: |
| See the System Colors topic to learn more about the font colors used when selecting or deselecting fixtures in the fixture sheet. |
Examples
Requirements:
- 10 patched fixtures. See Add Fixtures to the Show.
- A fixture sheet window is open.
To select fixtures 1 thru 5, press the following hardkeys on the console or use the command section menu ![]() :
:
Fixture 1 Thru 5 Please
This command is visible in the command line input:
|
|
User name[Fixture]>Fixture 1 Thru 5 |
Fixtures 1 thru 5 are selected. The five selected fixtures are in a yellow font in the Fixture Sheet window.
To exclude fixtures from a selection, for example, types:
|
|
User name[Fixture]>Fixture 1 Thru 10 - 6 Thru 8 |
Fixtures 1 to 5 are selected, 6 to 8 are deselected, and 9 and 10 are selected.
To make the same selection of fixtures as shown in the example above using a different syntax, type:
|
|
User name[Fixture]>Fixture 1 Thru 5 + 9 Thru 10 |
To select fixtures in two commands, type:
|
|
User name[Fixture]>Fixture 1 Thru 5 |
|
|
User name[Fixture]>Fixture 9 + 10 |
To select the fixtures 9 and 10 in the example above, + or Thru can be used.
|
|
Important: |
| Some keys are used to navigate the sub-selection of fixtures, which is part of the MAtricks function. The keys have an on-screen version called the Selection Bar, which can also be used to select fixtures. |
Recursive Selection of Fixtures
Some fixtures have multiple sub-fixtures. The following examples show how to select fixtures and their sub-fixtures in different orders and hierarchies using an additional dot (.).
|
|
Hint: |
| See the First Patch topic in the Quick Start Guide to learn more about sub-fixtures. |
Requirement for this example:
- 10 Ayrton Alienpix - RS Ex 16-bit patched. See Add Fixtures to the Show.
- Fixtures spot numbered from 301 to 310.
- A fixture sheet window is open.
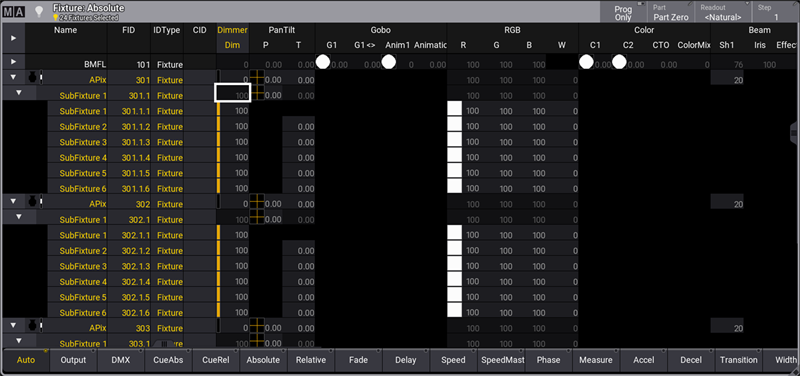
To select fixture 301, type:
|
|
User name[Fixture]>Fixture 301 |
Only the main fixture is selected.
- A dot (.) can be added to the selection syntax of the main fixture to quickly select all sub-fixtures.
To select fixture 301 and all its sub-fixtures, type:
|
|
User name[Fixture]>Fixture 301. |
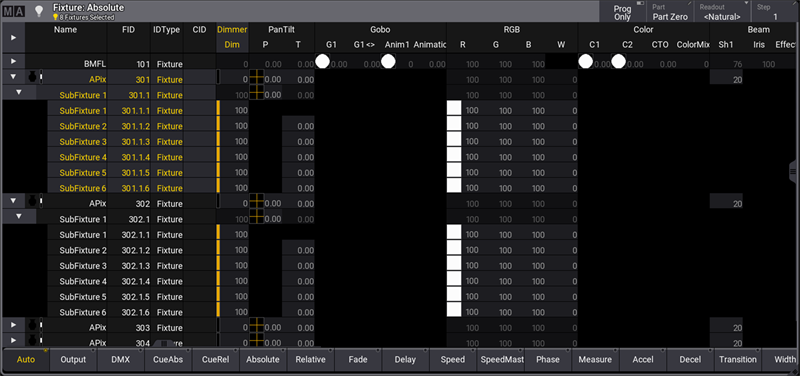
To select the main fixtures and all sub-fixtures of fixtures 301 thru 303, type:
|
|
User name[Fixture]>Fixture 301 Thru 303. |
-
The dot selects the sub-fixtures downwards from the specified level. Therefore, it is also possible to select only the pixels of an AlienPix.
To select all pixels of an AlienPix, type:
|
|
User name[Fixture]>Fixture 301.1. Thru |
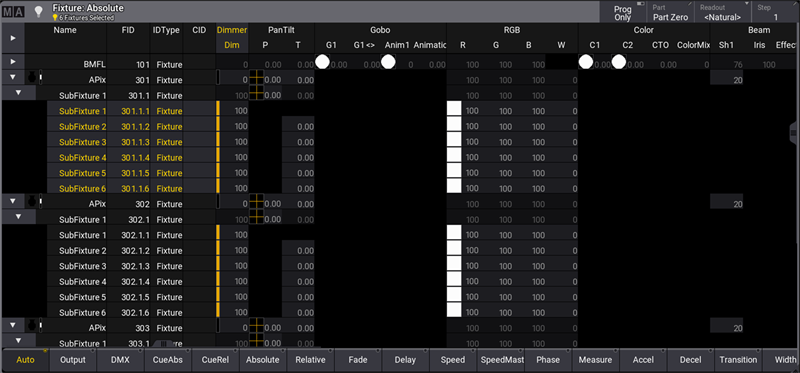
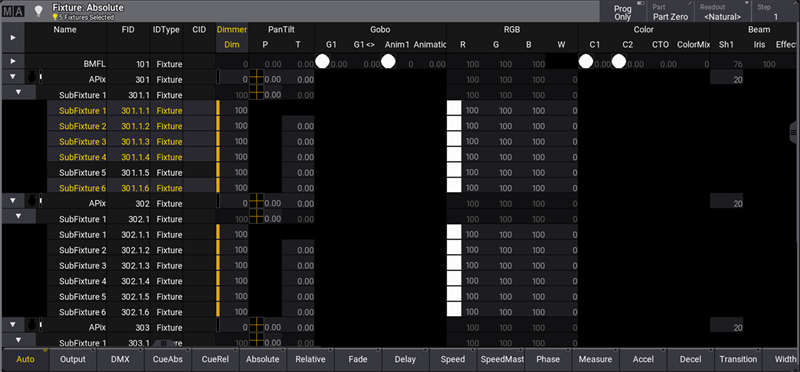
To select pixels of an AlienPix in particular, type:
|
|
User name[Fixture]>Fixture 301.1. Thru 4 + 6 |
General Fixture Selection
To select all fixtures and sub-fixtures, type:
|
|
User name[Fixture]>Fixture Thru . |
To select all parents of all fixtures, type:
|
|
User name[Fixture]>Fixture Thru |