

- dot2 User Manual
- New in the Manual
- Introduction
- Intended Use
- System Requirements dot2 onPC
- Installation of dot2 onPC
- What are...
- System Colors
- Command History
- Executor
- Values
- Background
- Programmer
- Groups
- Presets
- Tracking
- Cues
- Executors
- Chasers
- Effects
- Preview and Blind
- Network
- IPv6
- DMX Tester
- System Colors
- How to...
- Turn the console on and off
- Update the console
- Add, patch, change, and delete fixtures
- Save and load your show
- Use the command line
- Use Encoders in the onPC
- Work with groups
- Work with presets
- Work with cues
- Work with chasers
- Work with effects
- Connect nodes, wings, 3D and onPC
- Use external input triggers
- Use MIDI and MIDI Show Control (MSC)
- Use the external screen
- Use web remote
- Reset the console
- Keys
- Align
- At
- Backup
- Blind
- B.O.
- Clear
- Copy
- Cue
- Delete
- DMX
- [dot]
- Down
- Edit
- Effect
- [Encoder]
- Esc
- Exec (Executor)
- [Exec Flash]
- [Exec Go]
- Fix
- Fixture
- Flash
- Full
- Go-
- Go- (Large)
- Go+
- Go+ (Large)
- [GoFastBack] <<<
- [GoFastForward] >>>
- Goto
- Group
- Help
- Highlt (Highlight)
- Label
- If
- MA
- Macro
- Magic
- [Minus] -
- Move
- Next
- [Numeric keys]
- Off
- On
- Oops
- Page
- Page+
- Page-
- Pause
- Pause (Large)
- Please
- [Plus] +
- Preset
- Prev (Previous)
- Prvw (Preview)
- Select
- Set
- Setup
- Speed
- Store
- Thru
- Time
- Toggle
- Tools
- Up
- Update
- View [Eye]
- Views & Windows
- Control Elements
- Command Line
- Encoder Bar
- Executor Bar
- Preset Type Bar
- Title Bar
- View Bar
- Icons
- Add New Fixtures
- Backup
- Beam Preset Type
- Calculator
- Calibrate Screens
- Change Functions of Executor
- Choose Clone Method
- Choose Copy Method
- Choose Delete Method
- Choose Store Method
- Choose Update Method
- Clock
- Color Preset Type
- Command Line
- Configure Slot
- Control Preset Type
- Cues
- Dimmer Preset Type
- DMX
- Edit Cue Number(s)
- Effects
- Empty Executor
- Enter Name for
- Executor Bar
- Executor Pool
- Fixtures
- Fixture Schedule Overview
- Focus Preset Type
- Gobo Preset Type
- Global Settings
- Groups
- Help
- Import Fixture Type
- Key Backlight
- Leaving Patch & Fixture Schedule...
- Load Show
- Macros Pool
- Magic Speeds
- MIDI Configuration
- MIDI Monitor
- MIDI Show Control
- Network Interface
- Network Protocols Configuration
- Network Setup
- New Show
- Off...
- Oops
- Page Pool
- Patch and Fixture Schedule
- Position Preset Type
- Presets Pools
- Remote Inputs Configuration
- Save Show As...
- Select DMX Address...
- Select DMX Ports
- Select Fixtures ID(s)
- Select Fixture Type...
- Select Function for Remote Inputs Configuration
- Select Function of Executor
- Select Language...
- Select Session Number
- Select Station...
- Select Trig
- Select Type
- Select View
- Select View for External Screen
- Select Wing...
- Session Collision
- Settings of Executor
- Setup
- Shapers Preset Type
- Software Update via USB
- Sound Input Configuration
- Status and Messages
- System Clock
- System Information
- Time defaults
- Timecode Configuration
- Tools
- Video Preset Type
- Virtual Playbacks
- Window Settings
- Wings
- Wings & Nodes Diagnosis
- Control Elements
- Commands
- >>> [GoFastForward]
- <<< [GoFastBack]
- - [Minus]
- + [Plus]
- Assign
- At
- Black
- Blind
- Call
- Clone
- Copy
- Cue
- Default
- Delay
- Delete
- Dmx
- DmxUniverse
- Edit
- Effect
- Executor
- Fade
- Fix
- Fixture
- Flash
- Full
- FullHighlight
- Go
- GoBack
- Goto
- Group
- Help
- If
- IfOutput
- Invert
- Label
- Learn
- Macro
- MidiNote
- Move
- Off
- On
- OutDelay
- OutFade
- Page
- Park
- Pause
- Preset
- PresetType
- Preview
- Rate
- Record
- Release
- Remove
- Replace
- Select
- Selection
- SetIP
- SnapPercent
- Solo
- Stomp
- Store
- StoreLook
- SyncEffects
- Temp
- Thru
- Toggle
- Top
- Unpark
- Update
- View [Eye]
- Zero
- Hints for Operating
- Error Handling
- CrashLogCopy
- CrashLogDelete
- CrashLogList
- Error Messages
- Glossary
- dot2 Quick Start Guide
- dot2 3D
- dot2 Release Notes
Macros Pool View
Table of contents of this topic
To go to the Macros Pool View on screen 1, press Macro on the console.
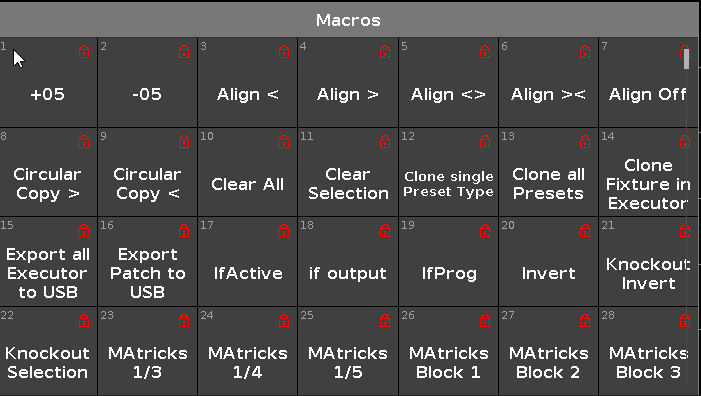
Macros are used for the automation of tasks.
The first 45 are predefined macros that cannot be edited or deleted. They are organized in alphabetical order.
To scroll in the macros pool view, slide the vertical scroll bar or slide up and down in the view.
Numbers 46 to 999 can be edited.
Predefined macros
1. +05:
Adds 5% dimmer value to the selected fixture.
2. -05:
Removes 5% dimmer value from the selected fixture.
3. Align <:
Selects the align mode <. Refer to, Align Key.
4. Align >:
Selects the align mode >. Refer to, Align Key.
5. Align <>:
Selects the align mode <>. Refer to, Align Key.
6. Align ><:
Selects the align mode ><. Refer to, Align Key.
7. Align Off:
Turns the align mode off. Refer to, Align Key.
8. Circular Copy >:
Copies all values of the selected fixtures one step to the right.
This is useful to create a chaser.
9. Circular Copy <:
Copies all values of the selected fixtures one step to the left.
This is useful to create a chaser.
10. Clear All:
Clears the selection and removes all values from the programmer. Refer to, Clear Key.
11. Clear Selection:
Clears the selection of fixtures. Refer to, Clear Key.
12. Clone single Preset Type:
Clones a single preset types from one fixture to another fixture.
Useful if you have an existing show and you get additional fixtures in the show.
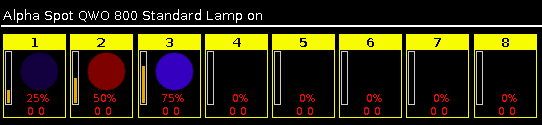
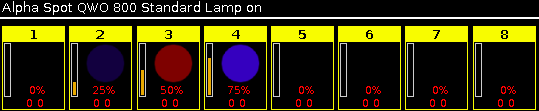
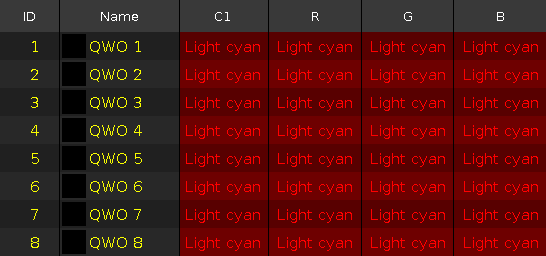
Example:
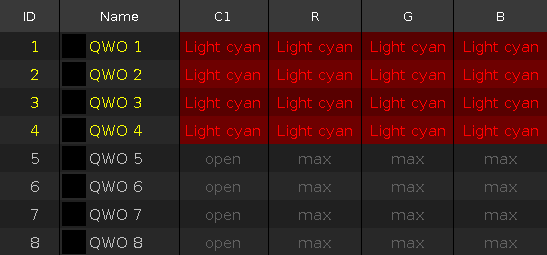
Fixture 1 thru 4 uses color preset light cyan.
Now I got additional fixtures in the show, fixture 5 thru 8. I want that they use color preset light cyan as well.
- Tap macro Clone single Preset Type.
A pop-up asks from what fixture you like to clone. - Type 1 for fixture 1.
One of the fixtures using the preset is enough.
Tap Ok in the title bar.
A pop-up asks to what fixture you like to clone. - Type 5 thru 8.
Tap Ok in the title bar.
A pop-up asks what preset type number you like to clone. - Type 4 for color preset type.
Tap Ok in the title bar.
A pop-up informs you about how many objects will be cloned. - Tap Ok.
All the fixtures 1 thru 8 uses color preset light cyan.
13. Clone all Presets:
Clones all presets from one fixture to another fixture.
Useful if you have an existing show and you get additional fixtures in the show.
If you clone all presets, double-check the position presets. If the fixture doesn´t have exactly the same position, you need to adjust the position presets.
Example:
Fixture 1 thru 4 were already existing. Fixture 5 thru 8 are new in the show and they should use all the same presets than fixture 1 thru 4.
- Tap macro Clone all Presets.
A pop-up asks from what fixture you like to clone. - Type 1 for fixture 1.
One of the fixtures using the preset is enough.
Tap Ok in the title bar.
A pop-up asks to what fixture you like to clone. - Type 5 thru 8.
Tap Ok in the title bar.
A pop-up informs you about how many objects will be cloned. - Tap Ok.
Fixture 5 thru 8 uses all the same presets than fixture 1.
14. Clone Fixture in Executor:
Clones the fixture only on the entered executor. If the source fixture is using a preset, the preset will be cloned as well.
This makes sense, if you need to add one more fixture on an executor what does exactly the same as another fixture.
15. Export all Executor to USB:
A shorted version of the cues view of all executors will be exported to the inserted USB stick as an .xml file. The .xml files are in the folder dot2\importexport. To open the .xml file use a browser or import the .xml file in a calculation program.
16. Export Patch to USB:
The console asks to enter the file name. Export a shorted version of the patch & fixture schedule to the inserted USB stick as an .xml file. The .xml files are in the folder dot2\importexport. To open the .xml file use a browser or import the .xml file in a calculation program.
17. IfActive:
Selects only fixtures in the fixtures view, if they have active programmer values. Refer to, What is a Programmer?
18. if output:
Selects only fixtures in the fixtures view, if they have a dimmer value bigger than 0.
19. IfProg:
Selects only fixtures in the fixtures view, if they have values in the programmer. Refer to, What is a Programmer?
20. Invert:
Enters the Invert Command in the command line.
21. Knockout Invert:
Inverts at fist the selection and removes the inverted selection from the programmer.
This is useful if you have a lot of values in the programmer but you want to store only the current selected values.

22. Knockout Selection:
Deselects the selected fixtures in the fixtures view and remove their values from the programmer.
23. MAtricks 1/3:
Selects every third fixture of the current fixture selection, starting with the first fixture.
Next and Previous Key selects the every third fixture, starting with next or previous fixture.
Example: If Highlight is on, every third fixture is highlighted.
Reset the Next and Previous Key back to default by using Macro 38 MAtricks RESET.
24. MAtricks 1/4:
Selects every fourth fixture of the current fixture selection, starting with the first fixture.
Next and Previous Key selects the every fourth fixture, starting with next or previous fixture.
Example: If Highlight is on, every fourth fixture is highlighted.
Reset the Next and Previous Key back to default by using Macro 38 MAtricks RESET.
25. MAtricks 1/5:
Selects every fifth fixture of the current fixture selection, starting with the first fixture.
Next and Previous Key selects the every fifth fixture, starting with next or previous fixture.
Example: If Highlight is on, every fifth fixture is highlighted.
Reset the Next and Previous Key back to default by using Macro 38 MAtricks RESET.
26. MAtricks Block 1:
Selects blocks of 1 fixture of the current fixture selection, starting with the first fixture.
Next and Previous Key selects the next or previous block.
Reset the Next and Previous Key back to default by using Macro 38 MAtricks RESET.
You can assign MAtricks block macros as a command in the cues view.
27. MAtricks Block 2:
Selects blocks of 2 fixtures of the current fixture selection, starting with the first fixture.
Next and Previous Key selects the next or previous block.
Reset the Next and Previous Key back to default by using Macro 38 MAtricks RESET.
28. MAtricks Block 3:
Selects blocks of 3 fixtures of the current fixture selection, starting with the first fixture.
Next and Previous Key selects the next or previous block.
Reset the Next and Previous Key back to default by using Macro 38 MAtricks RESET.
29. MAtricks Block 4:
Selects blocks of 4 fixtures of the current fixture selection, starting with the first fixture.
Next and Previous Key selects the next or previous block.
Reset the Next and Previous Key back to default by using Macro 38 MAtricks RESET.
30. MAtricks Even:
Selects every second fixture of the current fixture selection, starting with the second fixture.
Next and Previous Key function changes into a toggle function between even and odd.
Reset the Next and Previous Key back to default by using Macro 38 MAtricks RESET.
31. MAtricks Even ID:
Selects only fixtures with an even fixture ID of the current fixture selection.
Next and Previous Key selects next and previous even fixture ID.
Reset the Next and Previous Key back to default by using Macro 38 MAtricks RESET.
32. MAtricks Group 0:
To use the MAtricks Group macros, enter the values by using the calculator or the number pad.
Aligns the values across the fixture selection.
- Select the MAtricks Group and then enter the align values.

33. MAtricks Group 2:
Aligns the values across groups of 2 fixtures of the fixture selection.
- Select the MAtricks Group and then enter the align values.

34. MAtricks Group 3:
Aligns the values across groups of 3 fixtures of the fixture selection.
- Select the MAtricks Group and then enter the align values.

35. MAtricks Group 4:
Aligns the values across groups of 4 fixtures of the fixture selection.
- Select the MAtricks Group and then enter the align values.

36. MAtricks Odd:
Selects every second fixture of the current fixture selection, starting with the first fixture.
Next and Previous Key function changes into a toggle function between even and odd.
Reset the Next and Previous Key back to default by using Macro 38 MAtricks RESET.
37. MAtricks Odd ID:
Selects only fixtures with an odd fixture ID of the current fixture selection.
Next and Previous Key selects next and previous odd fixture ID.
Reset the Next and Previous Key back to default by using Macro 38 MAtricks RESET.
38. MAtricks RESET:
Resets the Next and Previous key back to their default function.
This is necessary after using MAtricks macros.
39. Off all Executor:
Turns off all executors except the main executor.
40. Off Pages Minus Current:
Turns off every page except the current visible page in the executor bar.
41. Oops Menu:
Opens the Oops View on screen 1.
42. Quicksave the Show File:
Saves the show file. Refer to, Backup Key.
43. Shuffle Selection:
The dot2 remembers the order of how you select the fixtures, e.g. from fixture 1 to 10 or from fixture 10 to 1.
This necessary for e.g. effects or the highlight function.
The shuffle selection macro mixed-up the order of the fixture selection.
Example without Shuffle Selection Macro:
Select the fixtures in the fixtures view from 1 to 8, press At 1 0 Thru 1 0 0.
The values from 10 to 100 are assigned to the fixtures in the selection order.
Example with Shuffle Selection Macro:
Select fixtures from 1 to 8 in the fixtures view, tap at macro Shuffle Selection, press At 1 0 Thru 1 0 0.
The values from 10 to 100 are assigned to the fixtures in a mixed order.
44. Shuffle Values:
Mix-up the values of the selected fixtures.
45. Stomp Running Effects:
Mutes all running effects. To start the effects again, press Clear.
For more information, see Stomp command.
Editable macros
Macros 46 to 999 can be edited:
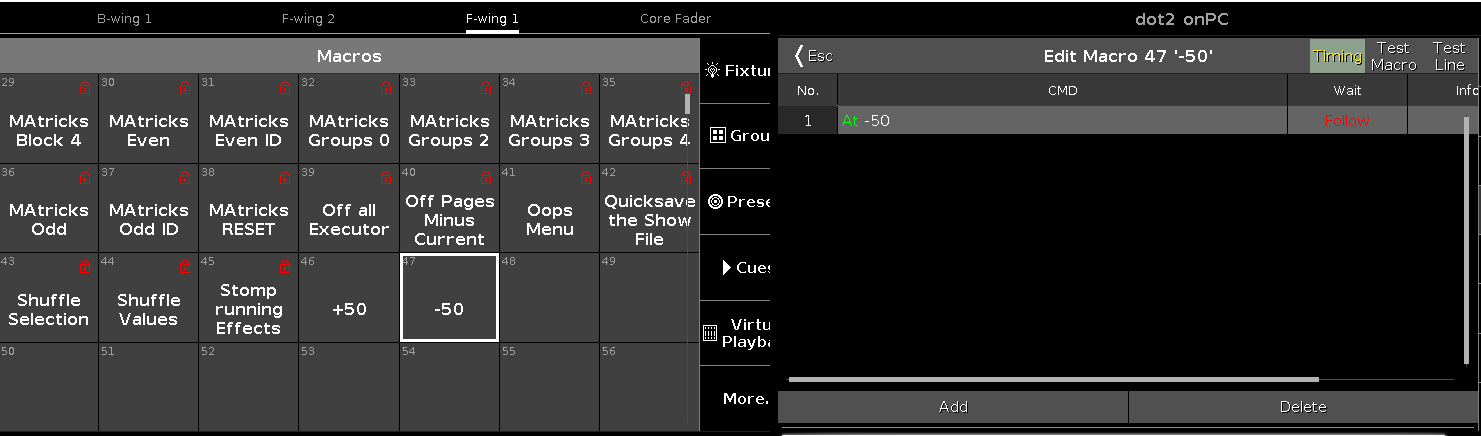
To edit a macro, use one of the options:
- Press Edit and tap the requested macro number. Press the right Screen Encoder in the macro pool.
- Type Edit on the keyboard and enter the requested macro number. Press Enter.
The macro editor opens:
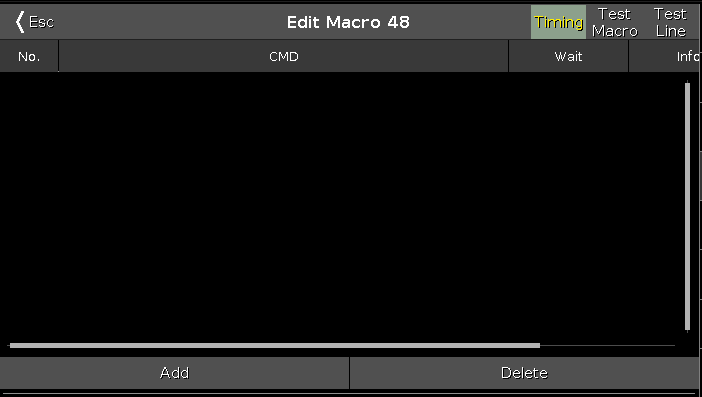
To enter a new macro line, tap Add:

Press the right Encoder and enter the macro command using the hardware keys or the keyboard:

To save the macro line, press Please or tap OK.
To rename the macro, press Label and tap the macro in the pool.

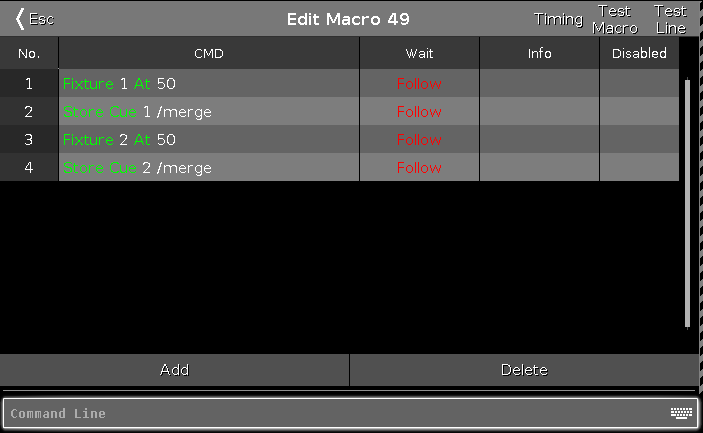
Example macro
This macro can easily be created using the hardware keys:
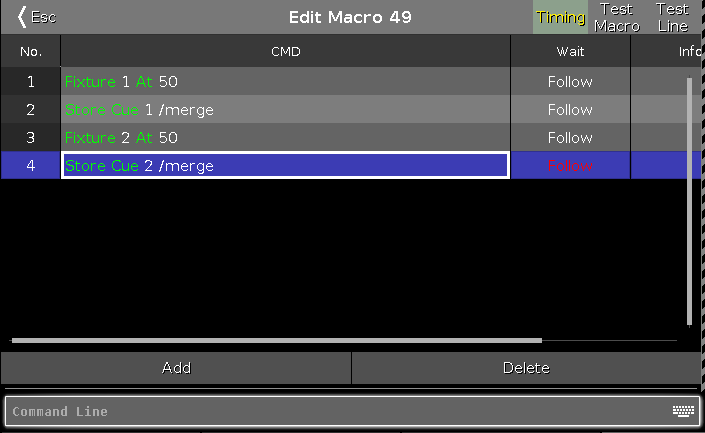
Resize the first column "CMD" to see all columns on one screen:
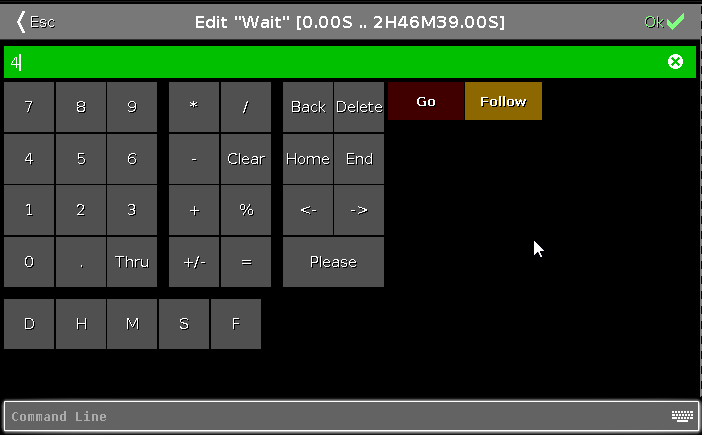
Macro Wait Time
The Macro Wait Time can be added to every macro line, except for the last line.
To toggle the Macro Wait Time on (yellow text) or off, tap the Timing button left from the Test Macro button.
To add a Macro Wait Time to a macro line, press Edit and tap the Wait cell of the desired line.
To add 4 seconds Wait Time to line 1 of Macro 49:
Create macro pop-ups
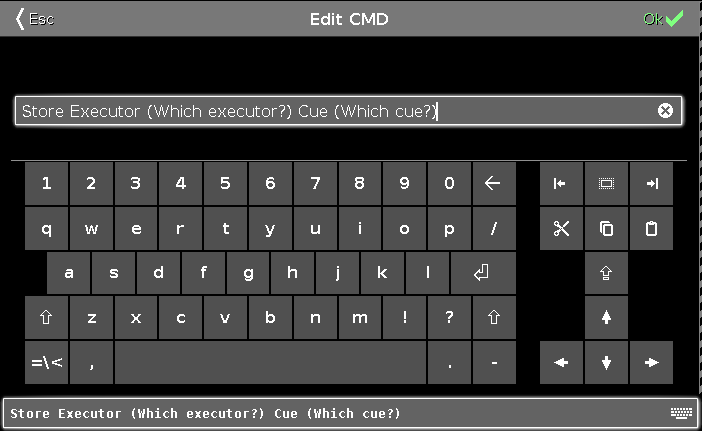
Sometimes it can be very useful to create macros that can collect user input while running.
A macro can create a pop-up that prompts the user for input. The macro will halt and wait for the user to type the input before continuing.
Pop-ups are created by the use of parentheses.
The text inside the parentheses is used as text prompted to the user, while the response entered by the user will replace the parentheses and the prompting text.
When you are using pop-ups to assign text to variables, you should use quotes inside the parentheses: ("Which address?") but when using pop-ups for commands and numbers, do not use quotes inside the parentheses: (Which Fixture ID?).
Example 1:
We want a macro that stores a specific cue to a specific executor. The macro should ask the user for an executor number and the cue number. This is done using two prompts - one for each user input.
Since we are asking for numbers, the text entered in the parentheses cannot be in quotes - the console would interpret it as text instead of numbers.
The macro looks like this:
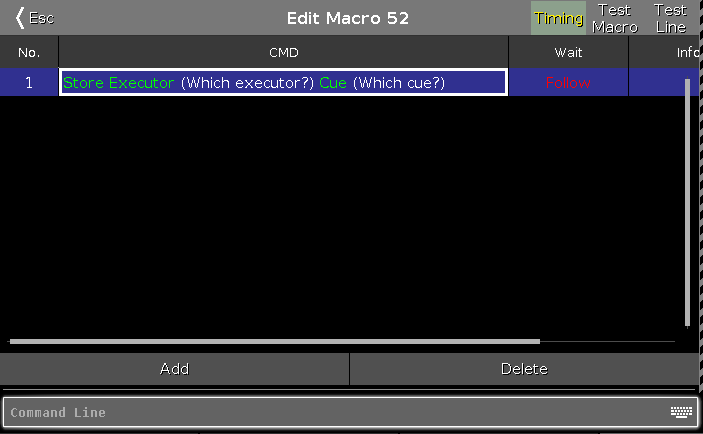
When running the macro, the console first prompts for the executor number:
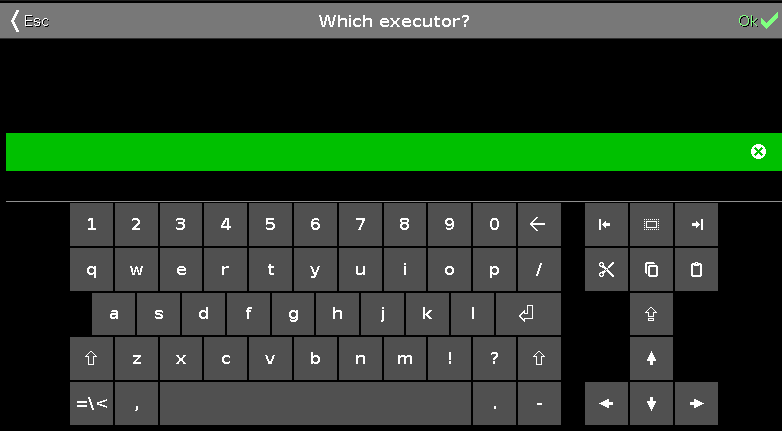
After the user types the number and finishes with Please/Enter, then it asks for the cue number:
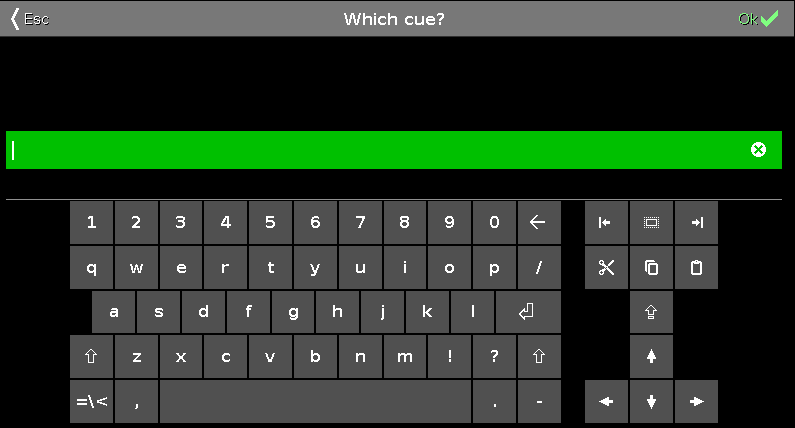
Processed, the macro executes the command. It could look like this:

@ character
You can make the commands of the macro lines interact by the use of the @ character.
This special command is only relevant in macros.
It is a placeholder for user commands. This allows you to interact with macro commands.
Ending a macro line with @
When it is used at the end of a macro line, the line will not execute the command line. It will simply put the command in the Command Line Input and then wait for you to complete the command. If your macro has several lines, it will then continue with the next macro line after your input.
Example:
You have a group (number 4) that you want to give a value and store as the next cue. You want to manually type the value.
| No. | CMD |
|---|---|
| 1 | Group 4 At @ |
| 2 | Store Cue |
Running this macro will give you the following command line input:
Then it waits for you to type the value and finish with a Please.
After the please it will run macro line 2 and store the (next) cue.