

- grandMA3 User Manual
- Introduction
- About the manual
- Symbols used in the manual
- System requirements grandMA3 onPC
- Installation of grandMA3 onPC
- Device Overview
- grandMA3 console
- grandMA3 replay unit
- grandMA3 processing units
- grandMA3 onPC command wing
- Keys
- Keys Overview
- . [Dot]
- <<< [GoFastBackward] | Black
- >>> [GoFastForward] | Flash
- - [Minus]
- + [Plus]
- / [Slash] | * [Asterisk/Multiply]
- At
- Assign
- Align
- Blind
- Clear
- Channel
- Copy
- Cue
- Down
- Delete
- Esc
- Edit
- Freeze
- Full
- Fixture
- Group
- Goto
- Go+ [large]
- Go- [large]
- Go+ | Temp
- Go- | Top
- Help
- Highlt [Highlight]
- If
- Learn | Rate1
- List
- MA
- Menu
- Move
- Next
- Numeric keys | arrows
- Oops
- On
- Off
- Pause [large]
- Pause | Fix
- Page+
- Page-
- Please
- Power
- Preset
- Prvw [Preview]
- Prev [Previous]
- Select
- SelFix [SelectFixture]
- Sequ [Sequence]
- Set
- Solo
- Stomp
- Store
- Thru
- Time
- Up
- Update
- U1
- U2
- X1 | Clone
- X2 | Link
- X3 | Grid
- X4 | Layout
- X5 | Step
- X6 | TC
- X7 | View
- X8 | DMX
- X9
- X10
- X11
- X12
- X13 | Phaser
- X14 | Macro
- X15 | Page
- X16 | Exec
- XKeys
- Control elements
- Dual encoders
- Level wheel
- Grand master
- Executor elements
- System Overview
- Standalone device
- Locally networked devices
- World server
- Parameters
- Calculate parameters
- Expand the amount of parameters
- First Steps
- Unpack the device
- Check scope of delivery
- Position the device
- Connect power
- Connect desk light
- Connect external screens
- Connect USB mouse and USB keyboard
- Connect DMX
- Connect Audio In
- Connect SMPTE (LTC)
- Connect Ethernet
- Connect DC Remote In
- Turn on the console the first time
- Show File Management
- Workspace
- User interface
- User-defined area
- Command line
- Control bar
- View buttons
- Grand master
- Tables in general
- Gestures
- Command section
- Master controls
- Playback controls
- Allocation of displays
- Encoder bar
- Feature group control bar
- Encoder toolbar
- Calculator
- Colors
- Icons
- User interface
- Command Syntax and Keywords
- General syntax rules
- Object keywords
- Function keywords
- Helping keywords
- All keywords
- / [Slash]
- . [Dot]
- .. [DotDot]
- <<< [GoFastBackward]
- >>> [GoFastForward]
- - [Minus]
- * [Asterisk]
- % [Percent]
- + [Plus]
- Absolute
- Acceleration
- Action
- Align
- AlignTransition
- Appearance
- Assign
- At
- Attribute
- Black
- Blind
- BPM
- Camera
- ChangeDestination
- Channel
- ChannelSet
- Chat
- Clear
- ClearActive
- ClearAll
- ClearSelection
- CmdDelay
- Configuration
- Console
- Copy
- Cue
- CueDelay
- CueFade
- CueInDelay
- CueInFade
- CueOutDelay
- CueOutFade
- Cut
- DataPool
- Decimal8
- Decimal24
- Default
- Delay
- Delete
- DelGlobalVar
- DelUserVar
- Dismiss
- DMXUniverse
- Down
- Drive
- Echo
- Edit
- EditOption
- Eject
- Effect
- EndIf
- Escape
- Exchange
- Executor
- Export
- Extract
- FaderMaster
- FaderRate
- FaderSpeed
- FaderTemp
- FaderX
- FeatureGroup
- Filter
- Fix
- Fixture
- Flip
- Flash
- Fog
- Freeze
- Full
- Gel
- GetGlobalVar
- GetUserVar
- Global
- Go-
- Goto
- Grid
- Group
- Help
- Hex8
- Hex24
- Highlight
- Houselights
- Hz
- If
- Insert
- Integrate
- Interface
- Invite
- Join
- Label
- Layout
- Leave
- Library
- List
- ListRef
- Load
- Loaded
- LoadShow
- Lock
- Login
- Logout
- Macro
- Master
- Media
- Move
- NewShow
- Next
- Node
- NonDim
- Normal
- Off
- On
- OnPC
- OSC
- Oops
- Page
- Part
- Park
- Paste
- Patch
- Pause
- Percent
- PercentFine
- Phase
- Physical
- Plugin
- Preset
- Press
- Previous
- Programmer
- PU
- Pyro
- Rate1
- Readout
- Reboot
- Recast
- Relative
- Release
- ReloadUI
- Remove
- Reset
- Restart
- SaveShow
- Scribble
- Seconds
- Select
- Selection
- SelFix
- Sequence
- SendOSC
- Set
- SetGlobalVar
- SetUserVar
- Shutdown
- SnapDelay
- Solo
- Station
- Step
- Stomp
- Store
- Temp
- Thru
- Top
- Transition
- Unlock
- Unpark
- Unpress
- Up
- Update
- User1
- User2
- User
- Version
- View
- Width
- Wing
- World
- Zero
- General syntax rules
- Windows, Views, and Menus
- Add windows
- Rearrange
- Store and recall views
- Remove windows from a screen
- Window settings
- Menus
- Change menu locations
- Pool windows
- Create pool object
- Label pool objects
- Move pool objects
- Insert pool objects
- Copy pool objects
- Lock and unlock pool objects
- Delete pool objects
- Networking
- Interfaces and IP
- Session
- Create a session
- Leave a session
- Invite to a session
- Dismiss from session
- Create a custom key
- DMX In and Out
- DMX port configuration
- Ethernet DMX
- Art-Net menu
- sACN menu
- Single User and Multi User Systems
- Create User
- User settings
- Patch and Fixture Setup
- What are fixtures
- Add fixtures to the show
- Live patch
- DMX sheet
- Remove fixtures from the show
- Position fixtures in the 3D space
- 3D Window
- Camera Pool
- Stages
- Classes and Layers
- Attribute definitions
- Activation group
- Feature group
- Operate Fixtures
- What is the programmer
- Fixture sheet
- Using the color picker
- Align
- Selection window
- Scribbles
- Create scribbles
- Edit scribbles
- Assign scribbles
- Delete scribbles
- Images
- Screenshots
- Appearance
- Create appearances
- Use appearances
- Delete appearances
- Groups
- Create groups
- Edit groups
- Delete groups
- Group masters
- Presets
- Preset pools
- Create presets
- Assign input filter
- Edit presets
- Update presets
- Preset pool settings
- Embedded presets
- Store values of multi steps
- Delete presets
- Worlds and Filters
- At filter
- Create a world
- Create a filter
- Use a world or filter
- Delete a world
- Delete a filter
- Cues and Sequences
- What is tracking
- Look at cues and sequences
- Sequence settings
- Store cues
- Store options and preferences
- Play back cues
- Cue timing
- Executors
- Assign object to an executor
- Executor configurations
- Running playbacks
- Phasers
- Step bar
- Phaser editor
- Create sinus dimmer phaser
- Macros
- Create macros
- Edit macros
- Assign macros to keys and buttons
- Timecode
- Toggle view mode
- What are timecode slots
- Layouts
- Create a layout
- Layout pool settings
- Edit layout
- Layout view settings
- Edit layout view
- Edit layout elements
- System Information
- Date and time
- Clock
- System info
- Update the Software
- Update grandMA3 consoles
- Update grandMA3 xport nodes
- Fixture Types
- Import fixture types
- Import GDTF
- Build fixture types
- Insert fixture types
- Insert DMX modes
- Insert geometries
- Insert models
- Link models to geometries
- Link DMX modes to geometries
- Export fixture types
- Export GDTF
- Import fixture types
- Introduction
- grandMA3 Quick Manual consoles
- grandMA3 Quick Manual processing
- grandMA3 Quick Manual nodes
- grandMA3 Quick Manual DIN-Rail
- grandMA3 Quick Manual onPC solutions
- Release Notes
New help version
The help version you selected belongs to an older software version. You may want to view the latest help version.
Store and Recall Views
Table of contents of this topic
The arrangement of windows is called a View. Views are stored in a View Pool. The pool can be created as a window.

Views can be assigned to ViewButtons.
Store Views
A view is stored using the standard store syntax and the View keyword. This means that it is possible to use the keys, keys in combination with buttons on the screens, or the command line.
Storing a view opens the Store View Options pop-up.
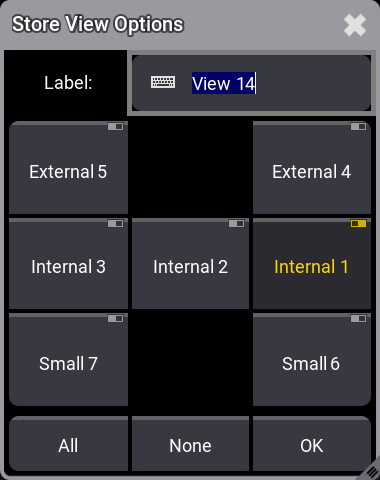
This is used to directly label the view and select what screens should be stored in the view. Each screen has a button that can be turned On or Off. The last touched screen is selected as a default. There are two buttons at the bottom that gives fast access to select All or None of the screens. Tap OK to store the window arrangement of the selected screens or press Please to confirm the options.
If the command line is used then the screens can be specified using the /Screen options. For more information please read the Store keyword topic.
Store Using Keys
- Press Store.
- Press and hold MA while pressing X7 | View.
This puts the View keyword in the command line. - Use the numeric keys to type the view number.
- Execute the command by pressing Please.
- Select the desired screens in the pop-up and press Please to confirm the options.
If point 3 is skipped (not adding a number), then the first available view is stored.
Store Using a Combination of Keys and Touch Screens
Requirement:
- A visible View Pool on one of the screens.
To store a new view:
- Press Store.
- Tap an available pool object in the view pool.
- Select the desired screens in the pop-up and tap OK to confirm the options.
The last touched object (the object with the white frame) can be labeled if you start typing on the keyboard. Any of the labeling methods described in the Label Pool Objects topic can also be used.
Store Using Command Line
Storing using the command line is very simple. The two keywords needed are Store and View.
For example storing the window arrangement on screen 1 and 2 as view 15 with the "layout" label:
Store a View Directly on a View Button
A new view can be stored on a View Button. This creates a view in the view pool and immediately assigns it to the view button.
- Press Store.
- Tap a view button.
- Select the desired screens in the pop-up and tap OK to confirm the options.
Now there is a new view in the pool and it is assigned to the tapped view button.
Any of the described label functions can be used with the view buttons.
Assign Existing View to a View Button
The above method is for creating a new view and having it available on a view button. Existing views can also be assigned to the view buttons.
Again there are three primary ways to do it: Keys, keys and screens, and command line.
Assign View Using Keys
- Press Assign.
- Press and hold MA while pressing X7 | View once.
- Use the numeric keys to type the view number.
- Press At.
- Press and hold MA while pressing X7 | View twice (this gives the ViewButton keyword).
- Use the numeric keys to type the view button number.
- Execute the command by pressing Please.
Assign View Using Keys and Screens
Requirement:
- A visible View Pool on one of the screens and visible view buttons.
To assign a view:
- Press Assign.
- Tap the desired view in the view pool.
- Tap the desired view button.
Assign View Using the Command Line
The Assign, View, and ViewButton keywords are needed for this command.
Recall Views
Stored views are recalled to load the view.
If the view is assigned to a button, then pressing the button recalls the view.
Tapping a view in the pool also recalls it.
Finally, a view can be recalled from the command line:
Update Views
A view is updated simply by storing it again and overwriting the existing view. This can be done directly in the view pool or on the view button using any of the methods described above.