

- grandMA3 User Manual
- grandMA3 Quick Start Guide
- grandMA3 Quick Manual consoles
- grandMA3 Quick Manual processing units
- grandMA3 Quick Manual Nodes
- grandMA3 Quick Manual Nodes DIN-Rail
- grandMA3 Quick Manual onPC command wing XT
- grandMA3 Quick Manual onPC command wing
- grandMA3 Quick Manual onPC fader wing
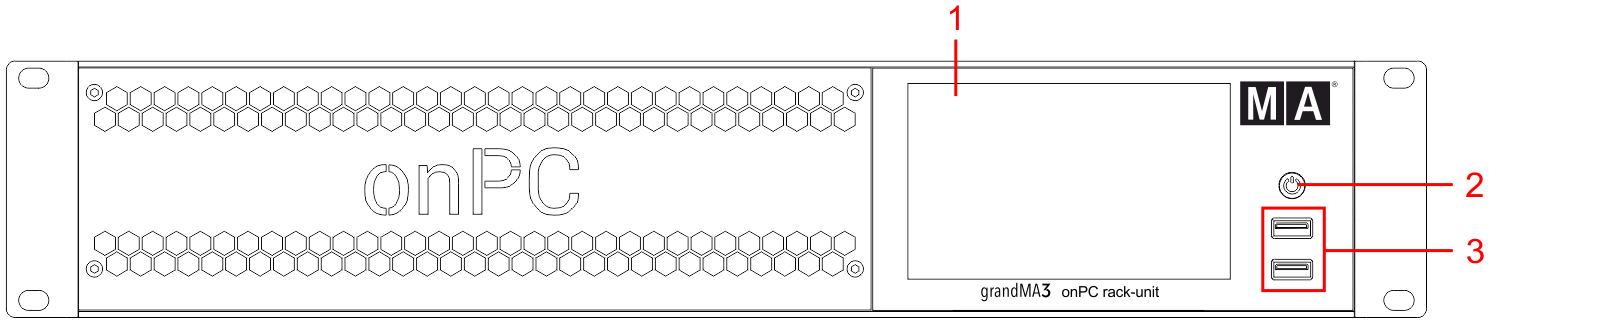
- grandMA3 Quick Manual onPC rack-unit
- Intended Use
- Safety
- Support
- Transport
- Limitations
- Quick Start
- Maintenance
- Disposal
- Technical Data
- Conformity
- grandMA3 Quick Manual viz-key
- grandMA3 Quick Manual I/O Nodes
- Release Notes
Hint:
New help version
The help version you selected belongs to an older software version. You may want to view the latest help version.
New help version
The help version you selected belongs to an older software version. You may want to view the latest help version.
Version 1.7
Quick Start
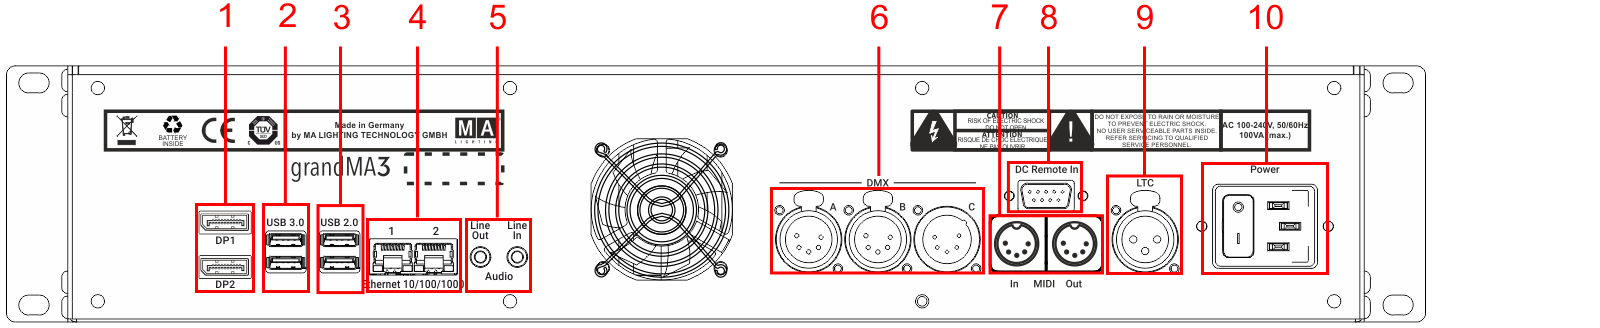
- DisplayPort 1+2
- USB 3.0
- USB 2.0
- Ethernet 1+2
- Line In+Out
- DMX A-C
- MIDI In+Out
- DC Remote Control
- LTC
- Power switch + IEC connector
Turn on the onPC rack-unit
- Unpack the grandMA3 device.
- Remove the packaging and cushioning material.
- Place the device indoors on a stable surface or install it in a 19" rack.
- Connect external monitors to the grandMA3 device using the native DisplayPort connectors.
- Connect an external mouse or keyboard using the USB ports.
- Insert the IEC connector into the corresponding jack.
- Connect the power plug.
- Turn on the power switch on the rear panel.
- Press the power key on the front panel.
Turn off the grandMA3 onPC rack-unit
Important:
Do not press the power key to turn off the device. Only if a hard shutdown is necessary, press and hold the power key for more than 3 seconds.
Do not press the power key to turn off the device. Only if a hard shutdown is necessary, press and hold the power key for more than 3 seconds.
- Tap
 at the top of the control bar to start the shutdown procedure or shutdown the onPC software by the shutdown keyword.
A warning pop-up appears:

- Tap OK.
- Shut down the Windows system.
The grandMA3 onPC rack-unit powers down.
Important:
Do not switch off the grandMA3 onPC rack-unit too early.
Make sure that you wait until Windows has completely shut down.
The display and the fan on the grandMA3 onPC rack-unit must have turned off.
Do not switch off the grandMA3 onPC rack-unit too early.
Make sure that you wait until Windows has completely shut down.
The display and the fan on the grandMA3 onPC rack-unit must have turned off.
- Set the power switch to position O.
Install the Latest grandMA3 Software and the Operating System
Warning:
Updating the grandMA3 software and the operating system deletes all previous stored files.
Updating the grandMA3 software and the operating system deletes all previous stored files.
Hint:
To update only the grandMA3 onPC software, use the network update process. For more information, see Network update.
To update only the grandMA3 onPC software, use the network update process. For more information, see Network update.
- To install, download the latest software version from www.malighting.com.
The required installer is called grandMA3 onPC Windows Hardware Image x.x.x.x. - Save the full software image on your computer's hard drive.
- Extract the zip file "grandMA3_v.x.x.x.x_windows_hardware_image.zip" and copy it onto a USB flash drive (FAT32 formatted, minimum 8 GB).
- Insert the USB flash drive.
- Power up the grandMA3 onPC rack-unit.
- If necessary, tap F8 to choose Boot device and select boot from USB.
- Follow the onscreen instructions during the update process.
To learn more about the update process, read the Update grandMA3 onPC windows hardware topic in the online user manual.
Important:
To configure the device, or to update or downdate the installed software, use a grandMA3 console or your PC or laptop with the grandMA3 onPC software installed. For more information see the topics Update the Software via Network Update in the grandMA3 User Manual online available at www.malighting.com.
To configure the device, or to update or downdate the installed software, use a grandMA3 console or your PC or laptop with the grandMA3 onPC software installed. For more information see the topics Update the Software via Network Update in the grandMA3 User Manual online available at www.malighting.com.
Different Combinations
| Device | Connected To | Parameters |
|---|---|---|
| grandMA3 onPC rack-unit | standalone | 4 096 |
| grandMA3 onPC rack-unit + | grandMA3 onPC 8/4/2Port Node | 4 096 |
| grandMA3 onPC rack-unit + | grandMA3 processing unit M/L/XL | 4 096 |
Important:
Independent of the devices connected to the grandMA3 onPC software, the number of parameters can only reach a maximum of 4 096.
Independent of the devices connected to the grandMA3 onPC software, the number of parameters can only reach a maximum of 4 096.
For more information see: Expand the Amount of Parameters topic.