

- grandMA3 User Manual
- grandMA3 Quick Start Guide
- 00 Welcome
- 01 New Show and Setup
- 02 First Patch
- 03 First View Setup
- 04 Control Simple Fixtures
- 05 3D Fixture Setup
- 06 Groups
- 07 Appearance
- 08 Scribbles
- 09 Macros
- 10 Store Cues and Use Executors
- 11 Add Moving Lights
- 12 Control Moving Lights
- 13 Presets
- 14 Phasers
- 15 Sequence with multiple cues
- 16 Network and How to Output DMX
- 17 Recipes
- grandMA3 Quick Manual consoles
- grandMA3 Quick Manual processing units
- grandMA3 Quick Manual Nodes
- grandMA3 Quick Manual Nodes DIN-Rail
- grandMA3 Quick Manual onPC command wing XT
- grandMA3 Quick Manual onPC command wing
- grandMA3 Quick Manual onPC fader wing
- grandMA3 Quick Manual onPC rack-unit
- grandMA3 Quick Manual viz-key
- grandMA3 Quick Manual I/O Nodes
- Release Notes
Welcome to the Quick Start Guide
This guide is a quick tour of some of the most used elements of the grandMA3 software. This guide has been written for version 1.9.3. If you are on a different version, then there might be elements that function slightly differently. The general functions and principles are the same. We will try to keep this guide updated to the latest version.
It is meant to be a more personal and loose reading experience than the main manual. It is a collection of tutorials where you (the reader) follow the steps I (the author) explain as we, together, go along. The main manual is better if you are looking for short explanations of how to do a specific thing. This guide has a lot of text and description behind the steps - hopefully, it is also a little fun to read.
It is highly recommended that you read the numbered chapters in order.
We will create a new show with some fixtures with standard functions. We will create something with a cue sequence and some busking setup that can be used for a more dynamic live playback.
Preface
This guide is written using the grandMA3 onPC primarily. The thought is that most users that go through this are on the onPC platform. If you have a grandMA3 console or a grandMA3 onPC command wing, it can be used in this guide. It will be explained if there is any difference in how to operate the onPC or console. The primary difference is that you do not need to open windows with virtual keys and executors if you have real hardware.
A mouse/trackball is recommended. Often the guide will say something like "click the button". This is the same as tapping it on a console or a touch screen. We might need to "Right-click" something with the mouse. It is the same as pressing the Edit key and tapping the object on a console. You can use an external mouse/trackball on the console, it is all up to you, but the interface is built to be touched.
If you are using the onPC, you will work a lot on the "virtual displays". The screens on the console are numbered like this.
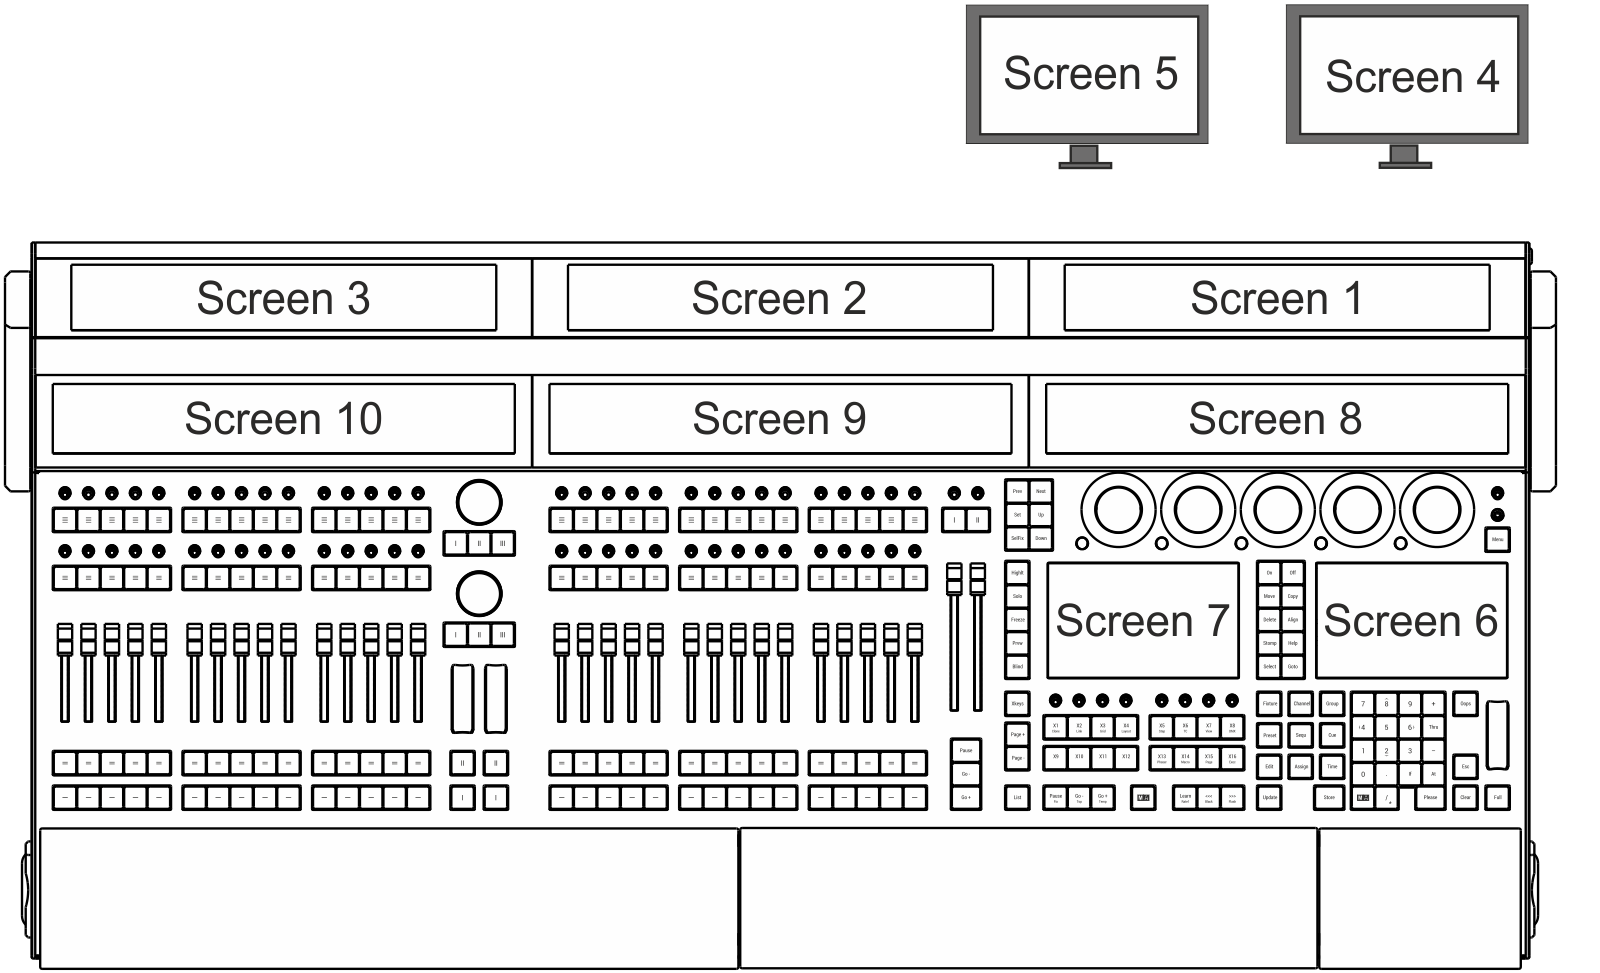
The grandMA3 onPC is a little different:
- Display 1 is a combination of console screens 1 and 8.
- Display 2 is a combination of console screens 2 and 9.
- Display 3 is a combination of console screens 3 and 10.
- Display E4 is an external screen 4.
- Display E5 is an external screen 5.
- Display S6 is console screen 6.
- Display S7 is console screen 7.
The displays can be toggled using the Display pop-up found in the Control Bar on the left side of the displays. It is the button with a screen icon(![]() ). It is not possible to turn off Display 1.
). It is not possible to turn off Display 1.
The Control Bar also gives access to virtual controls. There is the virtual Command Section, the Master Controls, the Playback Controls, and the Custom/Master Section. These can also be toggled using a keyboard's F3, F4, F5, and F7 keys. We will come back to all these controls later.
You should read this online since it is the most up-to-date version. But you can also create this as a PDF and maybe print it. You could save the paper, take the PDF with you, and read it on your favorite electronic device instead. One favorite device could be the console or onPC, where this guide is available in the help system - and then you do not need to create a PDF.
The Quick Start Guide is meant to be read from start to finish, and it is meant for beginners. If you are looking for help on a specific topic, you should try the main manual.
To get the best result, you should try to do precisely what is written. If you change something that is not described, you might get a different result.
Markup in the Quick Start Guide
In this guide, there are different markups in different situations.
Even though this is written using an onPC, there will be some (virtual) key presses. If you should press or click keys, then it is displayed like this: Store Cue 1 Please.
If we are just talking about a key, then it will be written in single quotes like this: The 'Store' key.
If it is an area on the screens you need to click or press, it is written like this Internal. This could be tabs in menus or a button on the screen.
If we are talking about a term, it will look like this: Store is a function to save something.
If you need to use a keyboard and write something in the command line (we are going to look at what this is later), then it will look like this:
All input like this should be executed with an 'Enter' on your keyboard. The Enter is not displayed. It is the same as the Please key. It is not a visible command - it is the key that executes the typed command. There is a default keyword displayed in the command line input above. It is the yellow word inside the square brackets. You do not need to write this; it is already there - it might be different than the one displayed above.
Feedback from the system is displayed like this:
Notice that the Please or Enter is not displayed. The feedback can be seen in the Command Line Feedback window (more on this later).
If you need to write something on the keyboard that is not for the command line, the keyboard input will look like this: Store Cue 1. This could, for instance, be a name.
There might be hints, important information, or restrictions throughout the guide. These are written in boxes with icons and a small headline showing the type of information.
This is what a hint would look like.
Recap
Each chapter ends with a short recap of what we did. It might also include links to relevant topics in the main manual. These links are meant as guides to relevant locations in the manual where you can get more detailed information about specific topics touched on in the guide chapter. You can take a break from the guide and read the manual topics if you want to, but you do not need to read it to continue to the next chapter.
For this chapter and introduction, I could add the following links:
Learn how to install the onPC in the Installation of grandMA3 onPC topic.
For details about setting up the console have a look at the First Steps section.
If you want to learn more about the command line input, then read the Command Line Topic.
At the end of the recap, there is a link to the next chapter - go ahead and click it when you are ready.