

- grandMA3 User Manual
- grandMA3 Quick Start Guide
- 00 Welcome
- 01 New Show and Setup
- 02 First Patch
- 03 First View Setup
- 04 Control Simple Fixtures
- 05 3D Fixture Setup
- 06 Groups, Appearances, and Scribbles
- 07 Macros
- 08 Store Cues and Use Executors
- 09 Add Moving Lights
- 10 Presets
- 11 Phasers
- 12 Sequence with multiple cues
- 13 Network and How to Output DMX
- grandMA3 Quick Manual consoles
- grandMA3 Quick Manual processing units
- grandMA3 Quick Manual Nodes
- grandMA3 Quick Manual Nodes DIN-Rail
- grandMA3 Quick Manual onPC command wing XT
- grandMA3 Quick Manual onPC command wing
- grandMA3 Quick Manual onPC fader wing
- grandMA3 Quick Manual onPC rack-unit
- grandMA3 Quick Manual viz-key
- grandMA3 Quick Manual I/O Nodes
- Release Notes
New help version
The help version you selected belongs to an older software version. You may want to view the latest help version.
Presets
We have looked at storing values in cues.
There is another option - storing the values in presets.
Presets are pool objects that can contain values and a selection of fixtures that can use the values.
These are often created as building blocks in cues but can also be used for busking shows.
One of the advantages of using presets as building blocks in cues is that the cue stores a reference to the preset and not the value stored in the preset. Should the preset values change, then the cue will still look in the preset for the values. There is no need to update the cue.
A preset pool looks a lot like the other pools we have looked at. There are several preset pools, so they have their own tab in the Add Window pop-up. The preset pools are created as windows in the user-defined area.
Each feature group has its own preset pool. The default setting is that you can only store values from a feature group in its respective pool. There are also five All preset pools. They can store values from all feature groups.
Let us have a look at color presets.
Clear your programmer if you still have values there.
Create a color preset pool on your screen.
Press Group 6 Please.
Press Full to turn them On.
Tilt them forward a little.
Finally, give them a nice color.
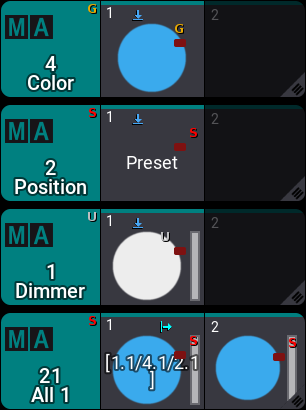
Now we have active programmer values in dimmer, tilt, and colors.
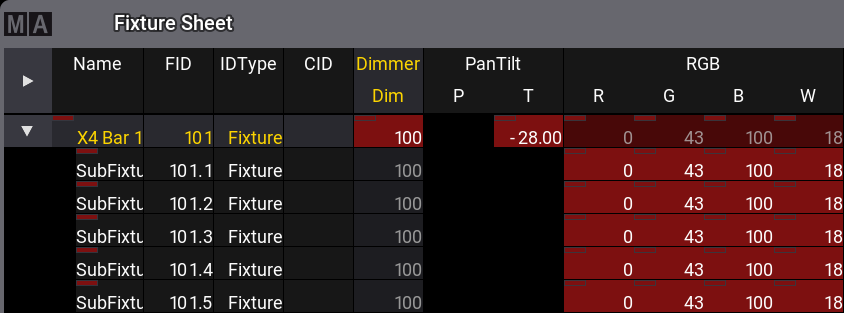
Notice that we have selected the "main" part of the X4 fixtures. The dimmer and tilt are part of this main part. The main part does not have any color attributes. The values shown for the row with the main part are slightly darker. This indicates that the value shown is actually from the child or sub-fixture. The colors are actually in the sub-fixtures. We do not need to select the sub-fixtures explicitly to apply the color. Since the main fixture does not have this attribute it is passed on to the sub-fixtures when applied to the main fixture. Have a look at the dimmer attribute. The main fixture and sub-fixtures all have dimmer attributes. The value is only applied to the actually selected (main) fixture. The sub-fixtures default dimmer value is at 100%, so the result is colored light is output.
Ok, back to presets.
Press Store and click the first preset pool object in the color preset pool - not the title field, but the one with a small "1" in the upper left corner.
Two things happened.
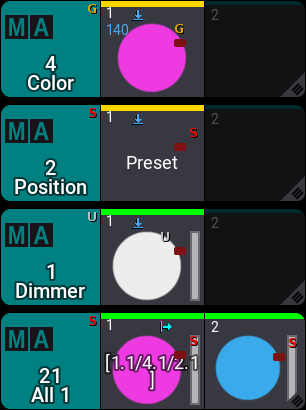
First, our fixture sheet changed.
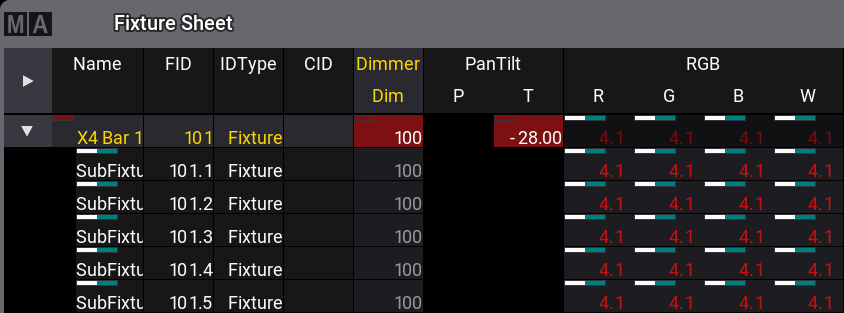
The color values are now inactive values in the programmer. The dimmer and tilt attributes are still active values. This indicates that the color values have gone somewhere and the dimmer and tilt have not.
Also, the color values have gone and are replaced with "4.1". This is the number of the preset where the color values have gone.
The first number is the feature group / preset pool number. The second number is the pool object.

So we got this new color preset.
Notice the small yellow "G" in the upper right corner of the preset. This indicates that the preset is a Global preset.
Let us have a look at what is actually stored in the preset.
Clear the programmer.
Press Edit and then click the preset.
Now the fixture sheet changes and look like this:
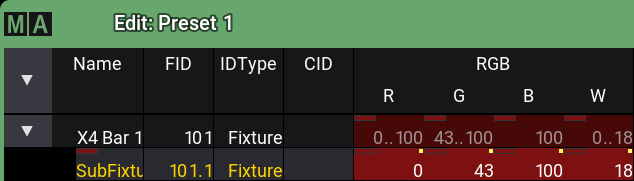
These are now values in our programmer and it is actually output.
What we see here is that the value is only stored for the first sub-fixture of the first X4 fixture and there is a small yellow marker above each value.
The marker indicates that a value is a global value.
Global values can be used by all fixtures of the same type. This means that all the sub-fixtures of the X4 bars can use this color.
Clear your programmer and press Esc.
Click the color preset.
This first preset "call" selects all the fixtures that can use a preset - when we do not already have a selection of fixtures. Notice that we select all the sub-fixtures.
Click the preset again.
Now we have called the preset reference into our programmer for the selected fixtures. This is also what happens if we had used a group or manual selection to select some of the sub-fixtures.
Notice that the preset number is showing in the value cells in the fixture sheet.
If we want to turn On and tilt the X4 bars again then we need to select the parent / main fixtures. We can do this easily by pressing the Up key. Now we have selected the main fixtures and we can press Full to turn them On and use the tilt encoder to tilt them forward.
Now we are going to store a couple of other presets. Please make a Position preset pool and a Dimmer preset pool.
Now press Store and click the first preset in the position pool. And we are immediately going to store the first dimmer preset as well.
Now you should have presets that looks like this (The color might not be the same):
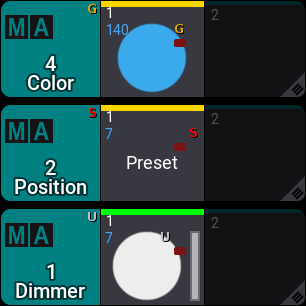
The position preset got a small red "S". this tells us that it is a Selective preset. These presets only store active values that can be used by the fixtures that had the values when they were stored.
Try to clear your programmer and click the position preset once. Now you have selected all the X4 main fixtures. Clicking it again assigns the reference to the preset.
If you edit the preset you can see in the fixture sheet that the tilt value is stored for all the X4 fixtures.
Clear the programmer again and exit the edit mode by pressing Esc.
Let us have a look at the dimmer preset. Notice that this got a gray "U". Which tells us that it is a Universal preset. Press Edit and click the preset.
Notice that it has only stored values for the first X4 and the value is marked as global. So it looks a lot like a global preset. But it is not global - it is universal. This is important when we call the preset.
Clear the programmer and exit the edit mode.
Now click the dimmer preset once.
This selects all the fixtures. That is because all the fixtures we have patched have a dimmer attribute and the preset can be applied to all dimmer attributes.
Clicking it again. Now all the fixtures are at full. Clear the programmer.
Why did the presets got stored with these different preset modes? It is because we did not change the default store settings. These say that the preset should be stored using the "Auto" option for the preset mode. Auto means that the preset pools mode is used.
Each preset pools title field also has one of the mode letters showing the mode for the entire pool. This can be changed by clicking the MA logo in the title field for the pool. This opens the pool settings.
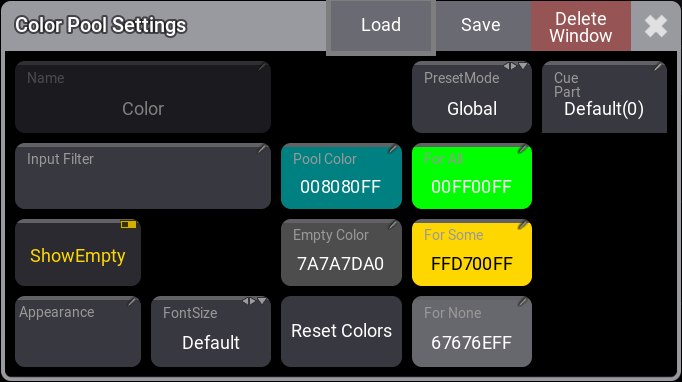
I am not going to explain all the different settings. But there is the PresetMode for the entire pool. Clicking the button toggles between the three different modes. Please leave it in the mode it was.
Close the settings pop-up by clicking the 'X' in the upper right corner of the pop-up.
Let us move on.
Create an All preset pool. There are five different All preset pools. They do the same and it does not matter which one you choose to create. There are several so you can organize the pools and store different content in different pools - should you choose to.
If we want to recreate the first look with the X4 bar, then we need to select the X4 fixtures and then apply the three presets. You could do this by clicking group 6, but we can also click the position preset first to select the X4 bars.
After you have made the selection, then you can click the three presets.
Now we have the references to the three presets in our programmer.
We want to store this in an all preset, but we would like to keep the references to presets - just like if we stored a cue.
To do this we need to make a small change to the store settings.
Press and hold the Store key until the store options open.
The store options are separated into different areas. One of them is about the preset. In this area, there is a button called "Embedded". Click it to activate it. Now click the first preset in the all preset pool.
We are going to do this again - almost and create a second All preset and then we can have a look at what happened.
Clear the programmer. Click the position preset twice and then the dimmer and color preset.
Now store the second All preset without changing the store settings.
The result should look something like this:
The first all preset got an icon with a vertical line and arrow pointing right. This means that the preset is referencing other objects. The three presets we started with have a different icon with a horizontal line and an arrow pointing down. This means that the preset is used as a reference somewhere else.
Clearing the programmer and clicking any of the two All presets gives the same output. But try to use the edit method and have a look at the two preset in the fixture sheet.
The first All preset has the references as values and the second preset has the attribute values. This means that the default when storing presets is that we extract the values from any selected preset and store these values into the new preset.
To explore this further, clear your programmer.
Select group 6 and click the color preset.
Change the color to something different.
Now the "Update" key is flashing. This means that we can update something. Click the "Update" button.
This opens the update menu. The left side shows the color preset. Click the preset.
Now we have updated the color preset and it could look something like this:
Notice that nothing in the two All preset has actually changed! But the output is obviously different. The first All preset is still just referencing the first color preset - and this color preset has changed. The second All preset has attribute values stored and these values have not changed.
Alright, this was all the preset knowledge we need at the moment.
Please create 5 different color presets including all the fixtures that can change color.
Also, create 5 position presets, some gobo presets and some All presets. Please create the position preset for all the fixtures that can move.
It is always a good idea to have presets with the default values (Open white, No Gobo, Home position, etc).
When you have created the desired preset, please clear your programmer and do not forget to save the show once in a while.
Recap
In this chapter, we had a look at different presets and we made some preset for use in later chapters.
We touched different areas including the Update Menu and the Store Settings.
The manual has an entire section with details about presets.
In the Next Chapter, we are going to look at Phasers.