

- grandMA3 User Manual
- grandMA3 Quick Start Guide
- 00 Welcome
- 01 New Show and Setup
- 02 First Patch
- 03 First View Setup
- 04 Control Simple Fixtures
- 05 3D Fixture Setup
- 06 Groups, Appearances, and Scribbles
- 07 Macros
- 08 Store Cues and Use Executors
- 09 Add Moving Lights
- 10 Presets
- 11 Phasers
- 12 Sequence with multiple cues
- 13 Network and How to Output DMX
- grandMA3 Quick Manual consoles
- grandMA3 Quick Manual processing units
- grandMA3 Quick Manual Nodes
- grandMA3 Quick Manual Nodes DIN-Rail
- grandMA3 Quick Manual onPC command wing XT
- grandMA3 Quick Manual onPC command wing
- grandMA3 Quick Manual onPC fader wing
- grandMA3 Quick Manual onPC rack-unit
- grandMA3 Quick Manual viz-key
- grandMA3 Quick Manual I/O Nodes
- Release Notes
New help version
The help version you selected belongs to an older software version. You may want to view the latest help version.
Phasers
Often we have a desire to have our fixtures move around and possibly change colors or any combination of values changing in a dynamic way. This is often achieved using some kind of effect engine.
The effect engine in grandMA3 is called Phaser.
Phasers can be complex and we are not going into a lot of details, but we are going to look at the basics of Phasers.
A phaser uses Steps. The cues and presets we have stored until now have one step. If we do not specify anything else we store the values in step 1. A step contains a set of values.
Normally you would need two or more steps to have a Phaser. Each step contains a set of values. We sometimes refer to objects with a Phaser as a "multi-step" object. Phasers can be stored just like cues and presets.
The Phaser plays each step one at a time and loops through the steps during playback.
A Speed value defines how fast this loop runs. If all the fixtures are going the same steps at the same time, then we say that they have the same Phase value. But often we want to spread the fixtures out so they are in different places in the loop. This is done by giving the fixtures different phase values. Do not confuse the Phase value with the concept of Phasers.
Let us create a simple dimmer chaser that fades between two values with the Even Blinders to try some of these concepts.
Clear the programmer.
Select Group 4.
Give them a value of 0%.
Notice this small area on the encoder toolbar:

It is called the "Step Bar". It currently says "1/1". This shows us that we are working with values for step number 1 out of 1 step. Everything we have been doing so far in all the previous chapters has been happening in step one.
We need to add another step with a new value.
Click the right-pointing arrow in the step bar.
Now it should say "2/1".
Since we have not given the fixtures any value yet, we still only have 1 step but we have selected step 2 and are ready to add some values.
Give the fixtures 100%.
Now the fixtures are looping between the two steps in the output.
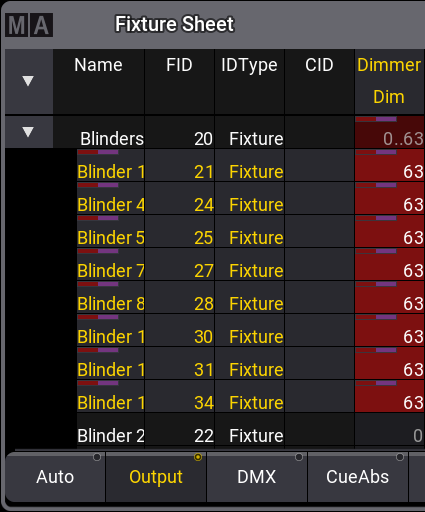
Have a look at the fixture sheet. You can probably not see the value changes, this is because we are looking at a layer called "Absolute". This shows you the values you have requested in the programmer. But the output can be affected by different elements, for instance, a phaser. We can change the fixture sheet so we are looking at the actual output.
Open the settings for the Fixture sheet by clicking the MA logo in the upper right corner of the sheet window.
Toggle the setting called "Layer Toolbar" On (yellow text).
Close the settings by clicking the X in the upper right corner of the settings pop-up.
Now there is a layer toolbar at the bottom of the fixture sheet. This can be used to select different layers. We are not going into details about the layer toolbar. But if you click Output, then you can see what the fixtures are actually outputting.
There is a version of the Layer Toolbar included in the Encoder Toolbar:

The buttons in this toolbar with a purple bar at the top are Phaser layers. The same colored marker is also showing in the fixture sheet on the values that are affected by a Phaser.
Click Speed in the layer toolbar in the encoder toolbar. Now the first encoder controls the speed. The default readout for the speed is BPM - Beats Per Minute. This could also be called SPM - Steps Per Minute. Each beat is a single step. So if we had a Phaser with 60 steps running at 60 BPM then it would take one minute to run through all steps.
At the moment we can see in the fixture sheet that the blinders are all moving together. We can change this by giving them different values in the Phase layer.
Click Phase in the toolbar. Click or do a short press on the encoder to open the calculator.
In the "Specials" section click 0 thru 360.
Now the fixtures are spread out equally over the entire loop.
You can see this if you select the "Phase" layer in the fixture sheet.
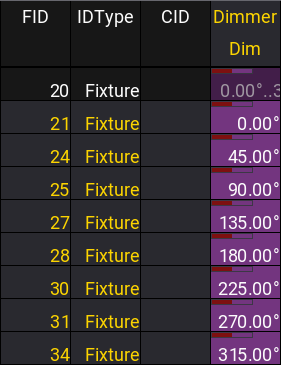
Notice that the values assigned are not actually from 0 to 360. This is because the phase value is defined as a degree on a circle.
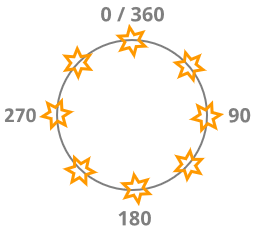
Imagine all the steps looping as a circle. On a circle, the value of 0 degrees and 360 degrees are actually the same location. So if the console actually did 0 to 360, then the first and last fixture would be the same.
The phase values we have now look like this on a circle:
Store this in a new All Preset.
Click the preset to have the reference to it active in your programmer.
Press/Click Store and then click executor 103.
Now we get a new pop-up:
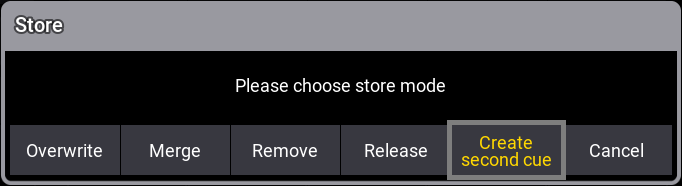
We want to store the Phaser as cue number 2. We could have been precise with our store command, but then you would not have seen this pop-up.
It asks this question because we can store the values in the existing cue or we can create a second cue. The default store settings have an option called "If not empty", the default action when storing is set to "Ask".
Click Create second cue.
Now you can use the "Go+" button on executor 203 to toggle between the two cues. We are going to make a third cue with a similar phaser but where the snap from one step to the other.
Turn off the executor if it is active (Off and then executor 103) and clear the programmer.
We can reuse many of the values we stored in the All Preset. Click it twice to call it into the programmer.
We did not do anything to make the blinders fade from one step to the other. The default values make this happen.
There are two Phaser layers called Accel (accelerate) and Decel (deceleration). These control if there is a curve to the fade to and from a step.
The Transition layer defines how much of the time available between different steps should be used on the transition.
These three sets of values define how the value gets from one step to the next.
The default values give us a linear fade using all of the available time.
If we want the values to jump or snap from one step to the other then we need to turn down the Transition value. The closer to 0% the more it snaps.
The values can be different for each step to make very creative Phasers. For our chaser, we need to make sure we select all steps. This is done by clicking the button to the right in the Step Bar. When both steps are selected then the Step Bar should say "1*/2".
Click Transition in the Layer Toolbar in the Encoder Toolbar and turn the left encoder down until the value is 0%.
Store this as a new All Preset. You should label the two preset with useful names. I have called them "Even Blind Soft" and "Even Blind Snap".
Click the second preset so it is active in your programmer and press/click Store and then executor 103.
This time it does not ask us what we want to do. When there are at least two cues in a sequence and we store to the sequence, then the system assumes we want to store a new cue using the next whole number as the cue number. If we want something else then we need to specify it.
Great, clear the programmer and try out the three different cues on the executor.
There is one thing we should adjust for this to be better. Right now the sequence reset when we turn the master all the way down. It would maybe be better if it stayed at the last cue we selected. And maybe we would like to be able to control the speed dynamically. Let us make these two changes.
We need to open the Assign Menu. Click Assign and then one of the executor buttons.
In the menu, we need to be on the Handle page. Click Handle on the left side if it is not already active.
We want to expand the executor even further up. Click the button that says 300.
Now the key assignment has changed (because we changed the size). Again we want the lower executor button to be "Flash". We want the key for the 300 button to be "Speed1" and we want the Encoder for the 300 knob to be "Speed". The handle assignment should look like this:
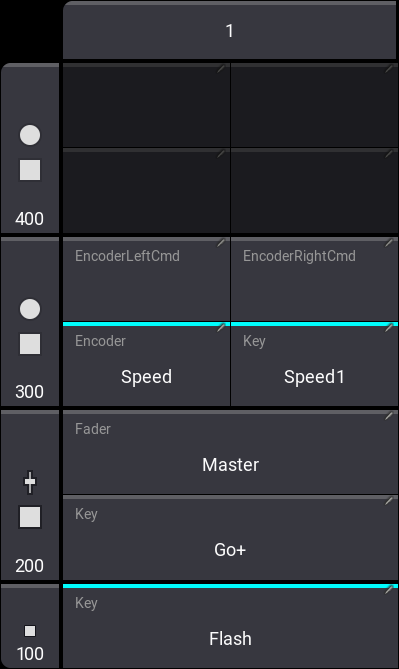
Now we need to adjust the settings of the executor. Click Edit Setting on the left side. This opens the settings for the sequence. There are many different settings. The one we want to change is called "Restart Mode". It is near the middle of the menu. This setting has three options. Click the button until it says "Current Cue". This means that the sequence will restart on the cue where we left it.
Finally, close the Assign Menu.
Play around with the new speed knob and the fader in combination with the three cues. The button below the knob resets the speed back to 60 BPM. The knobs on the onPC can be turned like the encoders.
Now do everything we just did again but this time for the Odd Blinders and set up their executor the same way. Store the Phasers in new All Presets. When you have done that, continue to the next chapter.
Recap
In this chapter, we had a look at simple dimmer Phasers. There is an entire section in the manual called Phaser - this gives you all the details about Phaser creation and there are some examples of more advanced Phasers. You can use this show to try the examples.
We also added a layer toolbar to the fixture sheet. This has a little bit more description - Fixture sheet layer toolbar.
We also briefly touched the Store Settings. We are not going to talk more about them in this quick start guide. You can learn more about the Store Setting in the Store Settings and Store Preferences topic.
In the next chapter, we are going to create a new sequence.