

- grandMA3 User Manual
- grandMA3 Quick Start Guide
- 00 Welcome
- 01 New Show and Setup
- 02 First Patch
- 03 First View Setup
- 04 Control Simple Fixtures
- 05 3D Fixture Setup
- 06 Groups
- 07 Appearance
- 08 Scribbles
- 09 Macros
- 10 Store Cues and Use Executors
- 11 Add Moving Lights
- 12 Control Moving Lights
- 13 Presets
- 14 Phasers
- 15 Sequence with multiple cues
- 16 Network and How to Output DMX
- 17 Recipes
- grandMA3 Quick Manual consoles
- grandMA3 Quick Manual processing units
- grandMA3 Quick Manual Nodes
- grandMA3 Quick Manual Nodes DIN-Rail
- grandMA3 Quick Manual onPC command wing XT
- grandMA3 Quick Manual onPC command wing
- grandMA3 Quick Manual onPC fader wing
- grandMA3 Quick Manual onPC rack-unit
- grandMA3 Quick Manual viz-key
- grandMA3 Quick Manual I/O Nodes
- Release Notes
First Patch with Simple Fixtures
The new show file we created is empty!
We need to add some devices to our Patch to be able to do something meaningful with the grandMA3.
We are going to create a mock-up festival rig. It will not be the perfect rig, but it will give us a very diverse and flexible rig that we can use to try some of all the features in the software.
The setup will have 7 "pods" each with the same fixtures. But before we add a lot of complex fixtures, we will start with the conventional fixtures in our setup.
The conventional fixtures will be front light, some sidelight, and blinders. We will start with these simple fixtures to get a basic understanding of the workspace and how to structure the patch and show file.
Everything about fixture setup is done in the patch. Some tools might give us easier access to fixture properties (we will get back to these in future chapters), but every fixture property ultimately lives in the patch.
Fixture properties include the fixture type and mode, the DMX patch address, the fixture position in a 3D space, etc.
There are different tools available to us for organizing the fixture setup. I am going to explain some of them before we start adding fixtures.
Grouping Fixtures
A fixture is typically represented as a single row in a Fixture Sheet. This makes it possible to see all the different values a fixture might have. If we have a lot of fixtures, then it might be a very long list of fixtures.
Fixtures can be grouped inside a special grouping fixture. This is especially nice for fixtures that often do the same thing. The grouping fixture is a virtual fixture that can have an ID number. Using this ID to select fixtures actually applies the values to the fixtures inside. The grouping fixture itself does not contain any values. Fixtures inside a grouping fixture must have their own ID and can be accessed individually using their ID number.
Having fixtures inside grouping fixtures creates a hierarchy. There are many hierarchies in grandMA3, and they can have many layers. Two terms often used with hierarchies are Parent and Child. When talking about grouping fixtures, the actual fixtures are the children inside the parent (the grouping fixture). The child fixtures can be selected using their own unique ID as mentioned above, but they can also be selected using the parent ID and a Child index number. We'll explore this more in chapter 4.
Sub-fixtures
Some fixtures have sub-fixtures. This is often the case when a fixture has multiple elements that do the same. For instance, an LED fixture with multiple LED cells which can be controlled individually. There would be a parent fixture with all the shared functions, for instance, pan and tilt. And then, there would be a child or sub-fixture for each LED element. These sub-fixtures are addressed as a sub-ID from the parent fixture ID. The parent and child IDs are separated by a dot (.).
For example, a Clay Paky A.leda B-EYE K10 can have the LEDs separated into 19 different individually controlled LEDs (Standard RGB mode). If the fixture has ID 17, selecting 17 would only select the main parent fixture. If the main and all the sub-fixtures need to be selected, then you need to select "17." - that is the ID followed by a dot. Selecting fixture 17.1 would only select the first LED element - the first sub-fixture.
IDTypes
The fixtures can be organized in different IDTypes. There are eight different types that we can use. Two of those are Fixture and Channel. The other six can be renamed to match our needs. The default names are Houselights, NonDim, Media, Fog, Effect, and Pyro.
Each IDType has its own number range from 1 and upwards.
A fixture can have two different ID numbers. The first one is always the Fixture IDType, which is called FID. The second can be one of the other IDTypes and is called CID. A fixture needs to have at least one ID for us to be able to select and ultimately control the fixture.
Enter the Patch
Here is the goal for this chapter:
- Add 14 standard dimmer channels that we can control.
- Add another 14 dimmer channels that are the audience blinders.
- Organize the blinders in a Grouping fixture.
We need to get to the patch. Press Menu (or the Gear Icon ![]() in the onPC) and then click Patch.
in the onPC) and then click Patch.
Insert New Fixtures Wizard
The first time we open the patch, it is empty, and we are presented with the Insert New Fixture wizard that helps us provide the needed information to add the fixtures.
![]()
The cursor is ready in the Filter input field and can be used to filter the list presented to us.
The list is the library. The default is the MA and user fixtures on the local hard drive (Internal). Other libraries can be chosen, but this is fine for the first fixtures.
We need dimmers, so type dim in the filter.
Now the list is limited to only showing fixtures that have dim somewhere in the manufacturer name, the fixture name, or the fixture mode.
It might look like this:
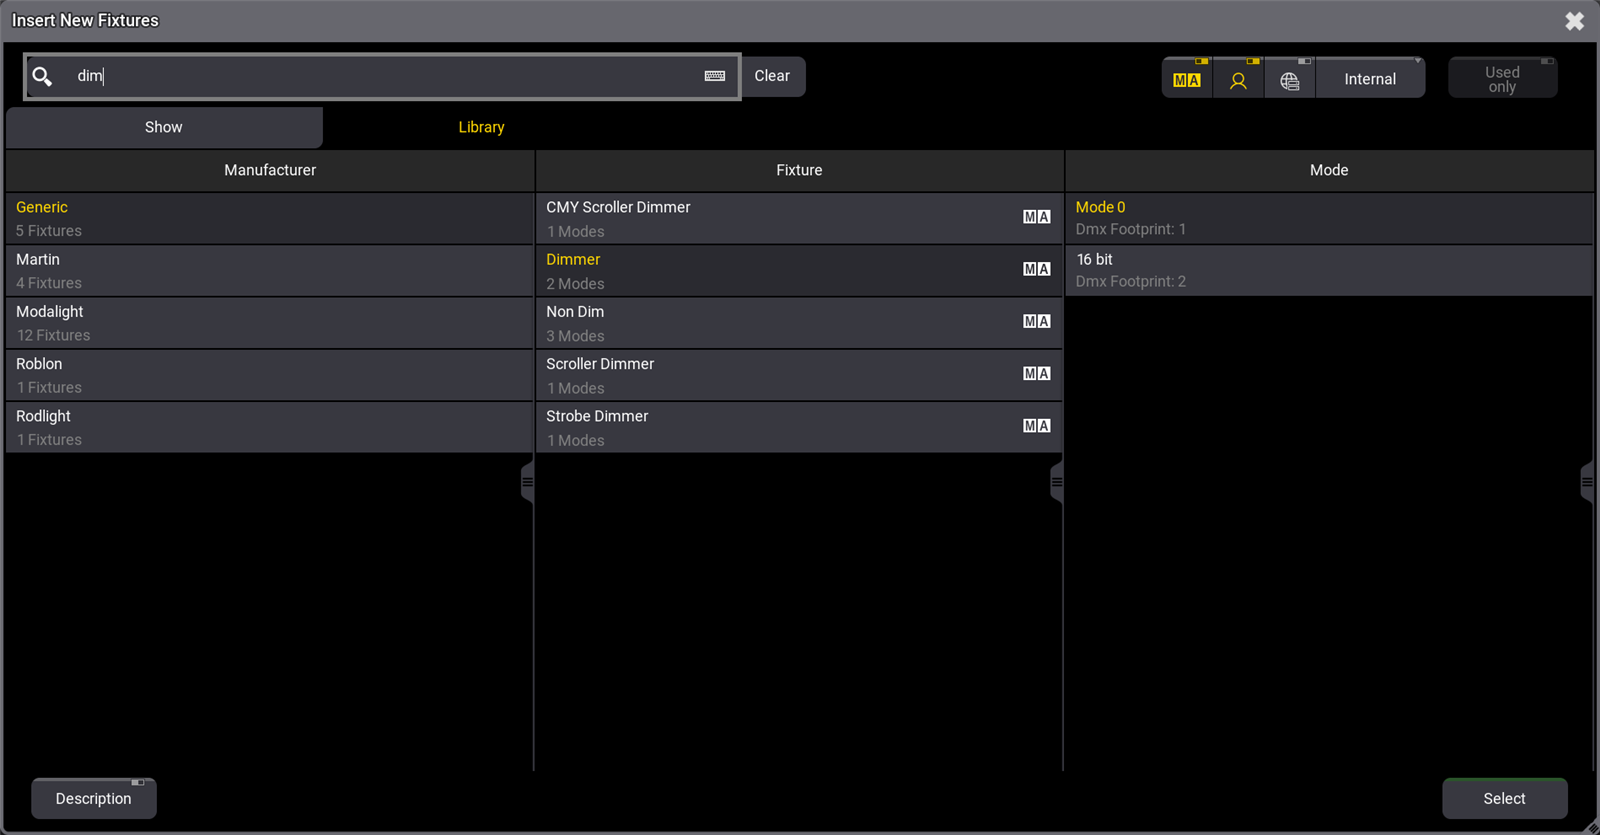
The library has three columns. The left column shows the different manufacturers. The center column is the fixtures models from the selected manufacturer. The right column lists the different modes available for the selected fixture model.
We need the Generic Dimmer in "Mode 0". Make sure the correct elements are selected (darker gray background and yellow text as in the image above) and click Select in the lower right corner.
Now you can give the fixtures a name. If the name ends with space and number, the fixtures are automatically numbered starting from the number you type.
Just leave it as the default "Dim 1" and click Please.
Next is the quantity, meaning how many fixtures we want to add.
Type 28 and click Create ! in the lower right corner (not the 'Please' in the number input).
Now we have 28 dimmers named "Dim" followed by a number. They are patched to DMX address 1 in DMX universe 1 and upwards.
They have an FID from 1 and up to 28.
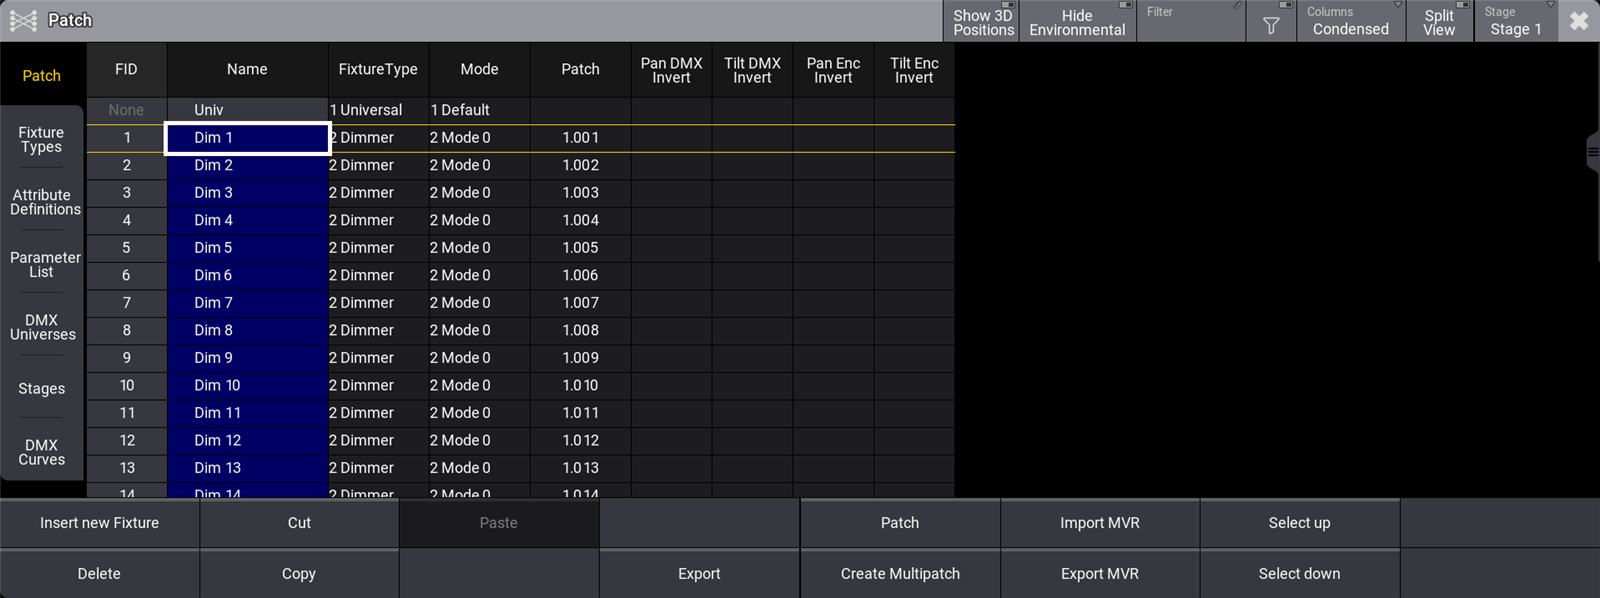
This solves some of our goals for this chapter. Next, we need to add the grouping fixture.
Scroll to the end of the list and select the cell called "New Fixture" and click Insert new Fixture in the menu. Now we are back at the Insert New Fixture wizard.
Now we look at the tab called "Show," and there is only the generic dimmer, which is nice if we want to add more dimmers, but we need to add a new fixture type to our show.
The idea behind this is that there are different libraries of fixture types, and we import a copy of the fixture type from a library into our show.
We need the grouping fixture, and this is in the Library, so click the Library tab below the filter input.
Now type group in the filter input and select the Generic Grouping fixture in "Default" mode, and click Select.
Name the fixture Blinders. We only need 1, but we want it to have FID 20 - type 20 in the FID input. This gives us a red background in the FID input to show us that there is a problem:
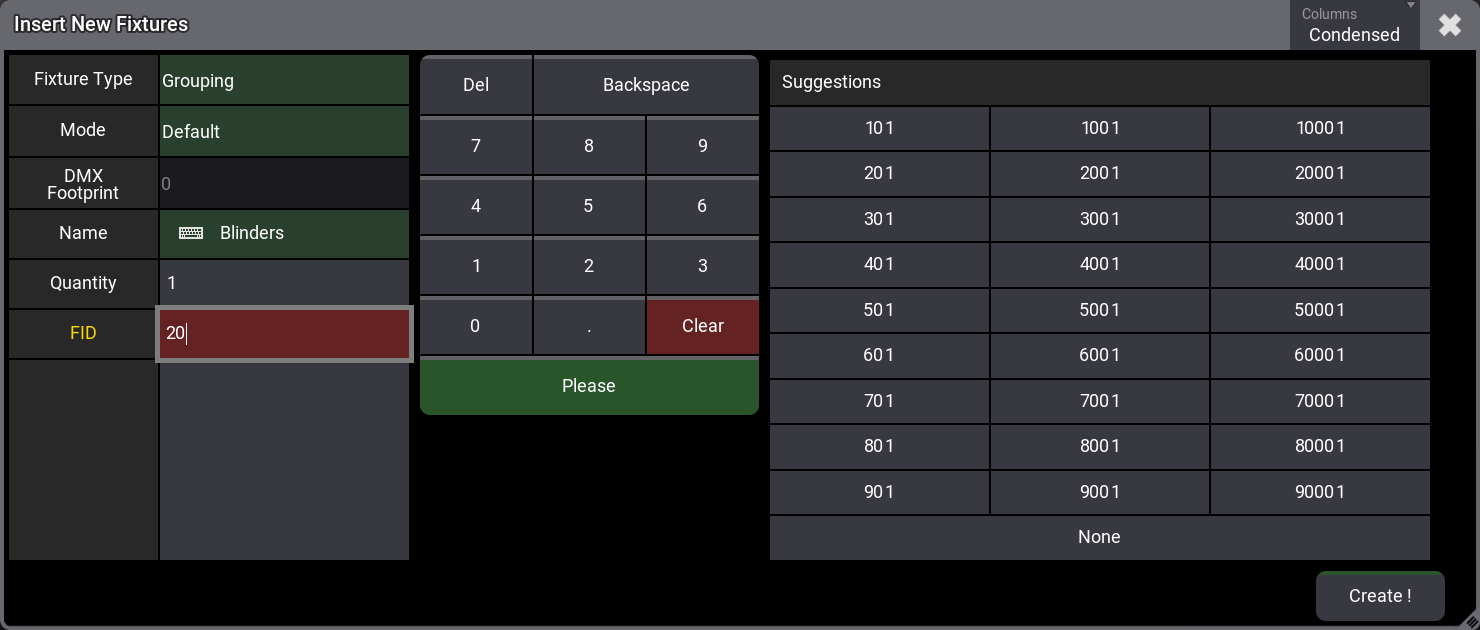
Ignore the problem for now and click Create !.
The problem was that we already had a fixture with FID 20 and since we can only have unique FIDs the previous fixture 20 now has "None" in the FID column.
We need to fix this and will renumber all the blinder fixtures. The blinders are the last 14 dimmer fixtures on the list. We need to select the FID for these fixtures.
Left-click and hold the FID 15 and drag down to FID 28 and release. it should look like this:
Now we need to edit this. Easy to do with a mouse; just right-click in the blue area. On the console, you can press Edit and then tap in the blue area.
A number pop-up appears where we need to click 2 1 and confirm with Please. Now the fixtures are renumbered. We also need to move them to be children of the grouping fixture.
Keeping the selection simply click Cut, to cut them from the list into the clipboard. The result is that they are now marked with a red background in the fixture list.
We need to paste them to the new location.
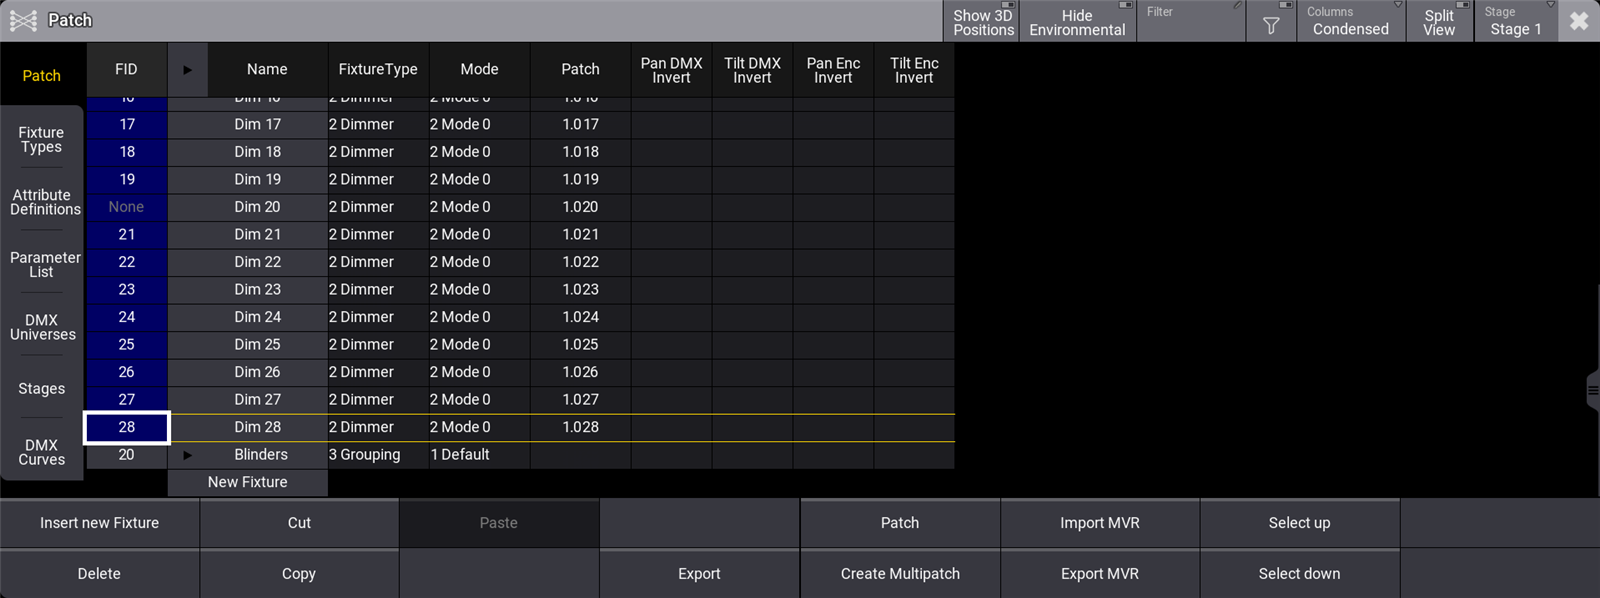
Click the triangle arrow next to the Blinders fixture so it unfolds and select New Fixture inside the "Blinders". Like this:
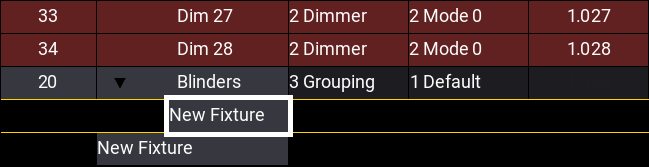
It is important that you do not select the lowest New Fixture as this is outside the "Blinders".
Now click Paste. The fixtures are now children of the blinder grouping fixture.
These were all the goals for the chapter, but there is one more thing we should do now that we are here.
The fixtures have a shape in a 3D virtual space. This shape is defined by the fixture type we select. Let us change the fixture for the blinders and find another fixture.
Select the 14 fixtures again, but this time in the FixtureType column and edit the value with a right-click.
Now we are back to the fixture finding pop-up. Here we need to select the Library tab and type blinder in the filter.
Select "Briteq" manufacture and the "COB Blinder 2x100W" and select the "1 channel" mode. Confirm the choice by clicking Select.
Finally, let us change the name of the blinders.
Select all the blinders in the name column and edit the name. Type Blinder 1 and confirm with Enter/Please.
The patch should look something like this:
| FID | Name | FixtureType | Mode | Patch |
|---|---|---|---|---|
| 1 | Dim 1 | Dimmer | Mode 0 | 1.001 |
| 2 | Dim 2 | Dimmer | Mode 0 | 1.002 |
| 3 | Dim 3 | Dimmer | Mode 0 | 1.003 |
| 4 | Dim 4 | Dimmer | Mode 0 | 1.004 |
| 5 | Dim 5 | Dimmer | Mode 0 | 1.005 |
| 6 | Dim 6 | Dimmer | Mode 0 | 1.006 |
| 7 | Dim 7 | Dimmer | Mode 0 | 1.007 |
| 8 | Dim 8 | Dimmer | Mode 0 | 1.008 |
| 9 | Dim 9 | Dimmer | Mode 0 | 1.009 |
| 10 | Dim 10 | Dimmer | Mode 0 | 1.010 |
| 11 | Dim 11 | Dimmer | Mode 0 | 1.011 |
| 12 | Dim 12 | Dimmer | Mode 0 | 1.012 |
| 13 | Dim 13 | Dimmer | Mode 0 | 1.013 |
| 14 | Dim 14 | Dimmer | Mode 0 | 1.014 |
| 20 | Blinders | Grouping | Default | |
| 21 | Blinder 1 | COB - Blinder 2x100w | 1 Channel | 1.015 |
| 22 | Blinder 2 | COB - Blinder 2x100w | 1 Channel | 1.016 |
| 23 | Blinder 3 | COB - Blinder 2x100w | 1 Channel | 1.017 |
| 24 | Blinder 4 | COB - Blinder 2x100w | 1 Channel | 1.018 |
| 25 | Blinder 5 | COB - Blinder 2x100w | 1 Channel | 1.019 |
| 26 | Blinder 6 | COB - Blinder 2x100w | 1 Channel | 1.020 |
| 27 | Blinder 7 | COB - Blinder 2x100w | 1 Channel | 1.021 |
| 28 | Blinder 8 | COB - Blinder 2x100w | 1 Channel | 1.022 |
| 29 | Blinder 9 | COB - Blinder 2x100w | 1 Channel | 1.023 |
| 30 | Blinder 10 | COB - Blinder 2x100w | 1 Channel | 1.024 |
| 31 | Blinder 11 | COB - Blinder 2x100w | 1 Channel | 1.025 |
| 32 | Blinder 12 | COB - Blinder 2x100w | 1 Channel | 1.026 |
| 33 | Blinder 13 | COB - Blinder 2x100w | 1 Channel | 1.027 |
| 34 | Blinder 14 | COB - Blinder 2x100w | 1 Channel | 1.028 |
There is an "Univ" fixture in there automatically - this is the universal fixture that the system uses. Just ignore it for now.
Exit the patch by clicking the ![]() in the upper right corner. Now you are asked if you want to keep the changes. Confirm this by clicking Save and Exit.
in the upper right corner. Now you are asked if you want to keep the changes. Confirm this by clicking Save and Exit.
Finally, save the show. Let us do this by using the command line.
Type the following keyword shortcut:
And execute the command with 'Enter'/Please.
Now the show is saved with the same name. We used the short version of the SaveShow keyword.
Recap
In this chapter, we have added simple dimmer fixtures to the patch, and we can now start learning how to control the dimmers.
You could look at some places in the manual to learn details about the patch.
The topic called Add Fixtures to the Show covers what we did and has detailed information. We will return to the patch in a later chapter and look closely at some of the functions there.
If you want to learn about fixture types, there is a whole section called Fixture Types.
We used one keyword in the command line - follow this link to learn a little more about it: SaveShow Keyword.
I suggest simply continuing to the next chapter in this guide.