

- grandMA3 User Manual
- grandMA3 Quick Start Guide
- 00 Welcome
- 01 New Show and Setup
- 02 First Patch
- 03 First View Setup
- 04 Control Simple Fixtures
- 05 3D Fixture Setup
- 06 Groups
- 07 Appearance
- 08 Scribbles
- 09 Macros
- 10 Store Cues and Use Executors
- 11 Add Moving Lights
- 12 Control Moving Lights
- 13 Presets
- 14 Phasers
- 15 Sequence with multiple cues
- 16 Network and How to Output DMX
- grandMA3 Quick Manual consoles
- grandMA3 Quick Manual processing units
- grandMA3 Quick Manual Nodes
- grandMA3 Quick Manual Nodes DIN-Rail
- grandMA3 Quick Manual onPC command wing XT
- grandMA3 Quick Manual onPC command wing
- grandMA3 Quick Manual onPC fader wing
- grandMA3 Quick Manual onPC rack-unit
- grandMA3 Quick Manual viz-key
- grandMA3 Quick Manual I/O Nodes
- Release Notes
New help version
The help version you selected belongs to an older software version. You may want to view the latest help version.
Control Moving Lights
Table of contents of this topic
In the previous chapter, we added some moving lights. In this chapter, we will look at how to control these fixtures. We are not adding any new content or fixtures in this chapter, so if you are comfortable controlling the fixtures, then feel free to skip this chapter. I do recommend reading it as you might learn something new.
We are going to need another version of the fixture sheet.
The first we made only shows the intensity attributes in the "Channel Sheet" mode.
We need a new one where we can see all the other attributes.
Create a new fixture sheet.
Let us adjust some of the sheet settings. Tap the MA icon in the upper left corner of the sheet.
Ensure both 'Fixture Sort' and 'Feature Sort' are On and that the 'Sheet Mode' is set to Fixture.
That is it for now. Please close the settings.
Store this as a new view.
Controlling Moving Lights
In the previous chapters, we looked at controlling the dimmer attribute. But now we have many more attributes.
The key to controlling these attributes is the Feature Group Control Bar.

With this, you can control what feature group you are controlling with the encoders.
All fixture attributes are separated into different sections. These are called feature groups.
The bar will display the feature groups you have access to.
If you select fixture 101 (or group 6), the bar above each button might change (from gray to red). This indicates the feature groups you can use for the selected fixture. If you clear your programmer and try to select fixture 1, then you can see that it is only the 'Dimmer' button that got a red bar.
Selecting a feature group also selects the feature, and the encoders give access to the first attributes in the feature.
Fixtures are structured in a hierarchy. The attributes are organized inside features, and features are organized inside feature groups.
The image below shows the dimmer feature group selected. Below the feature group is a button showing the feature (the button says "Dimmer 1 of 1"). Below the feature, the first encoder controls the first attribute (Dim) in the dimmer feature.
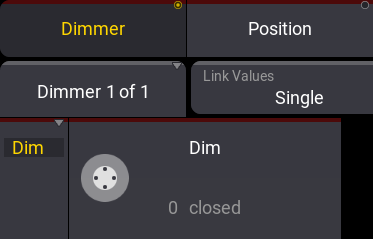
There can be several encoder pages for a feature. That is why the feature button says "1 of 1"; it is page one of one page. We need a second page if a feature has more attributes than we have encoders.
To get a better feeling for controlling fixtures, we should try the different elements of the MegaPointe. Clear your programmer and select group 7.
Dimmer
You can assign a dimmer value using the methods you learned in the previous chapters, or you can select the Dimmer feature group by touching the bar and turn the left encoder to turn up the lights. Please turn the fixture at full.
Position
Select Position by tapping it in the bar. Notice how your encoder changes function according to what feature group you have selected. With the "Position", your encoders look like this:

Turning the encoders changes the values. Turning them with the encoder pressed changes the value faster.
The outer ring on the dual encoders cannot be pressed. Pressing the small key next to the outer ring equals pressing the ring.
If you want to make smaller movements with a turn (increasing the resolution), you can press and hold the MA key and select a different resolution. On the grandMA3 onPC, you need to open the command section (F3), click and hold the MA button, slide the mouse out of the button, and then release the mouse button to latch the MA button.
This changes the small area next to the encoder readout.

Gobo
Gobos can be added if the fixtures contain the attributes.
The manufacturers design the fixture to control the gobo in different ways. Some manufacturers have a lot of functions on the same DMX channels, and others spread the functions out on different DMX channels. The MegaPointe has two gobo wheels with different gobos. The first wheel is physically a single metal plate with different cutouts. We can choose what cutout to have in from of the light. The wheel can have different operational modes. For instance, spin continually.
The second gobo wheel is a wheel with replaceable gobos that can be indexed and rotated.
Let us give the second wheel a try.
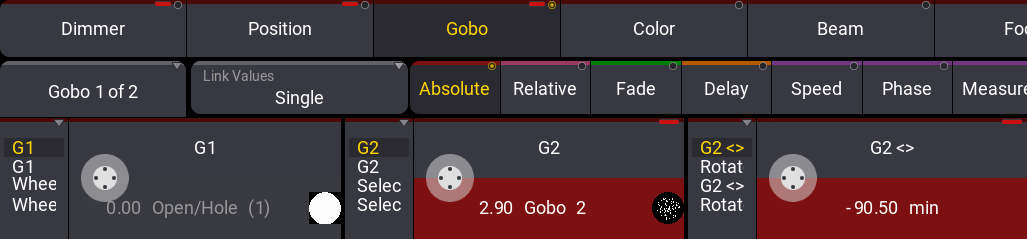
Tap Gobo in the feature group control bar.
Now we have the gobo controls on the encoders. The first encoder is "G1" - this is gobo wheel one.
The second encoder selects a gobo on the second gobo wheel. Gobos are often defined in the fixture type definition, and the gobos in the different "wheel slots" are often defined. These definitions include small images that match the actual gobos in the fixture.
Try to press the second encoder shortly or click on the value area of the encoder label. This opens the calculator that we talked about in chapter 4.
Around the calculator's middle is the 'Channel Sets' button. Please click this.
Now the right side displays the defined gobos on the second wheel.
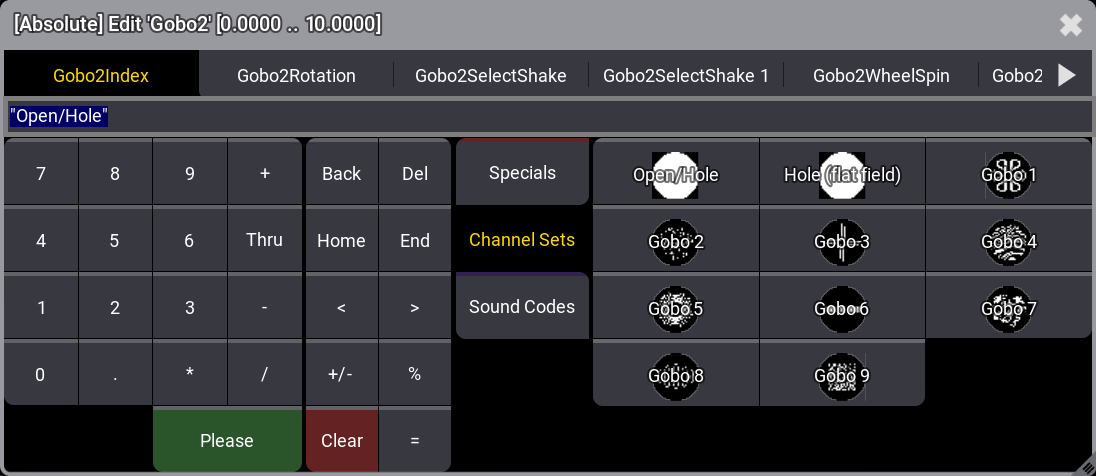
When an encoder controls different functions, they can be separated into different groups of values. At the top of the calculator, there are several tabs. The second tab can select the same gobos but with a gobo rotation mode.
Select one of the gobos in the first (Index) mode.
The third encoder controls the rotation index of the selected gobo on gobo wheel 2. This encoder also has several different modes. They are Index (G2<>), continuous rotation (Rotate), Shake Index (G2<>), and Shake Rotation (Rotate). We can change the mode by clicking the area on the left of the encoder label. We also need to give it a value after the mode selection before the fixture does what we want.
Try the different rotation and index functions. Remember you can see the result in the 3D window - the shake function is not visualized.
A very good tool with fixtures that have defined Channel Sets like the gobos is the Smart View window. This can be created on an empty user-defined area. It can be found in the More tab in the Add Window pop-up.
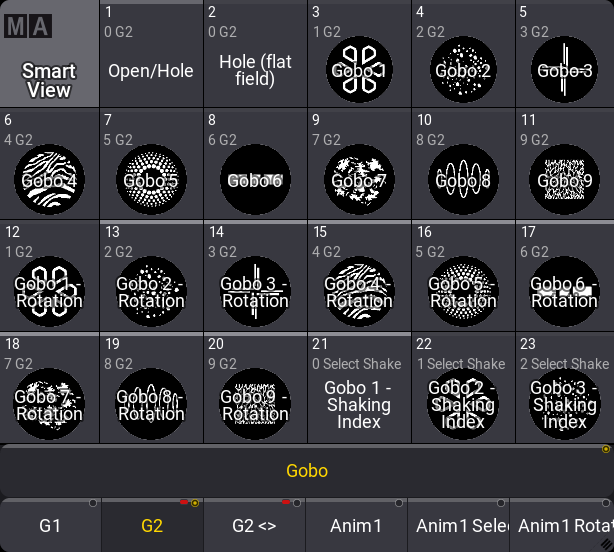
This gives access to the defined channel sets by a dynamic pool that changes content based on the selected feature ("Gobo" is the feature in the example above).
Notice that the gobos appear several times. Once for each mode.
Color
Let us have a look at the colors.
The three first encoders control red, green, and blue. This does not match the physical properties of what is inside the MegaPointe (it has a subtractive color system).
The grandMA3 system has a color engine that gives us the same unified control no matter what color system the fixtures use. This means we control the MegaPointe and the Auras using the same controls.
We could use the encoders to change the colors, but we have a better tool. It is called Color Picker, a window that can be created like any other window. It is found in the Common tab.
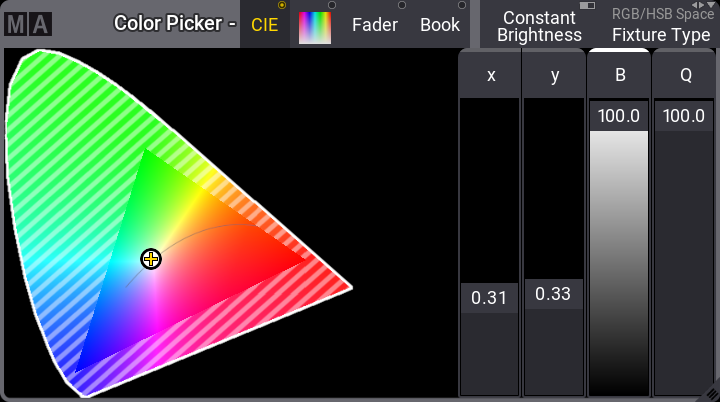
The color picker has four different modes. The first one we see is the CIE. The modes can be changed in the title bar.
CIE is a CIE 1931 chromaticity diagram. The crossed-out area is the area the selected fixture cannot output. The area changes if we had fixtures with more color options (for instance, fixtures with LED emitters of more than the standard red, green, and blue types) or if the fixtures are measured against their real emitters.
A color can be selected by clicking in the color area.
The next mode is called HSB and is represented by a colored square. This can also be clicked to select a color.
The Fader mode gives access to different faders that can be used to select the desired color.
Finally, the Book mode can select different defined filters sorted by manufacturers. The book can be searched by filter name or number. Selecting a filter gives a color that is as close as possible based on the known information about the fixture.
The color picker only affects the color mixing system in a fixture if it exists. This means it only changes the color wheels in fixtures if color wheels are the only option. We have patched some Sharpys, and they only have a color wheel. If we want to change colors in a Sharpy, it works much like the gobo control, and the best tool can be the Smart View window.
The color wheels (C1, C2, etc.) are maybe on a different feature page. So you might need to change the page by clicking the feature button to access these functions on the encoders.
Try the different color modes of the color picker and play around with the on-screen faders in the color picker. The "Q" fader is about color quality, and it becomes relevant in RGB+ LED fixtures, where different sets of LEDs have different ways to reach the same colors.
Beam
The beam feature group has controls for shutters, iris, prism, and other beam effects. The MegaPointe has some prisms, and the 3D can visualize these. On feature page 2, there is a "Prism1" where different prisms can be selected. The "Prism 1 Pos" attribute can be used to rotate the prism. This can be used to rotate or index the prisms. A rotating gobo and a rotating prism can give some very interesting looks. Try this while looking at the 3D.
Focus
The focus feature group has controls for the focus. But it also has the Zoom attribute.
Zoom is visualized in the 3D window. Focus is not visualized.
Control
The final feature group we have with the patched fixtures is the Control. This is where we find attributes used to reset and set different modes in the fixtures. These are often attributes that we do not store in cues. The exception is possibly a sequence that can be used to turn the lamp on and off in the fixtures.
Recap
In this chapter, we looked at different ways to control moving head fixtures.
There is an entire section in the manual about operating fixtures. It gives more details about the different elements we discussed in this chapter.
The next chapter is about Presets.