

- grandMA3 User Manual
- grandMA3 Quick Start Guide
- 00 Welcome
- 01 New Show and Setup
- 02 First Patch
- 03 First View Setup
- 04 Control Simple Fixtures
- 05 3D Fixture Setup
- 06 Groups
- 07 Appearance
- 08 Scribbles
- 09 Macros
- 10 Store Cues and Use Executors
- 11 Add Moving Lights
- 12 Control Moving Lights
- 13 Presets
- 14 Phasers
- 15 Sequence with multiple cues
- 16 Network and How to Output DMX
- 17 Recipes
- grandMA3 Quick Manual consoles
- grandMA3 Quick Manual processing units
- grandMA3 Quick Manual Nodes
- grandMA3 Quick Manual Nodes DIN-Rail
- grandMA3 Quick Manual onPC command wing XT
- grandMA3 Quick Manual onPC command wing
- grandMA3 Quick Manual onPC fader wing
- grandMA3 Quick Manual onPC rack-unit
- grandMA3 Quick Manual viz-key
- grandMA3 Quick Manual I/O Nodes
- Release Notes
Control Simple Fixtures
In this chapter, we will look at controlling the dimmers we patched in chapter 2.
The grandMA3 system uses a Programmer as a temporary memory to hold values until they are stored or released.
To do something with a fixture, we need to select it first. Click one of the fixtures in the Fixture Sheet.
Fixtures with a yellow ID text are selected fixtures.
Fixture 1 is selected in the image above.
Selected fixtures can get a dimmer value using a lot of different methods.
If you have grandMA3 hardware, for example, from the console range or a grandMA3 onPC command wing model, there is a level wheel on the right side. This can be scrolled up and down to adjust the dimmer value.
A value can also be typed using the numeric keys. Type this: At 5 0 Please.
Now the fixture's dimmer value is 50%.
Other physical keys can be used to set a value. For instance, 'Full'. This will take the dimmer value to 100%. Pressing 'At' twice takes the dimmer to a defined value called Normal. The default for this is also 100%, but it can be modified. Double pressing '.' (dot) takes the dimmer to Zero. Pressing the 'MA' key and the '.' (dot) simultaneously puts the Default keyword in the command line; this can be executed by 'Please'. The Default value is often 0% for dimmers.
Try these keys and see the result in the fixture sheet and the command line history.
Another control option is the encoders. There are five dual encoders on the control hardware.
The Encoder Bar we saw in the last chapter shows us what the encoders are controlling. It should look something like this:
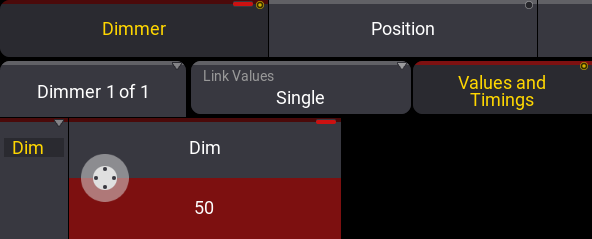
There are three rows in the encoder bar. In the top row, there are different Feature Groups - we will return to these when we have fixtures with more than dimmers. The important part is that Dimmer is selected (yellow text).
We will also return to the second row in later chapters. It has buttons that do different things and a row of layer selection buttons.
At the bottom is the encoder labels. We also call this Attribute Control because it can be used to control the different attributes in fixtures. Our current fixtures only have the dimmer attribute.
We can use this to control the dimmer value. If you have the physical hardware, you can turn the left-most encoder to change the value. The inner encoder changes the value in larger steps than the outer encoder.
If you use grandMA3 onPC, there are different ways to mimic the hardware.
You can place the mouse pointer in the white encoder icon and then scroll the mouse wheel (if you have one).
Another option is to use a kind of invisible on-screen encoder. You can also click and hold the encoder icon and, while keeping the mouse button pressed, move the pointer to another area of the screen. This is now the center of the encoder. While keep holding the mouse button, you can now draw circles around the center of your invisible encoder. The further away from the center you draw the circle, the finer resolution you have. Small circles close around the center make the value change faster (smaller resolution). You can release the mouse button when you are happy with the value.
Finally, you can click the red area or press the inner encoder shortly. This opens the Calculator pop-up.
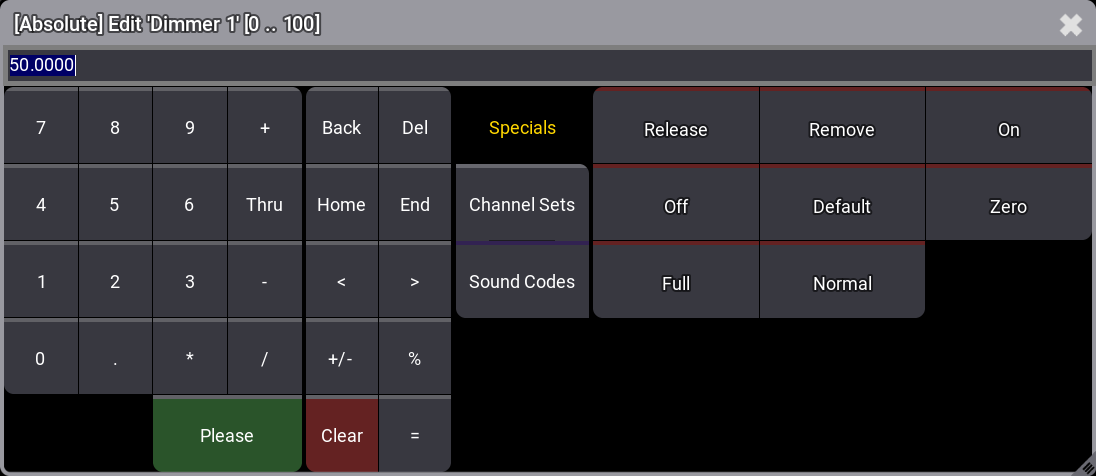
The calculator pop-up gives access to type a value on the on-screen keypad.
There is also access to "Specials" (button in the middle of the calculator), with buttons for the keys we learned about above - 'Full', 'Default', 'Normal', and 'Zero'.
Fixture types might also have Channel Sets. These are named values defined in the fixture type. Dimmers often have 'Open' and 'Closed' representing 0% and 100%.
This pop-up is named calculator because we can do some arithmetic with this. In my example, the dimmer is at 50%. If I click + 1 0 Please, I add 10 to the current value. We can also subtract, divide, and multiply.
If we have selected more than one fixture, we can even type a value range using 'Thru'. Clicking 'Please' closes the pop-up. You can also close it without making any changes by clicking the 'X' in the upper right corner of the pop-up.
Try to select multiple fixtures either by clicking and dragging in the fixture sheet or by typing. For instance, 1 Thru 1 0 Please.
Now open the calculator and click 1 0 Thru 1 0 0 Please.
The result should be a nice range of values from 10% to 100% across the selected fixtures.
This is also where the fixture selection order matters. The value is spread out across the fixtures in the selection order. So if we selected the same fixtures in a different order - for instance, 10 thru 1 - and then applied the same value range, then the result would be reversed.
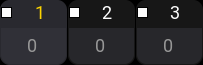
The programmer has three levels of information. It is the selected fixtures, active values, and inactive values. We can remove each level by shortly pressing 'Clear'. A long press clears all three levels at once, and all values in our programmer are gone.
If we, on the other hand, just press 'Clear' once, then we release the selection of fixtures. This means that we do not have any selected fixtures, and trying to give a value does not change anything.
If we do not have a fixture selection and we press 'Clear', then we make active values inactive. This means the value is still sent to the output but is typically not stored if we try to.
If we press 'Clear' without a fixture selection and with no active values, then the inactive values are cleared from the programmer.
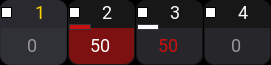
The image above shows the programmer levels. Fixture 1 is selected. Fixture 2 has active values. Fixture 3 has inactive values. Fixture 4 does not have anything in the programmer.
A final programmer tool I will introduce you to is the At Overlay. This is very useful, especially when you are using the grandMA3 onPC.

It can be opened by clicking the At in the Control Bar or pressing F1 on a keyboard. It can also be opened using a command: Menu "AtOverlay"
The overlay has buttons with access to many useful commands, including Clear, Zero, Full, and Normal.
And remember that often-used keys can be added to the Quickey pool. I have added the 'Clear' key to my pool.
Selecting Fixtures
We discussed selecting fixtures in the fixture sheet, but they can also be selected using the keypad in the command section.
When we look at the command line, it should look like this:
The yellow fixture part of this is the default keyword. This means that if we do not define a different beginning keyword, it assumes we want to begin our command with Fixture.
Fixtures can be selected using their ID numbers. You can select fixture 1 simply by writing 1 in the command line and executing the command.
If you look at the Command Line History window. It says
You can add a fixture to the selection by writing + 2 and executing the command.
Removing a fixture from the selection can be done using minus.
A range of fixtures can be selected using thru. Write the following in the command line and run the command:
9 Thru 14
As long as we have not given the fixtures a value, we keep adding fixtures to our selection. If you give the selected fixtures a value by any of the methods described above, the system assumes that the next fixture selection means that you are done with the previous selection and automatically clears it before selecting the new fixtures.
A single 'Clear' will clear the fixture selection.
If numbers are left out on the sides of the "Thru" keyword, then the range will go as far as possible. This means that Fixture Thru selects from the lowest to the highest number. This is often all fixtures.
The 14 blinders have their own individual FID numbers but are also children of the Blinders grouping fixture. We also call these Sub-fixtures.
This means that they can also be selected using a sub-fixture index number. Fixture 20.11 is the same as Fixture 31.
There are a lot of different combinations of commands that allow you to use this recursive selection of sub-fixtures. We will explore a few of them. Start by clearing the programmer completely.
Select fixture 20. This only selects the grouping fixture and not the sub-fixtures. The grouping fixture does not have any attributes, but at the same time, we can change the dimmer attribute. This is because the children inherit the dimmer values. Try to give the fixture a dimmer value. You can see that all the children get the value without being selected. Press the Down key (not the down arrow). We have moved down in the hierarchy, and all the children are selected. Since multiple fixtures are selected, we can use the calculator to apply a range of values. Try to apply 0 Thru 65. Your result should look similar to this:
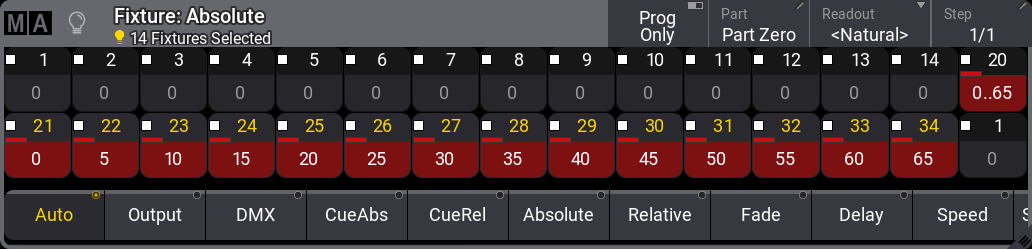
Notice that the grouping fixture says "0..65". This indicates the value range of the child fixtures. Pressing Up moves back up the hierarchy to the grouping fixture.
Clear the programmer again.
Now do Fixture 20. (remember the dot at the end).
Adding the dot at the end will select the main fixture 20 and all the sub-fixtures. Clear the programmer again.
Now type Fixture 20.2 thru 10
This selects sub-fixtures 2 thru 10 in fixture 20.
Try other combinations of fixture selections until you are comfortable selecting fixtures and sub-fixtures.
Finish this chapter by clearing the programmer.
Recap
This topic taught us about the programmer, fixture selection, and how to assign dimmer values.
The primary manual has a section called Operate Fixtures. This section of topics has information about the programmer and fixture control.
Noteworthy keywords from this chapter are Fixture, Thru, Clear, ClearAll, -[minus], +[plus], At, Down, and Up.
In the next chapter, we will look at the 3D virtual space.