

- grandMA3 User Manual
- About the manual
- Device Overview
- grandMA3 consoles
- grandMA3 full-size
- grandMA3 full-size CRV
- grandMA3 light
- grandMA3 light CRV
- grandMA3 compact XT
- grandMA3 compact
- grandMA3 extension
- grandMA3 replay unit
- grandMA3 processing units
- grandMA3 Nodes
- grandMA3 Nodes DIN-Rail
- grandMA3 I/O Node
- grandMA3 I/O Node DIN-Rail
- grandMA3 onPC command wing XT
- grandMA3 onPC command wing
- grandMA3 onPC fader wing
- grandMA3 onPC rack-unit
- Screen allocation
- Keyboard shortcuts
- Keys
- . [Dot]
- <<< [GoFastBackward] | Black
- >>> [GoFastForward] | Flash
- - [Minus]
- + [Plus]
- / [Slash] | * [Asterisk/Multiply]
- At
- Assign
- Align
- Blind
- Clear
- Channel
- Copy
- Cue
- Down
- Delete
- Esc
- Edit
- Freeze
- Full
- Fixture
- Group
- Goto
- Go+ [large]
- Go- [large]
- Go+ | Temp
- Go- | Top
- Help
- Highlt [Highlight]
- If
- Learn | Rate1
- List
- MA
- Menu
- Move
- Next
- Numeric keys | arrows
- Oops
- On
- Off
- Pause [large]
- Pause | Fix
- Page+
- Page-
- Please
- Power
- Preset
- Prvw [Preview]
- Prev [Previous]
- Select
- SelFix [SelectFixture]
- Sequ [Sequence]
- Set
- Solo
- Stomp
- Store
- Thru
- Time
- Up
- Update
- U1
- U2
- X1 | Clone
- X2 | Link
- X3 | Grid
- X4 | Layout
- X5 | Step
- X6 | TC
- X7 | View
- X8 | DMX
- X9
- X10
- X11
- X12
- X13 | Phaser
- X14 | Macro
- X15 | Page
- X16 | Exec
- Xkeys
- Control elements
- Command area
- Master area
- Custom area
- Dual encoders
- Level wheel
- Grand master
- Executor elements
- Connector pin assignment
- grandMA3 consoles
- System Overview
- Standalone device
- Locally networked devices
- World server
- Parameters
- Calculate parameters
- Expand the amount of parameters
- First Steps
- Unpack the device
- Check scope of delivery
- Position the device
- Connect power
- Connect desk light
- Connect external screens
- Connect USB devices
- Connect DMX
- Connect Audio In
- Connect MIDI
- Connect LTC
- Connect Ethernet
- Connect DC Remote In
- Connect grandMA3 extension
- Connect grandMA3 fader wing
- Turn on the device the first time
- grandMA3 onPC
- System requirements grandMA3 onPC
- Windows installation
- Optimize Windows
- macOS installation
- Optimize macOS
- onPC Terminal App
- onPC settings
- Clean start
- Show File Handling
- Workspace
- User interface
- Configuration of displays
- Desk lock
- User-defined area
- Command line
- Control bar
- View bar
- Tables in general
- Trackpad window
- Gestures
- Command area
- Master controls
- Playback controls
- Displays in grandMA3 onPC
- Encoder bar
- Feature group control bar
- Encoder toolbar
- Calculator
- Playback bar
- Command wing bar
- Colors
- System
- Markers
- Color theme
- User interface
- Command Syntax and Keywords
- General syntax rules
- All keywords
- ; [Semicolon]
- / [Slash]
- . [Dot]
- .. [DotDot]
- = [Equal]
- <<< [GoFastBackward]
- >>> [GoFastForward]
- - [Minus]
- * [Asterisk]
- % [Percent]
- + [Plus]
- Absolute
- Acceleration
- Action
- ActivationGroup
- Align
- AlignTransition
- Appearance
- Assign
- At
- Attribute
- Black
- Blind
- Block
- BPM
- Call
- Camera
- Capture
- Certificate
- ChangeDestination
- Channel
- ChannelSet
- Chat
- Cleanup
- Clear
- ClearActive
- ClearAll
- ClearSelection
- Clone
- CmdDelay
- ColorTheme
- Configuration
- Console
- Cook
- Copy
- Cue
- CueAbs
- CueDelay
- CueFade
- CueInDelay
- CueInFade
- CueOutDelay
- CueOutFade
- CueRel
- CurrentUser
- CurrentUserProfile
- Cut
- DataPool
- Deceleration
- Decimal8
- Decimal16
- Decimal24
- Default
- Delay
- Delete
- DelGlobalVar
- DelUserVar
- Dismiss
- Display
- DMXAddress
- DMXReadout
- DMXUniverse
- Down
- Drive
- Echo
- Edit
- EditSetting
- Eject
- Effect
- EndIf
- Exchange
- Executor
- Export
- Extract
- Extension
- Fade
- Fader
- FaderHighlight
- FaderLowlight
- FaderMaster
- FaderRate
- FaderSolo
- FaderSpeed
- FaderTemp
- FaderTime
- FaderX
- FaderXA
- FaderXB
- FeatureGroup
- Filter
- Fix
- Fixture
- FixtureType
- Flip
- Flash
- Fog
- Font
- Freeze
- Full
- Gel
- GetGlobalVar
- GetUserVar
- Universal
- Go+
- GoStep
- Go-
- Goto
- Grid
- Group
- HardwareKey
- Help
- Helplua
- Hex8
- Hex16
- Hex24
- Highlight
- Houselights
- Hz
- If
- IfActive
- IfOutput
- IfProg
- Image
- Import
- Index
- Insert
- Integrate
- Interface
- Invert
- Invite
- IP
- JoinSession
- Key
- Keyboard
- KeyboardShortcuts
- Knockin
- Knockout
- Label
- Language
- Layout
- LearnRate
- LearnSpeed
- LeaveSession
- Library
- List
- ListOwner
- ListRef
- Load
- Loaded
- LoadShow
- Lock
- Login
- Logout
- Lowlight
- Lua
- LuaFile
- Macro
- Master
- MAtricks
- Media
- Menu
- Mesh3DS
- MessageCenter
- Monitor
- Move
- MyRunningMacro
- MyRunningSequence
- NewShow
- Next
- Node
- NonDim
- Normal
- Off
- On
- OnPC
- OSC
- Oops
- Output
- OutputLayer
- Page
- Part
- Park
- Paste
- Patch
- Pause
- Percent
- PercentFine
- Phase
- Physical
- Plugin
- Preset
- PresetUpdate
- Press
- Preview
- Previous
- Programmer
- Property
- PU
- Pyro
- Rate1
- Readout
- Reboot
- Recast
- Relation
- Relative
- Release
- ReloadPlugins
- ReloadUI
- Remote
- RemoteHID
- RemoteCommand
- Remove
- Reset
- Restart
- Root
- RTChannel
- RunningMacro
- RunningSequence
- SaveShow
- ScreenConfig
- ScreenContent
- Scribble
- Seconds
- Select
- Selection
- SelFix
- Sequence
- SendOSC
- Set
- SetGlobalVar
- SetUserVar
- Shuffle
- Shutdown
- SnapDelay
- SoftwareUpdate
- SoundChannel
- Solo
- SpecialExecutor
- Speed
- Speed1
- Stage
- Station
- Step
- Stomp
- Store
- Temp
- Texture
- Thru
- Time
- Timecode
- TimecodeSlot
- Toggle
- Top
- Transition
- Type
- UIChannel
- UiGridSelection
- Unblock
- Unlock
- Unpark
- Unpress
- Up
- Update
- UpdateContent
- User1
- User2
- User
- UserProfile
- Video
- Version
- View
- ViewButton
- Width
- World
- Xkeys
- Zero
- Extended command line syntax options
- Windows, Views, and Menus
- Add window
- Rearrange
- Store and recall views
- Remove windows from a screen
- Window settings
- Menus
- Change menu locations
- Pool windows
- Create pool object
- Label pool objects
- Move pool objects
- Insert pool objects
- Copy pool objects
- Lock and unlock pool objects
- Delete pool objects
- Networking
- Interfaces and IP
- Session
- Create a session
- Join a session
- Leave a session
- Invite to a session
- Dismiss from session
- Create a custom key
- Web remote
- SFTP connection
- DMX In and Out
- DMX port configuration
- Ethernet DMX
- Art-Net menu
- sACN menu
- Transmit DMX using Art-Net
- Single User and Multi User Systems
- Create User
- User settings
- Patch and Fixture Setup
- What are fixtures
- Add fixtures to the show
- MVR
- Live patch
- DMX sheet
- DMX universes
- Remove fixtures from the show
- Position fixtures in the 3D space
- Marker fixture
- 3D window
- Camera Pool
- Stages
- Classes and Layers
- Attribute definitions
- Activation group
- Feature group
- Parameter list
- DMX curves
- Operate Fixtures
- What is the programmer
- Fixture sheet
- Encoder resolution
- Using the color picker
- Selection bar
- Align
- Selection Grid
- Smart view
- Scribbles
- Create scribbles
- Edit scribbles
- Assign scribbles
- Delete scribbles
- Images
- Screenshots
- Appearances
- Create appearances
- Use appearances
- Delete appearances
- Groups
- Create groups
- Edit groups
- Delete groups
- Group masters
- Presets
- Preset pools
- Create new presets
- Recipe presets
- Use preset
- Edit or Update presets
- Worlds and Filters
- At filter
- Create a world
- Create a filter
- Use a world or filter
- Delete a world
- Delete a filter
- MAtricks and Shuffle
- Blocks
- Groups
- Wings
- Widths
- Shuffle
- Cues and Sequences
- What is tracking
- Look at cues and sequences
- Sequence settings
- Store cues
- Update cues
- Copy cues
- Cue recipes
- Store settings and preferences
- Play back cues
- Move in black
- Cue timing
- Renumber cues
- Delete cues
- Executors
- Assign object to an executor
- Executor configurations
- Running playbacks
- Special executors
- Masters
- Selected masters
- Grand masters
- Time Control
- Speed masters
- Playback masters
- Phasers
- Step bar
- Phaser editor
- Create sinus dimmer phaser
- Create circle phaser
- Create circle phaser around position
- Create color rainbow phaser
- Macros
- Create macros
- Edit macros
- Assign macros to keys and buttons
- Examples
- Agenda
- Agenda modes
- Create an agenda entry
- Edit an agenda entry
- Agenda toolbar
- Agenda edit menu
- Timecode
- What are timecode slots
- Timecode settings
- Track groups
- Time ranges and events
- Toggle view mode
- Record a timecode show
- Record an external timecode show
- Edit a timecode show
- Layouts
- Create a layout
- Edit layout
- Layout view settings
- Edit layout view
- Edit layout elements
- Layout encoder bar
- Plugins
- What is Lua?
- Lua functions
- Object-Free API
- Cmd
- CmdIndirect
- CmdIndirectWait
- CmdObj
- Confirm
- DataPool
- Echo
- ErrPrintf
- ErrEcho
- Export
- GetPath
- GetShowFileStatus
- GetSubfixture
- GetSubfixtureCount
- HookObjectChange
- HostOS
- HostSubType
- HostType
- Import
- MessageBox
- ObjectList
- PopupInput
- Printf
- ProgressBar
- SelectedSequence
- SelectionCount
- SelectionFirst
- SerialNumber
- SelectionNext
- TextInput
- Timer
- UserVariables
- Version
- Object API
- Children
- Export
- HasActivePlayback
- Import
- ToAddr
- Object-Free API
- Data Pools
- System
- Date and time
- Clock
- Desk lights
- System information
- System monitor
- Info Window
- Sound Window
- Remote In and Out
- DC remotes
- MIDI remotes
- DMX remotes
- OSC
- PSN
- RDM
- Control other MA Devices
- grandMA3 Nodes
- MA Network Switch
- RemoteHID
- Update the Software
- Update grandMA3 consoles
- Update grandMA3 Nodes
- Update grandMA3 onPC windows hardware
- Update grandMA3 viz-key
- Network update
- Troubleshooting
- Fixture Types
- Import fixture types
- Import GDTF
- Build fixture types
- Insert fixture types
- Insert DMX modes
- Insert geometries
- Insert models
- Link models to geometries
- Link DMX modes to geometries
- Export fixture types
- Export GDTF
- Import fixture types
- File Management
- Import / Export Menu
- Folder Structure
- Shut down the System
- grandMA3 Quick Start Guide
- grandMA3 Quick Manual consoles
- grandMA3 Quick Manual processing units
- grandMA3 Quick Manual Nodes
- grandMA3 Quick Manual Nodes DIN-Rail
- grandMA3 Quick Manual onPC command wing XT
- grandMA3 Quick Manual onPC command wing
- grandMA3 Quick Manual onPC fader wing
- grandMA3 Quick Manual onPC rack-unit
- grandMA3 Quick Manual viz-key
- grandMA3 Quick Manual I/O Nodes
- Release Notes
New help version
The help version you selected belongs to an older software version. You may want to view the latest help version.
Phaser Editor
Table of contents of this topic
The Phaser Editor is a diverse tool for manipulating phasers.
It can be used to dynamically create Phasers with multiple steps. It can also be used as a simple trackpad to move the fixtures.
Open a Phaser Editor window using the Add Window pop-up.
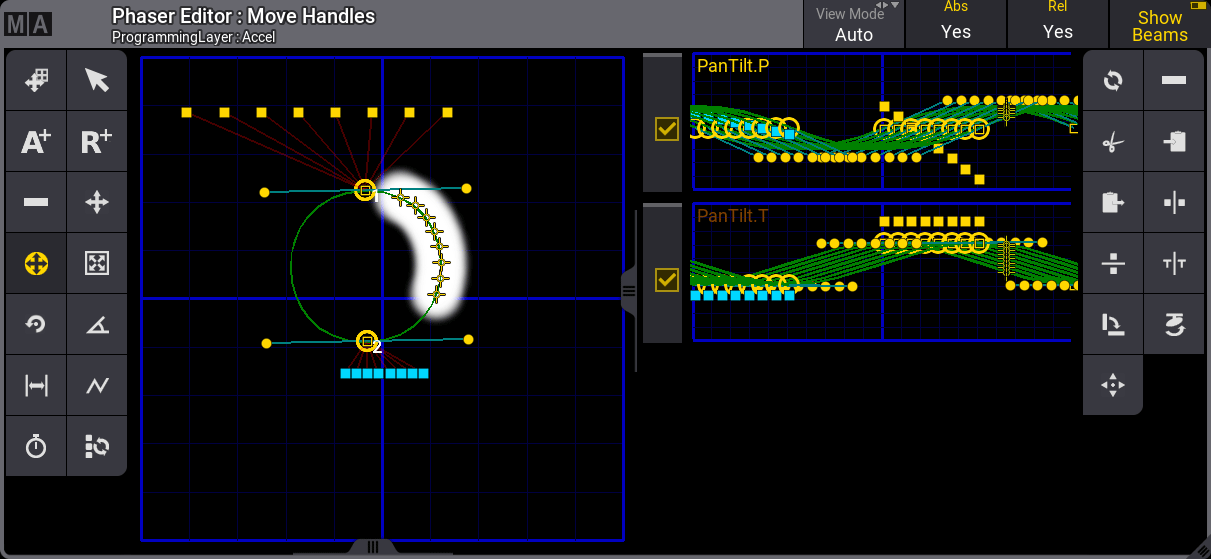
The tool buttons on the left side are mouse or touch tools, and the tool buttons on the right are operational functions and shortcuts - read more below. The right side tool buttons might change depending on the selected tool on the left side.
The blue grid in the middle left represents the entire pan range (horizontal) and the entire tilt range (vertical). This is called the 2D layout.
The smaller blue grids on the middle right are all the attributes, with more than one step, that are in the phaser. This area is called the 1D layout. Each step is represented by a vertical line. The example above shows the pan and tilt with two steps. It does not show the dimmer attribute because it only has a value in step 1. To change the height of the attribute lines displayed in the 1D layout, tap the MA logo in the upper-left corner of the window, then tap LineHeight in the Window Settings menu, enter the desired height, and press Please. The check boxes to the left of the attribute lines represent the status of those attributes in the At Filter. A yellow check mark indicates that adjustments are allowed on the corresponding attribute. An empty, grey box indicates that adjustments are not allowed. For more information about the At Filter, see the At Filter topic.
Toggling the Abs or Rel buttons in the title bar allows or prevents editing of absolute points or relative points, respectively.
When fixtures are selected, they are visualized by small yellow cross-hairs. The beams can be represented in the pan/tilt grid by toggling the Show Beams button in the title bar. When it is On, then the intensity and color are visualized by a bigger circle behind the yellow cross-hair.
Adding points in the pan/tilt editor add steps in the programmer. The first absolute point moves the fixtures to this position. Adding a second absolute point adds step two to the programmer. The relative points (yellow hollow square) need an absolute point (yellow or cyan filled square) for reference. A thin red line connects the relative point and the related absolute point. The cyan absolute points show that the value is from a preset. Yellow absolute points are hard values from the programmer.
Selected points have a yellow circle around them.
A green line describes the path of the fixtures.
Adjust the optional spline handles to modify acceleration and deceleration to and from each point. Each point has two handles. Each handle has a cyan line to the point it is referenced to. The handles can be moved together by touching the point and moving the finger. A handle can be moved individually by touching and moving the handle (small yellow circle).
Read the example topics to learn how to create a phaser.
Step View Mode
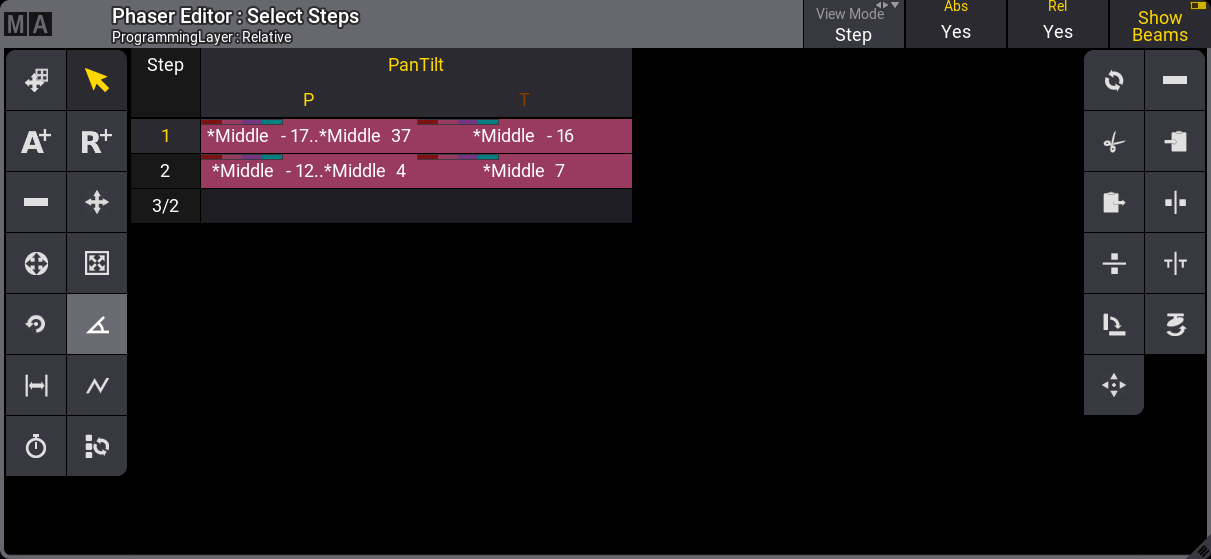
The step view mode option displays phaser steps using a format similar to the fixture sheet. Steps are arranged in rows, and attributes are arranged in columns. Only attributes that change from step to step are displayed.
Tools
The tool buttons on the left side are:

- 1 - Move Area:
Moves the entire blue pan/tilt square to show relative values that can be outside the position range. - 2 (selected) - Select:
Selects single steps or uses lasso selection for multiple steps. The selection can be filtered to Absolute and Relative steps by toggling the respective buttons in the title bar. - 3 - Add Absolute:
Adds a step using absolute value. The encoder bar follows the absolute layer. A filled rectangle represents absolute values. The Single Step Mode is automatically activated as long as you hold a finger or the mouse cursor in the editor while adding an absolute point. - 4 - Add Relative:
Adds a step using a relative value. The encoder bar follows the relative layer. An empty rectangle represents relative values. The Single Step Mode is automatically activated as long as you hold a finger or the mouse cursor in the editor while adding a relative point. - 5 - Delete:
Deletes single points or uses lasso selection to delete multiple points. - 6 - Move Point:
Moves selected steps. It is also possible to use the Align function. The Single Step Mode is automatically activated as long as you hold a finger or the mouse cursor in the editor while moving a single point. - 7 - Move Handles:
Move handles from selected steps. It is also possible to use the Align function. A cyan line is displayed if you tap and move a selected step. To influence acceleration and deceleration at the same time, tap the line in the middle. To change acceleration and deceleration individually, tap one of the filled dots at its endpoints. - 8 - Change Size:
Enlarges/reduces all selected steps evenly from the center point of the selection. It is also possible to use the Align function.
Pressing MA while changing the size enlarges/reduces all selected steps from the center point of the selection on the horizontal or vertical axis. - 9 - Change Rotation:
Rotates the selected steps around the center of the selection. It is also possible to use the Align function.
Pressing MA while changing the rotation, rotates the selected steps around the center of the selection in 5-degree increments. - 10 - Change Phase:
Opens an overlay with yellow dots symbolize the value of the phase for each fixture. Here the phase value can be shifted independently from the selected steps for the selected fixtures. The At filter can be used to move phases for individual attributes. It is also possible to use the Align and the Transition mode functions. If several attributes are displayed along with different phases, the selected feature groups are displayed in a brighter color. If the fixtures are allocated to grid positions, the values of the phases can be vertically or diagonally aligned. Selecting this also changes the functions on the right side to quick selections for alignment. This changes the tool buttons on the right side to give quick access to standard phase values and a Reset and Invert button. - 11 - Change Width:
The width can be changed with this tool. It changes the functions on the right side to shortcuts of different percentages. If all steps are selected and the Speed shortcut is tapped, then the movement speed is equalized between the steps. Default is that each step has the same width with no regard to the distance the fixtures are moving in the step. Equalizing the step width makes the fixture move at the same speed by adjusting the width. There is a Reset shortcut that resets the width. Default is a width of 100%. This means that each step has the same width with no regard to the travel distance of the fixtures in each step. - 12 - Select Form:
Selecting a form overwrites the values of the transition layer, accel layer and, decel layer to create the desired effect. Available forms are listed in the toolbar on the right side and include Rectangle, Sawtooth, Sine and Cosine. - 13 - Change Speed:
Tap to display various speed tools in the right side toolbar. Available speed tools include functions which multiply or divide the current speed of the phaser by a given amount. Special speed options include:- Loop: Tap Loop to multiply the current phaser speed by the number of steps currently in the phaser.
- Fixture: Tap Fixture to divide the current phaser speed by the number of fixtures in the current selection.
- 14 - Select all Steps:
This is not a tool like the others. Tapping this toggles between all steps selected or the selection of single steps. It keeps the previously selected tool active.
Some tools don’t require the user to precisely touch points in the 2D and 1D layouts in order to adjust them. Instead, make sure the desired steps are enabled in the Step Bar, and use the blue grid areas in the Phaser Editor as trackpads to make the desired adjustments.
The standard operational functions on the right side are:

- 1 - Reset:
Reset spline of the selected steps. - 2 - Delete
Deletes the selected steps. - 3 - Cut Programmer:
Removes all programmer values in the currently selected fixtures and moves them to the clipboard. - 4 - Copy Programmer:
Copies all programmer values in the currently selected fixtures and moves them to the clipboard. - 5 - Paste Programmer:
Inserts all values from the clipboard to the currently selected fixtures in the programmer. - 6 - Mirror X:
Mirrors all selected points on the x-axis. - 7 - Mirror Y:
Mirrors all selected points on the y-axis. - 8 - Mirror Time:
Swaps the order of the steps. Select all steps first. This is the same as reversing the direction of the movement. - 9 - Swap XY:
Swaps the X and Y axes of the selected steps. - 10 - Flip:
Flips the position of the selected fixtures. - 11 - Reset Zoom:
Resets the area with the blue square.
Phaser Encoder Toolbar
Depending upon the current layout of the Phaser Editor and the focus within the window, the Encoder Toolbar changes to include helpful tools, which are specific to the manipulation of Phaser data.
2D Encoder Toolbar
To enable the 2D phaser encoder toolbar, set the layout of the Phaser Editor to 2D or Auto, and tap anywhere inside the 2D grid area.

This encoder toolbar includes the following encoder controls:
- MoveX: Turn the inner encoder to adjust the X position in the 2D Phaser grid of all steps currently enabled in the Step Bar.
- MoveY: Turn the inner encoder to adjust the Y position in the 2D Phaser grid of all steps currently enabled in the Step Bar.
- Size: Turn the inner encoder to adjust size of all steps currently enabled in the Step Bar. This allows encoder access to the Change Size tool mentioned above.
- Handle: Turn the outer encoder to adjust the handle length of all steps currently enabled in the Step Bar. This allows encoder access to the Move Handles tool mentioned above.
- Rotate: Turn the outer encoder to rotate all steps currently enabled in the Step Bar. This allows encoder access to the Change Rotation tool mentioned above.
- Aspect: Turn the outer encoder to adjust the aspect ratio of all steps currently enabled in the Step Bar. This tool simultaneously adjusts positions of points as well as length and direction of handles in order to create a wider or taller version of the current 2D form.
- Select Step: Turn the inner or outer encoder to select individual steps. Press the inner encoder or the outer encoder key to toggle between selecting all steps and a single step.
1D Encoder Toolbar
To enable the 1D phaser encoder toolbar, set the layout of the Phaser Editor to 1D or Auto, and tap anywhere inside the 1D grid area.

This encoder toolbar allows for adjustment of Speed, Phase, Transition, and Width; based upon the current fixture and step selection, as well as the current status of the At Filter.