

- grandMA3 User Manual
- Introduction
- About the manual
- Symbols used in the manual
- Device Overview
- grandMA3 consoles
- grandMA3 full-size
- grandMA3 full-size CRV
- grandMA3 light
- grandMA3 light CRV
- grandMA3 compact XT
- grandMA3 compact
- grandMA3 extension
- grandMA3 replay unit
- grandMA3 processing units
- grandMA3 Nodes
- grandMA3 Nodes DIN-Rail
- grandMA3 I/O Node
- grandMA3 I/O Node DIN-Rail
- grandMA3 onPC command wing XT
- grandMA3 onPC command wing
- grandMA3 onPC fader wing
- Screen allocation
- Keyboard shortcuts
- Keys
- . [Dot]
- <<< [GoFastBackward] | Black
- >>> [GoFastForward] | Flash
- - [Minus]
- + [Plus]
- / [Slash] | * [Asterisk/Multiply]
- At
- Assign
- Align
- Blind
- Clear
- Channel
- Copy
- Cue
- Down
- Delete
- Esc
- Edit
- Freeze
- Full
- Fixture
- Group
- Goto
- Go+ [large]
- Go- [large]
- Go+ | Temp
- Go- | Top
- Help
- Highlt [Highlight]
- If
- Learn | Rate1
- List
- MA
- Menu
- Move
- Next
- Numeric keys | arrows
- Oops
- On
- Off
- Pause [large]
- Pause | Fix
- Page+
- Page-
- Please
- Power
- Preset
- Prvw [Preview]
- Prev [Previous]
- Select
- SelFix [SelectFixture]
- Sequ [Sequence]
- Set
- Solo
- Stomp
- Store
- Thru
- Time
- Up
- Update
- U1
- U2
- X1 | Clone
- X2 | Link
- X3 | Grid
- X4 | Layout
- X5 | Step
- X6 | TC
- X7 | View
- X8 | DMX
- X9
- X10
- X11
- X12
- X13 | Phaser
- X14 | Macro
- X15 | Page
- X16 | Exec
- Xkeys
- Control elements
- Command section
- Master section
- Custom section
- Dual encoders
- Level wheel
- Grand master
- Executor elements
- Connector pin assignment
- grandMA3 consoles
- System Overview
- Standalone device
- Locally networked devices
- World server
- Parameters
- Calculate parameters
- Expand the amount of parameters
- First Steps
- Unpack the device
- Check scope of delivery
- Position the device
- Connect power
- Connect desk light
- Connect external screens
- Connect USB mouse and USB keyboard
- Connect DMX
- Connect Audio In
- Connect LTC
- Connect Ethernet
- Connect DC Remote In
- Connect grandMA3 extension
- Turn on the console the first time
- grandMA3 onPC
- System requirements grandMA3 onPC
- Windows installation
- Optimize Windows
- macOS installation
- Optimize macOS
- Show File Management
- Workspace
- User interface
- Configuration of displays
- Desk lock
- User-defined area
- Command line
- Control bar
- View bar
- Tables in general
- Trackpad window
- Gestures
- Command section
- Master controls
- Playback controls
- Displays in grandMA3 onPC
- Encoder bar
- Feature group control bar
- Encoder toolbar
- Calculator
- Playback bar
- Colors
- System
- Markers
- Color theme
- User interface
- Command Syntax and Keywords
- General syntax rules
- Object keywords
- Function keywords
- Helping keywords
- All keywords
- / [Slash]
- . [Dot]
- .. [DotDot]
- = [Equal]
- <<< [GoFastBackward]
- >>> [GoFastForward]
- - [Minus]
- * [Asterisk]
- % [Percent]
- + [Plus]
- Absolute
- Acceleration
- Action
- ActivationGroup
- Align
- AlignTransition
- Appearance
- Assign
- At
- Attribute
- Black
- Blind
- Block
- BPM
- Camera
- Call
- ChangeDestination
- Channel
- ChannelSet
- Chat
- Clear
- ClearActive
- ClearAll
- ClearSelection
- Clone
- CmdDelay
- ColorTheme
- ColorThemeLibrary
- Configuration
- Console
- Cook
- Copy
- Cue
- CueDelay
- CueFade
- CueInDelay
- CueInFade
- CueOutDelay
- CueOutFade
- CurrentUser
- CurrentUserProfile
- Cut
- DataPool
- Deceleration
- Decimal8
- Decimal24
- Default
- Delay
- Delete
- DelGlobalVar
- DelUserVar
- Dismiss
- Display
- DMXAddress
- DMXReadout
- DMXUniverse
- Down
- Drive
- Echo
- Edit
- EditOption
- Eject
- Effect
- EndIf
- Exchange
- Executor
- Export
- Extract
- Extension
- Fade
- FaderMaster
- FaderRate
- FaderSpeed
- FaderTemp
- FaderX
- FeatureGroup
- Filter
- Fix
- Fixture
- FixtureType
- FixtureTypeLibrary
- Flip
- Flash
- Fog
- Font
- Freeze
- Full
- GDTFLibrary
- Gel
- GetGlobalVar
- GetUserVar
- Global
- Go+
- Go-
- Goto
- Grid
- Group
- Help
- Hex8
- Hex24
- Highlight
- Houselights
- Hz
- If
- IfActive
- IfOutput
- IfProg
- Image
- Import
- Index
- Insert
- Integrate
- Interface
- Invert
- Invite
- IP
- JoinSession
- Keyboard
- KeyboardShortcuts
- Knockin
- Label
- Language
- Layout
- LearnRate
- LearnSpeed
- LeaveSession
- Library
- List
- ListOwner
- ListRef
- Load
- Loaded
- LoadShow
- Lock
- Login
- Logout
- Lowlight
- Lua
- Macro
- MacroLibrary
- MAgic
- Master
- MAtricks
- MAtricksPool
- Media
- Menu
- MenuLibrary
- Mesh3DS
- MeshLibrary
- Move
- MyRunningMacro
- MyRunningSequence
- NewShow
- Next
- Node
- NonDim
- Normal
- Off
- On
- OnPC
- OSC
- Oops
- Page
- Part
- Park
- Paste
- Patch
- Pause
- Percent
- PercentFine
- Phase
- Physical
- Plugin
- PluginLibrary
- Preset
- Press
- Preview
- Previous
- Programmer
- Property
- PU
- Pyro
- Rate1
- Readout
- Reboot
- Recast
- Relative
- Release
- ReloadPlugins
- ReloadUI
- Remote
- RemoteHID
- RemoteCommand
- Remove
- Reset
- Restart
- Root
- RTChannel
- RunningMacro
- RunningSequence
- SaveShow
- ScreenConfig
- ScreenContent
- Scribble
- Seconds
- Select
- Selection
- SelFix
- Sequence
- SendOSC
- Set
- SetGlobalVar
- SetUserVar
- Shuffle
- Shutdown
- SnapDelay
- SoundChannel
- Solo
- SpecialExec
- Speed
- Speed1
- Stage
- Station
- Step
- Stomp
- Store
- Temp
- Thru
- Timecode
- Toggle
- Top
- Transition
- Unblock
- Unlock
- Unpark
- Unpress
- Up
- Update
- User1
- User2
- User
- UserProfile
- Version
- View
- ViewButton
- Width
- World
- Zero
- Extended command line syntax options
- General syntax rules
- Windows, Views, and Menus
- Add windows
- Rearrange
- Store and recall views
- Remove windows from a screen
- Window settings
- Menus
- Change menu locations
- Pool windows
- Create pool object
- Label pool objects
- Move pool objects
- Insert pool objects
- Copy pool objects
- Lock and unlock pool objects
- Delete pool objects
- Networking
- Interfaces and IP
- Session
- Create a session
- Leave a session
- Invite to a session
- Dismiss from session
- Create a custom key
- Web remote
- SFTP connection
- DMX In and Out
- DMX port configuration
- Ethernet DMX
- Art-Net menu
- sACN menu
- Transmit DMX using Art-Net
- Single User and Multi User Systems
- Create User
- User settings
- Patch and Fixture Setup
- What are fixtures
- Add fixtures to the show
- MVR
- Live patch
- DMX sheet
- DMX universes
- Remove fixtures from the show
- Position fixtures in the 3D space
- 3D Window
- Camera Pool
- Stages
- Classes and Layers
- Attribute definitions
- Activation group
- Feature group
- Operate Fixtures
- What is the programmer
- Fixture sheet
- Using the color picker
- Selection bar
- Align
- Selection Grid
- Smart view
- Scribbles
- Create scribbles
- Edit scribbles
- Assign scribbles
- Delete scribbles
- Images
- Screenshots
- Appearances
- Create appearances
- Use appearances
- Delete appearances
- Groups
- Create groups
- Edit groups
- Delete groups
- Group masters
- Presets
- Preset pools
- Create new presets
- Recipe presets
- Use preset
- Edit presets
- Worlds and Filters
- At filter
- Create a world
- Create a filter
- Use a world or filter
- Delete a world
- Delete a filter
- MAtricks and Shuffle
- Blocks
- Groups
- Wings
- Widths
- Shuffle
- Cues and Sequences
- What is tracking
- Look at cues and sequences
- Sequence settings
- Store cues
- Update cues
- Cue recipes
- Store options and preferences
- Play back cues
- Move in black
- Cue timing
- Renumber cues
- Executors
- Assign object to an executor
- Executor configurations
- Running playbacks
- Special executors
- Masters
- Selected masters
- Grand masters
- Time Control
- Speed masters
- Playback masters
- Phasers
- Step bar
- Phaser editor
- Create sinus dimmer phaser
- Create circle phaser
- Create circle phaser around position
- Create color rainbow phaser
- Macros
- Create macros
- Edit macros
- Assign macros to keys and buttons
- Examples
- Timecode
- What are timecode slots
- Timecode settings
- Tool buttons
- Toggle view mode
- Record a timecode show
- Create timecode ranges
- Record an external timecode show
- Edit a timecode show
- Layouts
- Create a layout
- Edit layout
- Layout view settings
- Edit layout view
- Edit layout elements
- Plugins
- What is Lua
- Data Pools
- System
- Date and time
- Clock
- Desk lights & color theme
- System information
- System monitor
- Info Window
- Remote Inputs
- RDM
- Control other MA Devices
- grandMA3 xPort Nodes
- RemoteHID
- Update the Software
- Update grandMA3 consoles
- Update grandMA3 xPort Nodes
- Update grandMA3 onPC command wing XT
- Update grandMA3 viz-key
- Network update
- Fixture Types
- Import fixture types
- Import GDTF
- Build fixture types
- Insert fixture types
- Insert DMX modes
- Insert geometries
- Insert models
- Link models to geometries
- Link DMX modes to geometries
- Export fixture types
- Export GDTF
- Import fixture types
- Shut down the System
- Introduction
- grandMA3 Quick Manual consoles
- grandMA3 Quick Manual processing
- grandMA3 Quick Manual Nodes
- grandMA3 Quick Manual Nodes DIN-Rail
- grandMA3 Quick Manual onPC command wing XT
- grandMA3 Quick Manual onPC command wing
- grandMA3 Quick Manual onPC fader wing
- grandMA3 Quick Manual viz-key
- grandMA3 Quick Manual I/O Nodes
- Release Notes
New help version
The help version you selected belongs to an older software version. You may want to view the latest help version.
Add Fixtures to the Show using the GUI
Table of contents of this topic
This is the process for adding new fixtures (or devices) to the show and the patch, using the GUI.
1. Open the Patch Menu.
2. Follow the steps in the wizard:
2A. Select the fixture type.
2B. (optional) Add a custom name.
2C. Type the quantity.
2D. Type the first ID number.
2E. (If in Full mode) Select a Layer and class (None is an option).
2F. Type the patch address for the first fixture.
2G. Tap Apply.
3. Close the Patch menu and tap Ok to save the changes.
These are steps needed for adding the first fixtures to a new show - read below for details.
1. Open the Patch Menu.
2. Select the row where the new fixtures should be inserted and tap the Insert New Fixture button.
3. Select the desired fixture type (use the filter to limit the list).
4. Fill in the rest of the fields in the wizard and tap Apply.
5. Edit any desired field in the patch grid before closing the Patch menu.
7. Close the Patch menu and save the changes.
These are steps needed to add more fixtures in an existing show - read below for details.
Everything about adding fixtures is done from the Patch menu.
Navigate to the Patch Menu
The Patch menu needs to be open to add fixtures.
- Press the Menu key.
- Tap the Patch button in the menu pop-up.
The patch menu is now open.
When the menu is opened the first time, then a wizard helps to add the first fixtures to the show and instead of the patch menu, there is a guide through the fixture selection and the Insert New Fixtures pop-up (see below).
Insert a Device in the Patch
Each fixture needs a row in the patch menu.
The fixtures belong to a "parent" stage object. The default parent is Stage 1. Several stage objects can be created - read more in the Stage topic.
The stage can be changed using the stage button in the title bar.
- Select the stage where the fixtures should be added using the button in the title bar.
- Tap the New Fixture area on the list.
- Tap the Insert New Fixture button once to add a fixture to the show.
This opens the Select DMX Mode to use pop-up.
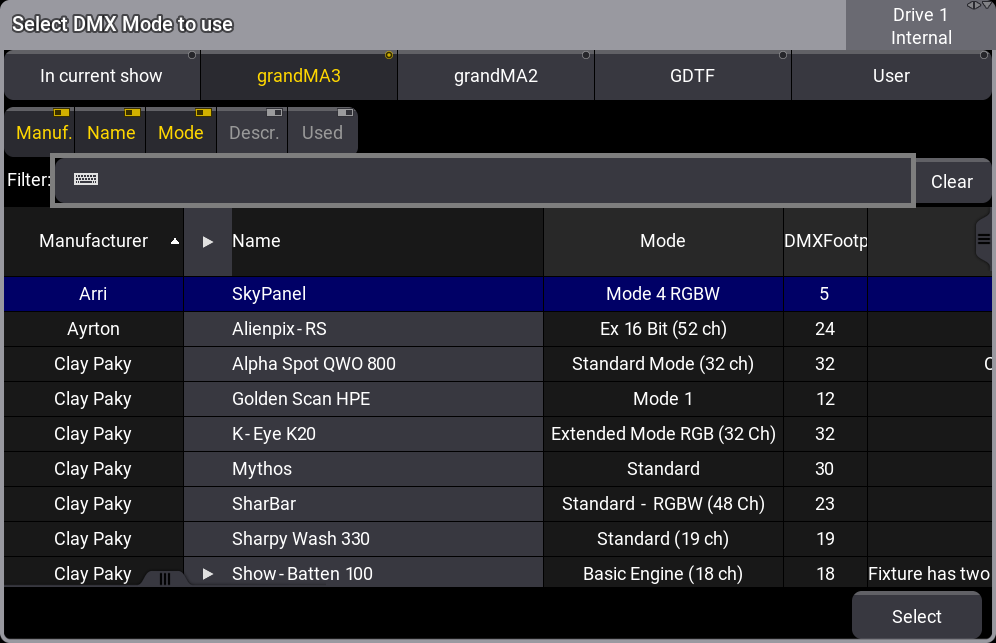
- In the pop-up, it is possible to change between different drives by tapping the drive button in the title bar. Select the desired drive.
- The fixtures are organized in different sources. The sources are: In current show, grandMA3 fixtures, grandMA2 fixtures, GDTF fixtures, and User fixtures. Select the desired source by tapping the relevant button at the top of the pop-up.
- If the list is long, then it might make sense to filter it by typing a word in the Filter input. There are different elements to filter by. For instance Manufacturer, Name, Mode, Description, and Used.
- Select the desired fixture from the list and tap Select. This opens the Insert New Fixtures Wizard. This comes in two different modes, depending on the mode of the patch. When the mode is Full then there are two more fields (Layer and Class). This is the Full version of the pop-up:
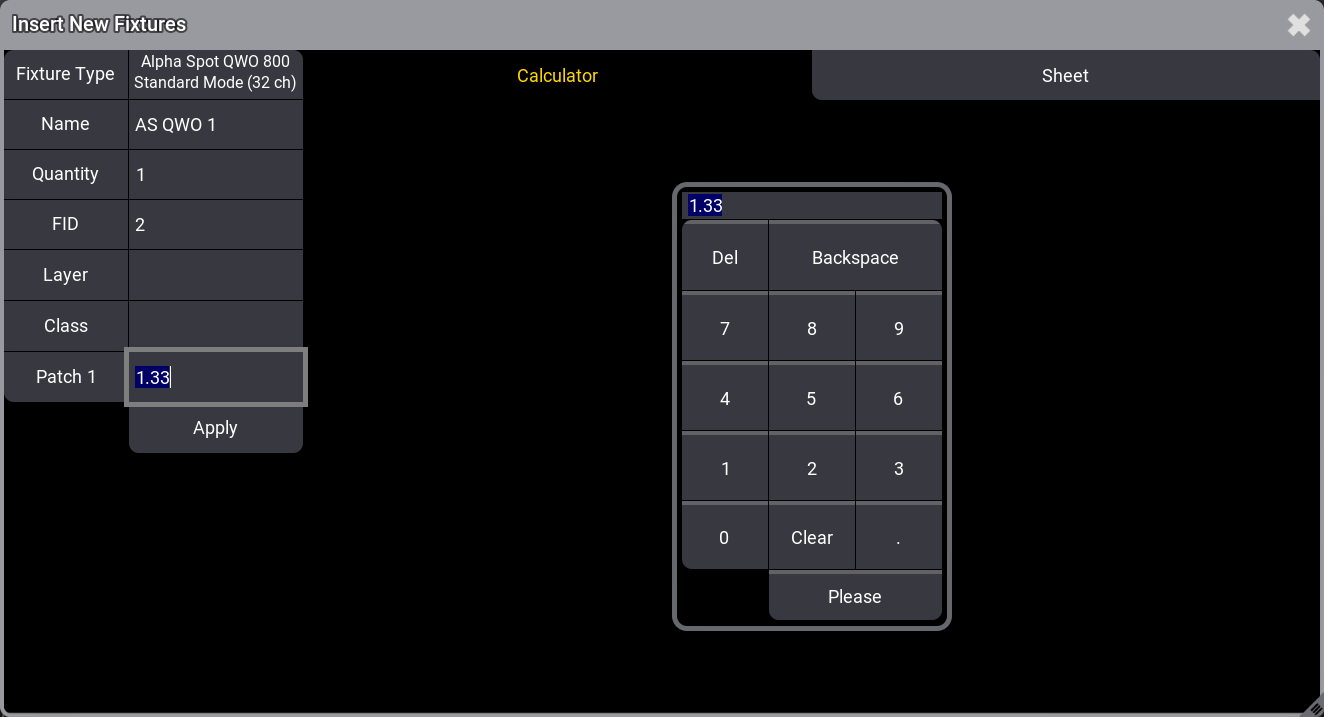
- All the fields in the right column can be filled with information. The required fields have a value suggestion. These can be edited to suit the needs. All the information can also be edited afterward in the patch menu. The area on the right side adapts to help filling out the selected field.
- Accept the suggestion values, or edit them to suit the needs.
- Tap Apply to add the fixtures.
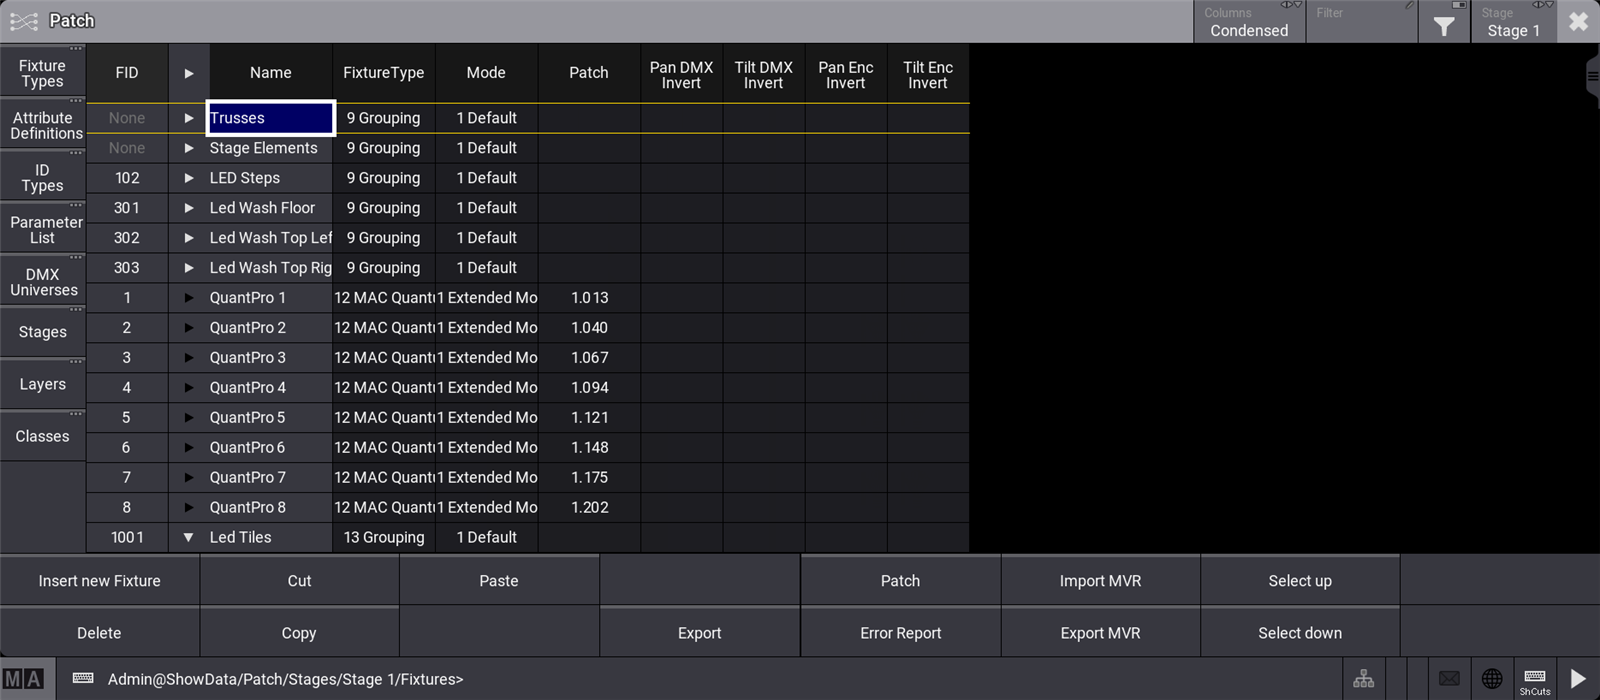
Each fixture is now represented by a row in the patch menu. Read below for an explanation of each column in the patch menu and also detailed information about changing some of the values.
Short Explanation of Each Column in the Patch Menu
The patch menu has a lot of columns. This is a short explanation of each. Remember that the patch menu has a condensed and full mode. Select Full to see all the columns.
- FID:
This is the Fixture ID of the fixture. Read more in the Assign an ID to fixtures below. - IDType:
This is the ID Type of the fixture. Read more in the Assign an ID to fixtures below. - CID:
This is the fixtures CID. Read more in the Assign an ID to fixtures below. - Name:
This is the name of the fixture. If there are sub-fixtures, then there is a right pointed arrow that can be tapped to unfold the sub-fixtures. - FixtureType:
This is the name of the selected fixture type. - Mode:
This is the mode of the selected fixture. - Patch:
This is the first DMX address of the fixture. Read more in the Assign DMX address to fixtures below. - Layer:
Fixtures can be organized in Layers. This is the layer information for the fixture. Read more in the Classes and Layers topic. - Class:
Fixtures can be organized in Classes. This is the class information for the fixture. Read more in the Classes and Layers topic. - Pan DMX Invert:
The Pan DMX output can be inverted by editing this field. This can be useful depending on how the fixtures are mounted. - Tilt DMX Invert:
The Pan DMX output can be inverted by editing this field. This can be useful depending on how the fixtures are mounted. - Pan Enc Invert:
Pan can be inverted for the encoder rotation by editing this field. This can be useful depending on how the fixtures are mounted. - Tilt Enc Invert:
Tilt can be inverted for the encoder rotation by editing this field. This can be useful depending on how the fixtures are mounted. - Pos X:
The is the fixtures position on the X-axis in the 3D window. - Pos Y:
The is the fixtures position on the Y-axis in the 3D window. - Pos Z:
The is the fixtures position on the Z-axis in the 3D window. - Rot X:
Is the rotation of the fixture on the X-axis in the 3D window. - Rot Y:
Is the rotation of the fixture on the Y-axis in the 3D window. - Rot Z:
Is the rotation of the fixture on the Z-axis in the 3D window. - Scale X:
This can be used to scale the fixture/object on the X-axis in the 3D window. The scale value is a factor where 1 is the default. A higher number makes the object bigger. A smaller number makes it smaller. - Scale Y:
This can be used to scale the fixture/object on the Y-axis in the 3D window. The scale value is a factor where 1 is the default. A higher number makes the object bigger. A smaller number makes it smaller. - Scale Z:
This can be used to scale the fixture/object on the Z-axis in the 3D window. The scale value is a factor where 1 is the default. A higher number makes the object bigger. A smaller number makes it smaller. - Gel Color:
Here a color can be defined that will be added to the output from the fixture. It is useful for adding gels to conventional fixtures. This is visualized in the console and 3D window. - Gel:
This column is not implemented. - Beam Angle:
Here a beam angle can be defined for the fixture. This is useful for conventional fixtures where different angles might be needed. This is visualized in the 3D window. - Cast Shadow:
Each fixture cast a show or not. Turning this on makes the 3D look more real world, but it also increases the calculations need for the 3D visualization. - Ray Traceable:
Turning this to Yes makes the fixtures or 3D objects something that can be selected or picked using the follow function in the 3D window. - 3D Selectable:
This is a Yes or No (text is hidden) field. Yes means that the fixture can be selected using the selection tool in the 3D window. It can bee useful to turn this off (No option) for stage elements that do not need to be controlled. - 3D Visible:
This is a Yes or No (text is hidden) field. Yes means that it is shown in the 3D window. - Master React:
There are three options to this setting: None, Group, and Grand. This defines if the intensity is affected by a master. If Grand is selected, then group masters are also affecting the fixture. If Group is selected then they are not affected by the grandmaster. None makes the fixture ignore both groups and grandmasters. - Appearance:
An appearance can be assigned to the fixture.
Assign an ID to Fixtures
The fixtures need at least one ID to be selected and controlled.
There are two types of ID numbers for each fixture. Fixtures can have both or just one of the two - but it needs at least one.
The FID is the default fixture ID. The number here is used with the Fixture keyword.
The CID is the second ID. This can be used if the IDType is something different than "Fixture". Editing the IDType field opens the Select IDType pop-up.
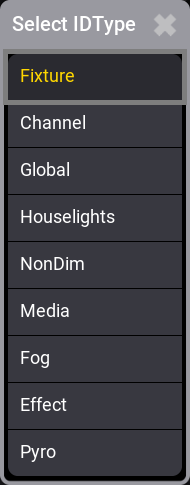
This lists the 9 different IDTypes. Select one that is not "Fixture" or "Global" to use the CID.
The Global type is a special type that the software automatically creates on a Global stage for each fixture type added to the patch. It should not be used for normal fixtures.
- Select the ID fields in one of the two ID columns (FID or CID) for the fixture rows where an ID is to be assigned. The selection order is important.
- Type a number on the keyboard and assign the number by pressing Please.
Now the fixtures have an ID. The numbers are assigned sequentially based on the selection order.
Assign DMX Address to Fixtures
The fixtures need to be assigned a DMX universe and address before being able to create any output.
There are two primary options to give the fixtures an address. One is to just type the desired address directly in the patch field. The other is to use the dedicated Edit Patch menu.
Type the number:
- Select the fields in the Patch column for the fixture rows where the address is to be assigned. The selection order is important.
- Type the DMX universe and address separated by a dot (for example 2.1) on the keyboard and assign the address by pressing Please.
Use the Edit Patch menu:
- Select the fields in the Patch column for the fixture rows where the address is to be assigned. The selection order is important.
- Right-click the blue selected areas or tap the Patch button - this opens the Edit Patch menu.
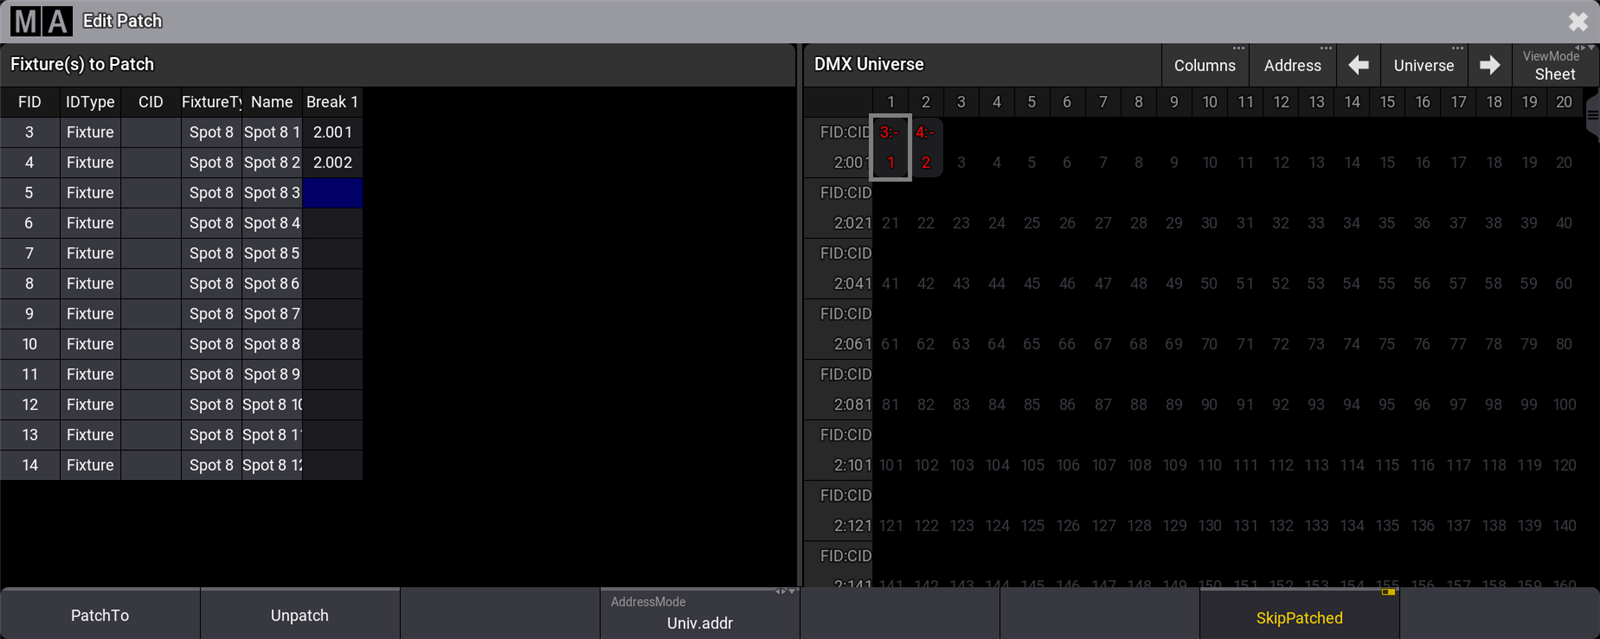
This menu is divided into two sides. On the left side, there are all the selected fixtures. on the right side, there is a view with all the DMX universes and addresses. The purpose of the menu is that fixtures can be selected on the left side and the universe list on the right side shows where there is available space in the universes. There are several ways to navigate universes and assign the fixtures to the selected DMX address.
The numbers on the right side are red if the universe is not granted.
The menu also opens a dedicated encoder toolbar:

This toolbar can be used to select fixtures, universe, and address.
This is one way to do it:
- Select the fixtures in the correct order.
- Use the encoders to navigate to the desired address.
- Tap the Address encoder to assign the fixtures to the address.
The Edit Patch menu auto closes when all the selected fixtures are patched.
Filtering the Patch Menu
Filtering in the patch menu can be useful when there are a lot of fixtures and stage elements.
There are two ways to filter the fixtures in the patch menu.
An existing filter can be assigned using the Filter input in the title bar. Tapping this opens a small select pop-up that lists all existing filters (read about crating filter in the Create a Filter topic). Two other options are None (no filter) and New (create new filter). Select the desired filter.
Filtering needs to be turned On for the filter to be active. Tap the filter icon button (between Filter and Stage) to turn it On. This button toggles On or Off.
Turning filters On also exposes column filters. An extra row is displayed above the fixture rows just below the column titles. The patch can be filtered by any column value simply by editing the filter field for a column. Only one filter value can be applied to each column.
Edit a column filter field to assign a value. Some fields open a small selection pop-up giving a list of options. Others are input fields where a text needs to be written.
The column filters can be combined with a filter from the pool.
Closing the Patch Menu
There is a pop-up asking what to do when exiting the patch menu.
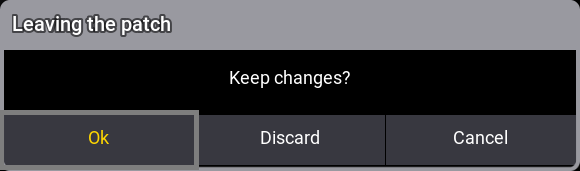
This asks if the changes should be kept.
Tap Ok to save the changes and leave the patch menu. Tap Discard to cancel any changes and leave the patch menu. Tap Cancel to stay in the patch menu.