

- grandMA3 User Manual
- Introduction
- About the manual
- Symbols used in the manual
- System requirements grandMA3 onPC
- Installation of grandMA3 onPC
- Device Overview
- grandMA3 console
- grandMA3 replay unit
- grandMA3 processing units
- grandMA3 onPC command wing
- Keys
- Keys Overview
- . [Dot]
- <<< [GoFastBackward] | Black
- >>> [GoFastForward] | Flash
- - [Minus]
- + [Plus]
- / [Slash] | * [Asterisk/Multiply]
- At
- Assign
- Align
- Blind
- Clear
- Channel
- Copy
- Cue
- Down
- Delete
- Esc
- Edit
- Freeze
- Full
- Fixture
- Group
- Goto
- Go+ [large]
- Go- [large]
- Go+ | Temp
- Go- | Top
- Help
- Highlt [Highlight]
- If
- Learn | Rate1
- List
- MA
- Menu
- Move
- Next
- Numeric keys | arrows
- Oops
- On
- Off
- Pause [large]
- Pause | Fix
- Page+
- Page-
- Please
- Power
- Preset
- Prvw [Preview]
- Prev [Previous]
- Select
- SelFix [SelectFixture]
- Sequ [Sequence]
- Set
- Solo
- Stomp
- Store
- Thru
- Time
- Up
- Update
- U1
- U2
- X1 | Clone
- X2 | Link
- X3 | Grid
- X4 | Layout
- X5 | Step
- X6 | TC
- X7 | View
- X8 | DMX
- X9
- X10
- X11
- X12
- X13 | Phaser
- X14 | Macro
- X15 | Page
- X16 | Exec
- XKeys
- Control elements
- Dual encoders
- Level wheel
- Grand master
- Executor elements
- System Overview
- Standalone device
- Locally networked devices
- World server
- Parameters
- Calculate parameters
- Expand the amount of parameters
- First Steps
- Unpack the device
- Check scope of delivery
- Position the device
- Connect power
- Connect desk light
- Connect external screens
- Connect USB mouse and USB keyboard
- Connect DMX
- Connect Audio In
- Connect SMPTE (LTC)
- Connect Ethernet
- Connect DC Remote In
- Turn on the console the first time
- Show File Management
- Workspace
- User interface
- User-defined area
- Command line
- Control bar
- View buttons
- Grand master
- Tables in general
- Gestures
- Command section
- Master controls
- Playback controls
- Allocation of displays
- Encoder bar
- Feature group control bar
- Encoder toolbar
- Calculator
- Colors
- Icons
- User interface
- Command Syntax and Keywords
- General syntax rules
- Object keywords
- Function keywords
- Helping keywords
- All keywords
- / [Slash]
- . [Dot]
- .. [DotDot]
- <<< [GoFastBackward]
- >>> [GoFastForward]
- - [Minus]
- * [Asterisk]
- % [Percent]
- + [Plus]
- Absolute
- Acceleration
- Action
- Align
- AlignTransition
- Appearance
- Assign
- At
- Attribute
- Black
- Blind
- BPM
- Camera
- ChangeDestination
- Channel
- ChannelSet
- Chat
- Clear
- ClearActive
- ClearAll
- ClearSelection
- CmdDelay
- Configuration
- Console
- Copy
- Cue
- CueDelay
- CueFade
- CueInDelay
- CueInFade
- CueOutDelay
- CueOutFade
- Cut
- DataPool
- Decimal8
- Decimal24
- Default
- Delay
- Delete
- DelGlobalVar
- DelUserVar
- Dismiss
- DMXUniverse
- Down
- Drive
- Echo
- Edit
- EditOption
- Eject
- Effect
- EndIf
- Escape
- Exchange
- Executor
- Export
- Extract
- FaderMaster
- FaderRate
- FaderSpeed
- FaderTemp
- FaderX
- FeatureGroup
- Filter
- Fix
- Fixture
- Flip
- Flash
- Fog
- Freeze
- Full
- Gel
- GetGlobalVar
- GetUserVar
- Global
- Go-
- Goto
- Grid
- Group
- Help
- Hex8
- Hex24
- Highlight
- Houselights
- Hz
- If
- Insert
- Integrate
- Interface
- Invite
- Join
- Label
- Layout
- Leave
- Library
- List
- ListRef
- Load
- Loaded
- LoadShow
- Lock
- Login
- Logout
- Macro
- Master
- Media
- Move
- NewShow
- Next
- Node
- NonDim
- Normal
- Off
- On
- OnPC
- OSC
- Oops
- Page
- Part
- Park
- Paste
- Patch
- Pause
- Percent
- PercentFine
- Phase
- Physical
- Plugin
- Preset
- Press
- Previous
- Programmer
- PU
- Pyro
- Rate1
- Readout
- Reboot
- Recast
- Relative
- Release
- ReloadUI
- Remove
- Reset
- Restart
- SaveShow
- Scribble
- Seconds
- Select
- Selection
- SelFix
- Sequence
- SendOSC
- Set
- SetGlobalVar
- SetUserVar
- Shutdown
- SnapDelay
- Solo
- Station
- Step
- Stomp
- Store
- Temp
- Thru
- Top
- Transition
- Unlock
- Unpark
- Unpress
- Up
- Update
- User1
- User2
- User
- Version
- View
- Width
- Wing
- World
- Zero
- General syntax rules
- Windows, Views, and Menus
- Add windows
- Rearrange
- Store and recall views
- Remove windows from a screen
- Window settings
- Menus
- Change menu locations
- Pool windows
- Create pool object
- Label pool objects
- Move pool objects
- Insert pool objects
- Copy pool objects
- Lock and unlock pool objects
- Delete pool objects
- Networking
- Interfaces and IP
- Session
- Create a session
- Leave a session
- Invite to a session
- Dismiss from session
- Create a custom key
- DMX In and Out
- DMX port configuration
- Ethernet DMX
- Art-Net menu
- sACN menu
- Single User and Multi User Systems
- Create User
- User settings
- Patch and Fixture Setup
- What are fixtures
- Add fixtures to the show
- Live patch
- DMX sheet
- Remove fixtures from the show
- Position fixtures in the 3D space
- 3D Window
- Camera Pool
- Stages
- Classes and Layers
- Attribute definitions
- Activation group
- Feature group
- Operate Fixtures
- What is the programmer
- Fixture sheet
- Using the color picker
- Align
- Selection window
- Scribbles
- Create scribbles
- Edit scribbles
- Assign scribbles
- Delete scribbles
- Images
- Screenshots
- Appearance
- Create appearances
- Use appearances
- Delete appearances
- Groups
- Create groups
- Edit groups
- Delete groups
- Group masters
- Presets
- Preset pools
- Create presets
- Assign input filter
- Edit presets
- Update presets
- Preset pool settings
- Embedded presets
- Store values of multi steps
- Delete presets
- Worlds and Filters
- At filter
- Create a world
- Create a filter
- Use a world or filter
- Delete a world
- Delete a filter
- Cues and Sequences
- What is tracking
- Look at cues and sequences
- Sequence settings
- Store cues
- Store options and preferences
- Play back cues
- Cue timing
- Executors
- Assign object to an executor
- Executor configurations
- Running playbacks
- Phasers
- Step bar
- Phaser editor
- Create sinus dimmer phaser
- Macros
- Create macros
- Edit macros
- Assign macros to keys and buttons
- Timecode
- Toggle view mode
- What are timecode slots
- Layouts
- Create a layout
- Layout pool settings
- Edit layout
- Layout view settings
- Edit layout view
- Edit layout elements
- System Information
- Date and time
- Clock
- System info
- Update the Software
- Update grandMA3 consoles
- Update grandMA3 xport nodes
- Fixture Types
- Import fixture types
- Import GDTF
- Build fixture types
- Insert fixture types
- Insert DMX modes
- Insert geometries
- Insert models
- Link models to geometries
- Link DMX modes to geometries
- Export fixture types
- Export GDTF
- Import fixture types
- Introduction
- grandMA3 Quick Manual consoles
- grandMA3 Quick Manual processing
- grandMA3 Quick Manual nodes
- grandMA3 Quick Manual DIN-Rail
- grandMA3 Quick Manual onPC solutions
- Release Notes
New help version
The help version you selected belongs to an older software version. You may want to view the latest help version.
3D Window
Table of contents of this topic
The 3D window shows a 3D visualization of the virtual space where fixtures can be positioned and rotated.
The fixtures project a light beam that moves and change color when the values for the fixtures are changed.
All the fixtures and the stage object can be positioned and rotated in the Patch, Live Patch, or using this window.
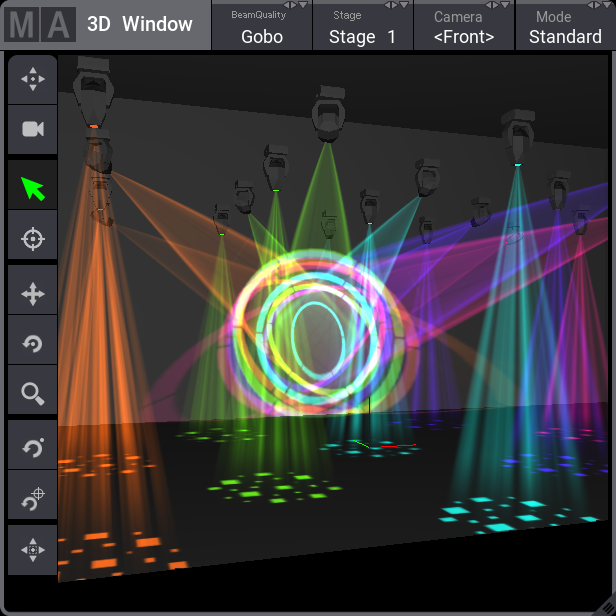
The Stage object is always visualized as a box. The box can be looked into, but not out of.
The position, direction, and other settings defining from where and how, the 3D space is viewed, is defined by a Camera object.
Title buttons
There are four buttons in the title bar. All the buttons are swipe buttons that opens a list of the available options.
They give fast access to select the Beam Quality, Stage object, Camera, and Mode of the window.
There can be several stages in the patch. Each 3D window can show one of these stages. Read more about stages in the Stages topic.
Read about the other settings below.
Left hand side menu
The menu has several buttons. These button are used to control what happens when the window is touched and to change camera positions (read more about the cameras below). The ones that change the touch mode are tapped to select the mode and then when the window is touched the mode dictates what happens. The selected mode is displayed with a green color. Most of the icons are grayed out and disabled if the selected camera is locked.
This is the explanation of the different icons:
 (fit) icon
Tapping this button moves the camera to fit the entire stage area into the view. (camera) icon
This button resets the selected camera to the cameras factory defined location and preferences. (select) icon
Sets the touch mode to Select. This is used to select fixtures in the window. The fixtures can be tapped or selected using a selection lasso. (follow) icon
Sets the touch mode to Follow. This makes all the selected moving lights point to the stage area that is touched. The follow function obeys the Align settings. (move) icon
The mode is set to Camera Move. Move means changing the position of the camera without changing the pan and tilt values. The scroll wheel on a mouse moves the camera forwards and backwards in the view based on the location of the pointer (not necessary the center). (rotate center) icon
Sets the mode to Camera Orbit. This mode orbits the camera around the center of the window keeping it pointed towards the center. The scroll wheel on a mouse moves the camera closer to or away from the location of the pointer (not necessary the center). (zoom) icon
Changes the mode to Camera Zoom. This mode moves the camera in and out of the 3D window. This can also be done in the other modes using a scroll wheel on a mouse. (rotate pivot) icon
This mode also orbits the camera, but this orbit around a pivot point that does not have to be the center. The pivot point can be set (read about next icon) and is remembered until a new point is set. The scroll wheel functions just like the rotate center mode. (set pivot) icon
This button is used to set a new pivot point in the window. As soon as the point has been set (by clicking or touching the window), then the rotate pivot mode is selected. (fit selected) icon
Tapping this button moves the camera to fit the selected fixtures into the view without orbiting the camera.
Moving the camera
The Cameras are pool objects in the Camera Pool. A camera can be moved to different locations and pointed in different directions.
This information can be edited in the pool, but the position and direction is easier to change the 3D window - read about the left hand side menu above. There is one camera mode that cannot be accessed in the menu on the left side (Camera Pivot). This can only be changed in the window settings. Read more be below.
Camera Pivot is a lot like Orbit - the difference is that the camera orbits around the point touched in the window instead of always around the center of the 3D space. A scroll wheel on a mouse moves the camera closer to or away from the pointers location.
Editing the camera in the pool allows to change the camera mode and type. Read more in the Camera Pool topic (link above).
Moving the fixtures
The fixtures position and rotation can be set in the patch or live patch. But they can also be positioned live in the 3D window.
Read more about this in the Position fixtures in the 3D space topic.
Window Settings
The settings can be opened by tapping the MA logo in the upper left corner of the 3D window.
This opens the standard settings pop-up. In this pop-up there is a tab called 3D Settings. This tab have two subtabs called Rendering and Misc.
Rendering settings
The rendering settings are about the light levels, colors, and rendering quality.
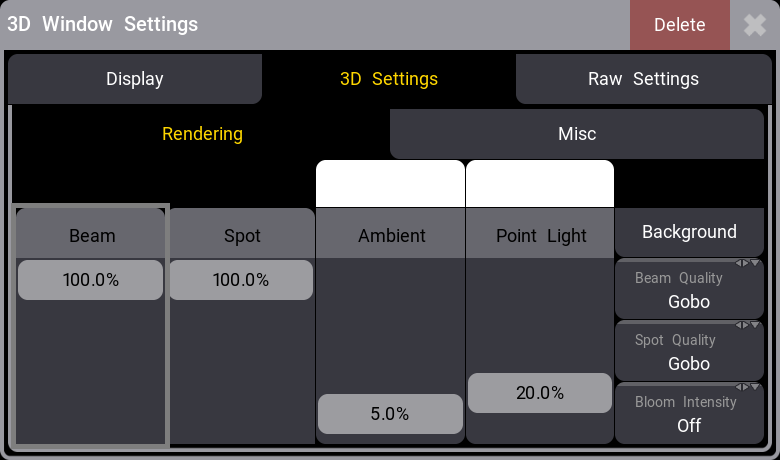
There are four on-screen faders:
- Beam
This is the visibility of the light beam from all fixtures. - Spot
This is the general intensity of the visualization of the light beam reflection where it hits a surface. - Ambient
This is the ambient light level inside and outside the stage box. It is a very diffuse light that removes some of the contrasting in the 3D window. - Point Light
Is a light source from the direction of the camera. It is used to light up the elements in the 3D space.
The Ambient and Point Light can be colored, similar to putting a gel in front of the light. The area above the faders can be tapped to open a color selector pop-up.
The Background can also be colored. The Ambient light needs to be turned up for this color to be visible.
There are three swipe buttons to set the quality and the Bloom intensity:
- Beam Quality
This toggles through a list of different simulation qualities that can be selected for the light beam. The options include: Line and Gobo. - Spot Quality
Just like the beam above, there is also a setting for the detail level where the beam hits a surface. Tapping this toggles through the following options: No Spot and Gobo. - Bloom Intensity
The blooming effect can be changed to different levels on intensity. Tapping this button toggles through steps from "Off" (0%) to "Max" (100%) in 10% increments.
They are swipe buttons, so remember that the options ca be reached easily by swiping out of the button.
Misc Settings
The other subtab is called Misc and has a few options.
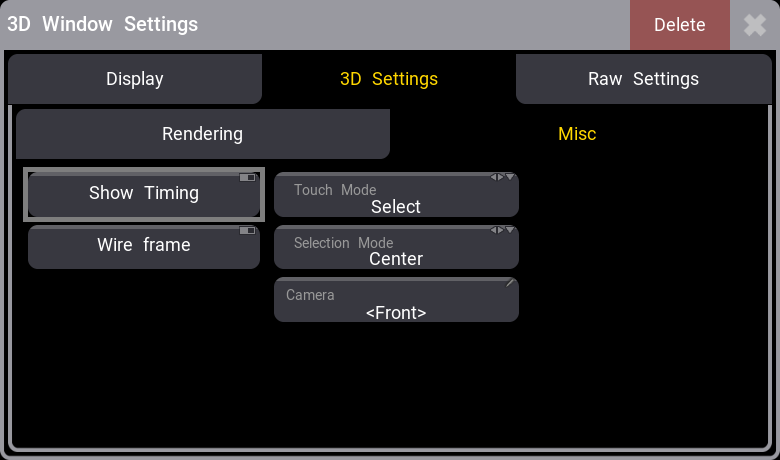
Currently there are the following settings:
- Show Timing
Turning this On displays timing information in the window. - Wire frame
Turning this On show the 3D window as wire frame in stead of a shaded view. - Touch Mode
Touching and swiping in the 3D window can interact with the window in different ways. This setting defines how. Tapping it toggles through the following options: Select, Follow, Camera Orbit, Camera Zoom, Camera Move, Camera Pivot, and Camera Set Pivot. The Camera options moves the camera - Read move above. The Select option is used to select fixtures in the view. - Selection Mode
The selection mode has three different options: Center, Occluded, and Occluded not. This defines how the fixtures are selected. - Camera
This setting opens the Select Camera pop-up. It lists the existing cameras and at the top is a Link Selected option that will use the currently selected camera in the Camera Pool. This setting can also be changed in the Title bar.