

- grandMA3 User Manual
- Introduction
- About the manual
- Symbols used in the manual
- System requirements grandMA3 onPC
- Installation of grandMA3 onPC
- Device Overview
- grandMA3 console
- grandMA3 replay unit
- grandMA3 processing units
- grandMA3 onPC command wing
- Keys
- Keys Overview
- . [Dot]
- <<< [GoFastBackward] | Black
- >>> [GoFastForward] | Flash
- - [Minus]
- + [Plus]
- / [Slash] | * [Asterisk/Multiply]
- At
- Assign
- Align
- Blind
- Clear
- Channel
- Copy
- Cue
- Down
- Delete
- Esc
- Edit
- Freeze
- Full
- Fixture
- Group
- Goto
- Go+ [large]
- Go- [large]
- Go+ | Temp
- Go- | Top
- Help
- Highlt [Highlight]
- If
- Learn | Rate1
- List
- MA
- Menu
- Move
- Next
- Numeric keys | arrows
- Oops
- On
- Off
- Pause [large]
- Pause | Fix
- Page+
- Page-
- Please
- Power
- Preset
- Prvw [Preview]
- Prev [Previous]
- Select
- SelFix [SelectFixture]
- Sequ [Sequence]
- Set
- Solo
- Stomp
- Store
- Thru
- Time
- Up
- Update
- U1
- U2
- X1 | Clone
- X2 | Link
- X3 | Grid
- X4 | Layout
- X5 | Step
- X6 | TC
- X7 | View
- X8 | DMX
- X9
- X10
- X11
- X12
- X13 | Phaser
- X14 | Macro
- X15 | Page
- X16 | Exec
- XKeys
- Control elements
- Dual encoders
- Level wheel
- Grand master
- Executor elements
- System Overview
- Standalone device
- Locally networked devices
- World server
- Parameters
- Calculate parameters
- Expand the amount of parameters
- First Steps
- Unpack the device
- Check scope of delivery
- Position the device
- Connect power
- Connect desk light
- Connect external screens
- Connect USB mouse and USB keyboard
- Connect DMX
- Connect Audio In
- Connect SMPTE (LTC)
- Connect Ethernet
- Connect DC Remote In
- Turn on the console the first time
- Show File Management
- Workspace
- User interface
- User-defined area
- Command line
- Control bar
- View buttons
- Grand master
- Tables in general
- Gestures
- Command section
- Master controls
- Playback controls
- Allocation of displays
- Encoder bar
- Feature group control bar
- Encoder toolbar
- Calculator
- Colors
- Icons
- User interface
- Command Syntax and Keywords
- General syntax rules
- Object keywords
- Function keywords
- Helping keywords
- All keywords
- / [Slash]
- . [Dot]
- .. [DotDot]
- <<< [GoFastBackward]
- >>> [GoFastForward]
- - [Minus]
- * [Asterisk]
- % [Percent]
- + [Plus]
- Absolute
- Acceleration
- Action
- Align
- AlignTransition
- Appearance
- Assign
- At
- Attribute
- Black
- Blind
- BPM
- Camera
- ChangeDestination
- Channel
- ChannelSet
- Chat
- Clear
- ClearActive
- ClearAll
- ClearSelection
- CmdDelay
- Configuration
- Console
- Copy
- Cue
- CueDelay
- CueFade
- CueInDelay
- CueInFade
- CueOutDelay
- CueOutFade
- Cut
- DataPool
- Decimal8
- Decimal24
- Default
- Delay
- Delete
- DelGlobalVar
- DelUserVar
- Dismiss
- DMXUniverse
- Down
- Drive
- Echo
- Edit
- EditOption
- Eject
- Effect
- EndIf
- Escape
- Exchange
- Executor
- Export
- Extract
- FaderMaster
- FaderRate
- FaderSpeed
- FaderTemp
- FaderX
- FeatureGroup
- Filter
- Fix
- Fixture
- Flip
- Flash
- Fog
- Freeze
- Full
- Gel
- GetGlobalVar
- GetUserVar
- Global
- Go-
- Goto
- Grid
- Group
- Help
- Hex8
- Hex24
- Highlight
- Houselights
- Hz
- If
- Insert
- Integrate
- Interface
- Invite
- Join
- Label
- Layout
- Leave
- Library
- List
- ListRef
- Load
- Loaded
- LoadShow
- Lock
- Login
- Logout
- Macro
- Master
- Media
- Move
- NewShow
- Next
- Node
- NonDim
- Normal
- Off
- On
- OnPC
- OSC
- Oops
- Page
- Part
- Park
- Paste
- Patch
- Pause
- Percent
- PercentFine
- Phase
- Physical
- Plugin
- Preset
- Press
- Previous
- Programmer
- PU
- Pyro
- Rate1
- Readout
- Reboot
- Recast
- Relative
- Release
- ReloadUI
- Remove
- Reset
- Restart
- SaveShow
- Scribble
- Seconds
- Select
- Selection
- SelFix
- Sequence
- SendOSC
- Set
- SetGlobalVar
- SetUserVar
- Shutdown
- SnapDelay
- Solo
- Station
- Step
- Stomp
- Store
- Temp
- Thru
- Top
- Transition
- Unlock
- Unpark
- Unpress
- Up
- Update
- User1
- User2
- User
- Version
- View
- Width
- Wing
- World
- Zero
- General syntax rules
- Windows, Views, and Menus
- Add windows
- Rearrange
- Store and recall views
- Remove windows from a screen
- Window settings
- Menus
- Change menu locations
- Pool windows
- Create pool object
- Label pool objects
- Move pool objects
- Insert pool objects
- Copy pool objects
- Lock and unlock pool objects
- Delete pool objects
- Networking
- Interfaces and IP
- Session
- Create a session
- Leave a session
- Invite to a session
- Dismiss from session
- Create a custom key
- DMX In and Out
- DMX port configuration
- Ethernet DMX
- Art-Net menu
- sACN menu
- Single User and Multi User Systems
- Create User
- User settings
- Patch and Fixture Setup
- What are fixtures
- Add fixtures to the show
- Live patch
- DMX sheet
- Remove fixtures from the show
- Position fixtures in the 3D space
- 3D Window
- Camera Pool
- Stages
- Classes and Layers
- Attribute definitions
- Activation group
- Feature group
- Operate Fixtures
- What is the programmer
- Fixture sheet
- Using the color picker
- Align
- Selection window
- Scribbles
- Create scribbles
- Edit scribbles
- Assign scribbles
- Delete scribbles
- Images
- Screenshots
- Appearance
- Create appearances
- Use appearances
- Delete appearances
- Groups
- Create groups
- Edit groups
- Delete groups
- Group masters
- Presets
- Preset pools
- Create presets
- Assign input filter
- Edit presets
- Update presets
- Preset pool settings
- Embedded presets
- Store values of multi steps
- Delete presets
- Worlds and Filters
- At filter
- Create a world
- Create a filter
- Use a world or filter
- Delete a world
- Delete a filter
- Cues and Sequences
- What is tracking
- Look at cues and sequences
- Sequence settings
- Store cues
- Store options and preferences
- Play back cues
- Cue timing
- Executors
- Assign object to an executor
- Executor configurations
- Running playbacks
- Phasers
- Step bar
- Phaser editor
- Create sinus dimmer phaser
- Macros
- Create macros
- Edit macros
- Assign macros to keys and buttons
- Timecode
- Toggle view mode
- What are timecode slots
- Layouts
- Create a layout
- Layout pool settings
- Edit layout
- Layout view settings
- Edit layout view
- Edit layout elements
- System Information
- Date and time
- Clock
- System info
- Update the Software
- Update grandMA3 consoles
- Update grandMA3 xport nodes
- Fixture Types
- Import fixture types
- Import GDTF
- Build fixture types
- Insert fixture types
- Insert DMX modes
- Insert geometries
- Insert models
- Link models to geometries
- Link DMX modes to geometries
- Export fixture types
- Export GDTF
- Import fixture types
- Introduction
- grandMA3 Quick Manual consoles
- grandMA3 Quick Manual processing
- grandMA3 Quick Manual nodes
- grandMA3 Quick Manual DIN-Rail
- grandMA3 Quick Manual onPC solutions
- Release Notes
New help version
The help version you selected belongs to an older software version. You may want to view the latest help version.
Store Cues
Table of contents of this topic
Storing a cue is the default Store action in grandMA3.
This means that if nothing else is defined and you just press Store Please, then a new cue is stored in the selected sequence.
Or press Store, followed by pressing the executor button where the sequence with the cue should be stored.
If there are active values in the programmer, then they are stored into the cue, but programmer values are not needed to store cues.
Of course, there are more details about storing cues, so please keep reading.
Store a New Cue on an Empty Executor
If a cue is stored on an empty executor, then the grandMA3 software automatically stores the cue in a new sequence and assigns this executor to control the sequence using the default settings.
Going back to the second example at the top of this topic: just pressing the Store button and then an executor button on the empty executor is enough. The software assumes the desired action is storing a cue.
This will automatically be cue number 1 - nothing else was specified.
Storing cues obeys Worlds and Filters. This enables control of what is stored. Worlds and filters can also be assigned to the sequence both as an input but also as an output filter - independently of each other. This will function as an input or output filter allowing only the elements in the world to be stored in or played back from the sequence.
Store the Second Cue
If the store function is used again on the same sequence - without adding cue number details - then the grandMA3 does not know what should happen and a pop-up appears, giving different choices.
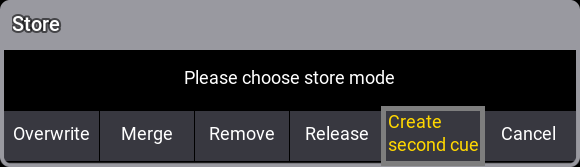
Tapping Create Second Cue will store a cue with the next whole number.
Overwrite and Merge options are explained below. Remove and Release are described in the What is Tracking topic. Cancel does not store anything.
Cue Numbers
When a cue is stored, it is possible to specify a cue number. This is done by using the following syntax: Store Cue cue_number. It is also possible to specify a sequence or an executor, using the keys in the command section, while storing:
Store Cue cue_number Sequence sequence_number or
Store Cue cue_number Executor executor_number.
Notice that the cues are stored in the sequence. Using the executor number will store the cue into the sequence the executor is controlling.
Cue numbers have three decimal numbers. If all are zero then they are not displayed. But cue number "42" is the same as cue number "42.000" - it is not "42 thousand", it is "42 point 0 0 0". The currently highest cue number that can be stored is "999 999.999". The lowest number that can be stored is "0.001".
Storing nearly 1 billion cues will completely fill the memory and make the show file VERY big.
The software will cancel the store process before the system crashes, but almost any operation after this will make the software shutdown!!
The software hides the trailing decimal zeros, but they are still there. This means that cue "5.2" is after cue "5.11" because they are actually cue "5.200" and "5.110".
It is not limited to only store a single cue number at a time. It can just as easily be a range of numbers - this means that it is possible to use Thru, +, and - buttons to create number ranges to be stored.
If you are going to be working with or adding a lot of cues to the same sequence, then it can be a good idea to select the sequence.
This can be done easily by pressing the Select key and then one of the buttons associated with the executor controlling the sequence or tap the sequence in the sequence pool.
If no sequence or executor is defined in the store command, then the selected sequence is used.
Store Into Cues that are Not Empty
If the store operation is used to store into already existing cues then a pop-up like this appears:

It only appears if the store options do not specify what should happen.
Have a look at the Store Options and Defaults topic for information about specifying this while storing.
Remove and Release are described in details in the What is Tracking topic.
The two relevant options are:
- Overwrite:
This will remove what is already stored in the cue and only store the new values. - Merge:
This will merge the new values into the existing values. New values have a higher priority and will overwrite existing values.
Examples
In the following examples we have a sequence with the following two cues:
| Number | Name | 1:DIM | 2:DIM |
|---|---|---|---|
| 1 | Cue 1 | 100% | |
| 2 | Cue 2 | 100% | 100% |
The cursive value for fixture 1 in cue 2 is a tracked value. Tracked values are indicated like this for the next examples.
Now we turn on fixture 3 at 100 % and store this into cue 2.
This is the result if Overwrite is chosen:
| Number | Name | 1:DIM | 3:DIM |
|---|---|---|---|
| 1 | Cue 1 | 100% | |
| 2 | Cue 2 | 100% | 100% |
Now fixture 2 is gone. This is because it only had values stored in cue number 2.
If we had chosen Merge instead it would have looked like this:
| Number | Name | 1:DIM | 2:DIM | 3:DIM |
|---|---|---|---|---|
| 1 | Cue 1 | 100% | ||
| 2 | Cue 2 | 100% | 100% | 100% |
Now the value from fixture 3 is added to the existing values. The dimmer value for fixture 1 is not affected because it is a tracked value.
Store Cues with Timings
When storing a cue it is possible to also store the different cue timings. This is described in detail the Cue Timings topic, but here is the short version.
The Time button will add different timing keywords to the command when storing.
For instance, storing cue 4 with a fade time of 6 seconds and a delay of 1 second, the following keys can be pressed:
Store Cue 4 Time 6 Time 1 Please
This is the result in the command line feedback:
Pressing the Time button repeatedly will change what timing it adds.
Adding and Using Cue Labels
A cue can be given a name - using the label keyword - while it is stored. This is the syntax: Store Cue [cue number] "my cue name".
The keyboard is needed for writing this. The quotation marks are needed to tell the software that this is text - then it is not interpreted as a command.
Labels can also automatically be numerated while storing. Have a look at this command:
This will not label both cue 2 and 4 the same - it will add 1 to the number for each cue. The result is that cue 2 is called "BO Scene 1" and cue 4 is "BO Scene 2". This enumeration only works if the number is the last part of the label and if there is a space between the last word and number.
Cue labels can be used when storing. This means that if there are several cues whose labels start with "BO", then it is possible to store into all these cues in one operation using BO plus an asterisk. See the following example.
Example
This is the cue sequence and content before storing:
| Number | Name | 1:DIM |
|---|---|---|
| 1 | Cue 1 | 100% |
| 2 | BO Scene 1 | 100% |
| 3 | Cue 3 | 100% |
| 4 | BO Scene 2 | 100% |
| 5 | Cue 5 | 100% |
Notice that cue 3 and 5 are blocked. This means that 100% is stored in the cues even though it is currently not necessary.
With an active value of 0% for fixture 1, use the keyboard to type the following command:
This is the result:
| Number | Name | 1:DIM |
|---|---|---|
| 1 | Cue 1 | 100% |
| 2 | BO Scene 1 | 0% |
| 3 | Cue 3 | 100% |
| 4 | BO Scene 2 | 0% |
| 5 | Cue 5 | 100% |
The two cues whose label begins with BO now got the new value.
Store Cue Parts
Besides the many cues that could be stored in each sequence, it is also possible to store 256 Cue Parts to each cue.
Cue parts are a division of the "main" cue. The "main" cue is actually part 0. The first part that can be stored is number 1.
A value can only be in one of the parts. Have a look at this example:
| Number | Name | 1:DIM | 2:DIM | 3:DIM |
|---|---|---|---|---|
| 1 | Cue 1 | 100% | 0% | 0% |
| 2 | Cue 2 | 100% | 100% | |
| 2P10 | Part 10 | 100% |
Notice that the value for fixture 3 is stored in cue 2 part 10. It does not have a value in cue 2 part 0 (the main cue). And the values from fixtures 1 and 2 are in the main cue and therefore do not have any value in cue 2 part 10.
Storing something in a part is almost as easy as storing the main cue. Using the example above the keypresses would be:
Store Cue 2 Cue 1 0 Please
The second press on the cue key will result in the Part keyword and the command line feedback looks like this:
Using Command Line Input to Add More While Storing
In the example using the cue labels to store, there was a command that showed some of the other possibilities while storing cues.
The command line gives access to all the store options that can be found in the GUI Store Options - read about them in the Store Options and Defaults topic.
All the different elements are described in the Store Keyword topic.
Examples
The following are just a few extra command line examples showing some of the possibilities while storing.
Stores cue number 1.2 in sequence 4.
It does not matter if you write sequence or cue first. So this could also have been:
The commands can often be written shorter in the command line input. See some examples in the General Syntax Rules topic.
Read the topics about each keyword to see the short version for the keyword.
This will store the cue with a name, it is merged, and it is also stored with an in-fade of six seconds and an out-fade of three seconds. Read more about the store options in the Store options and defaults topic.
Store Remove
A version of storing is the Store Remove, where the Remove button is selected in the store pop-up (described above).
This will remove the stored values for the attributes that currently have active values in the programmer.
The values in the programmer are irrelevant in this case. They are simply an indicator of what attributes you want to remove from the cue.