

- grandMA3 User Manual
- grandMA3 Quick Manual consoles
- Intended Use
- Safety
- Support
- Transport
- Limitations
- Quick Start
- Maintenance
- Disposal
- Technical Data
- Pixel Faults
- Conformity
- grandMA3 Quick Manual processing
- grandMA3 Quick Manual Nodes
- grandMA3 Quick Manual DIN-Rail
- grandMA3 Quick Manual onPC command wing XT
- grandMA3 Quick Manual onPC command wing
- grandMA3 Quick Manual onPC fader wing
- Release Notes
Hint:
New help version
The help version you selected belongs to an older software version. You may want to view the latest help version.
New help version
The help version you selected belongs to an older software version. You may want to view the latest help version.
Version 1.3
Quick Start
grandMA3 connectors

Hint:
To display the rear panel connectors on the letterbox screens, type:
To display the rear panel connectors on the letterbox screens, type:
Menu "Connectorview"
1. Desk light
2. powerCON TRUE1
3. Power switch
4.-10. DMX
11. DisplayPort 4
12. MIDI In
13. MIDI Out
14. DisplayPort 5
15. LTC / SMPTE In
16. USB 3.0
17. Audio Remote In
18. DC Remote In
19. S/PDIF In
20. Ethernet 1
21. Ethernet 2
22. Ethernet 3
23. S/PDIF Out
24. 3x USB 2.0
Turn on the console
- Unpack the device.
- Remove the packaging, cushioning material, and the dust cover.
- Place the device indoors on a stable surface.
- Connect external monitors to the console using a native DisplayPort connector.
- Start the grandMA3 console:
-Insert powerCON TRUE1 into the corresponding jack.
-Connect the main power plug.
-Turn on the power switch:
-Set it to position I.
-The power switch lights up in red.
-Press the power key on the front panel.
-The device starts booting.
-The Mode Selection dialog appears.
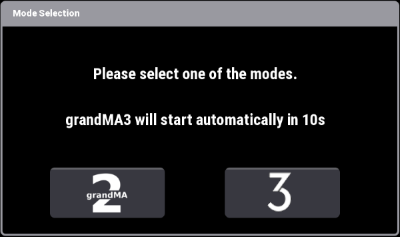
-Tap to select a mode.
Turn off the console
To turn off the grandMA3 console:
-Press the power key on the front panel.
-A warning pop-up appears.
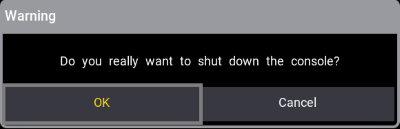
-Tap OK.
-The grandMA3 console powers down.
-Set the power switch to position O.