

- grandMA2 User Manual
- grandMA3 Mode2
- Mode2
- Screen Layout
- grandMA3 Settings
- grandMA2 Quick Start Guide
- grandMA2 Quick Manual onPC solutions
- MA 3D
- MA VPU
- Release Notes
New help version
The help version you selected belongs to an older software version. You may want to view the latest help version.
Screen Layout
Table of contents of this topic
If you run Mode2 on a grandMA3 console, the screen layout differs from the layout in a grandMA2 console.
Screen 1
Screen 1 corresponds to screen 2 on a grandMA2 console.
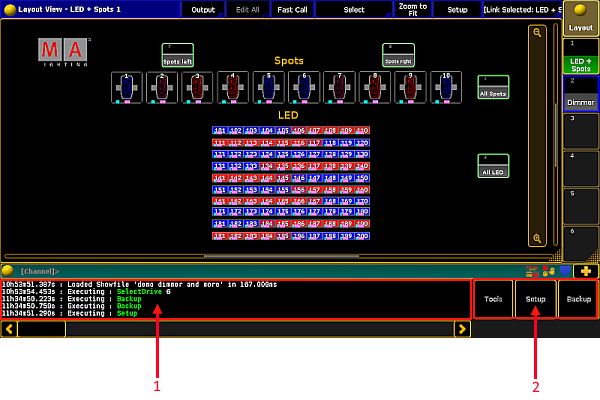
- Command line feedback – displays the history of commands at a glance.
- Tools, Setup, Backup – allow fast access on the grandMA3 console.
- The upper section – user-defined area and the command line – of screen 2 and the view buttons stay the same.
- Tools, Setup and Backup are also displayed in the Setup Menu. To access the Setup Menu on the grandMA3 console, press Menu.
For more information on the upper screen see Screen Layout – Screen 2.
Screen 2
Screen 2 corresponds to screen 3 on a grandMA2 console.
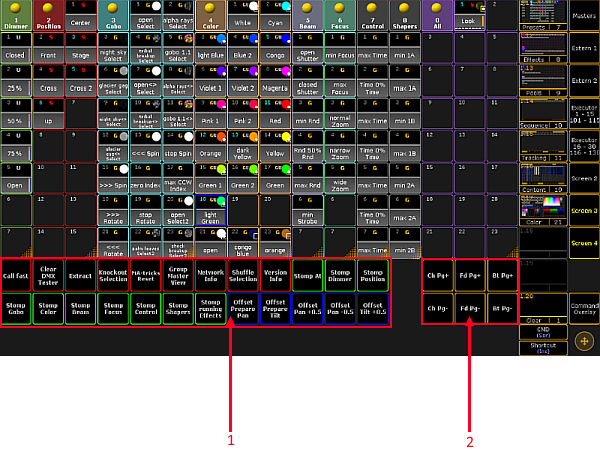
- Macros Buttons – allow fast access on the grandMA3 console.
- Channel Page (+/-) – tap to execute the ChannelPage Keyword.
Fader Page (+/-) – tap to execute the FaderPage Keyword.
Button Page (+/-) – tap to execute the ButtonPage Keyword.
It is possible to disable the macro buttons on screen 2 and 3. For more information see Setup.
It is possible to execute FaderPage and ButtonPage in Mode2 using buttons of the grandMA3 console:
-To execute the FaderPage keyword, press Pg+ or Pg-.
-To execute the ButtonPage keyword, press and hold
 and press Pg+ or Pg-.
For more information on the upper screen see Screen Layout – Screen 3.
Screen 3
Screen 3 corresponds to screen 4 on a gandMA2 console.
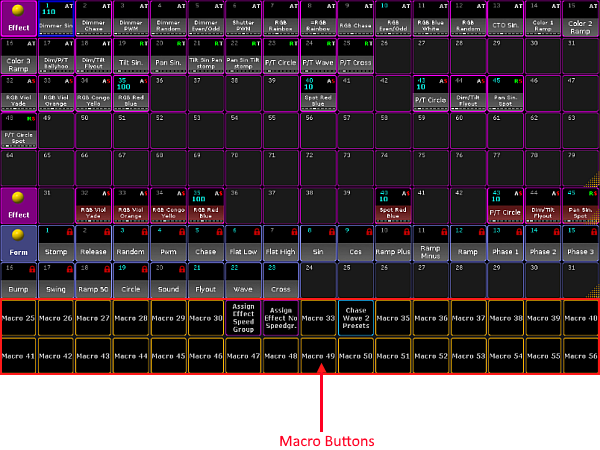
Macro Buttons – for more information see the macro buttons in screen 2.
- The upper section stays the same as in screen 2
Screen 4 and screen 5 (external screens)
External screens must have a minimum resolution of 1920 x 1080.
Screens 4 and 5 are screens 5 and 6 on a grandMA2 console.
Screen 4 and 5 stay the same as in the grandMA2 console.
For more information on theses screens see Screen Layout – Screen 5 and Screen 6.
Screen 6 – Right Command Screen
The Right Command Screen displays the familiar command section of a grandMA2 console.
- To toggle the screen to the trackpad, tap Trackpad.
The trackpad opens.
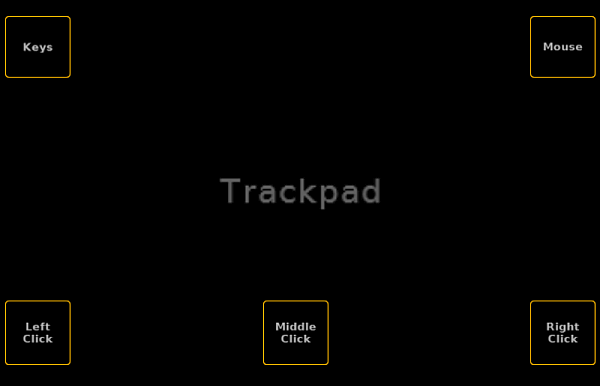
The trackpad has the same functions as the trackball on a grandMA2 console.
For more information on the usage of a trackball see Single User and Multi User Systems – User Settings.
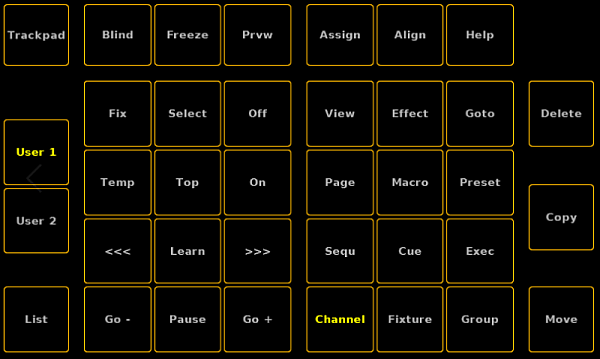
Screen 7 – Left Command Screen
Screen 6 corresponds to screen 1 on a grandMA2 console.
For more information on the areas of the left command screen follow the links below:
The grandMA3 console has 16 X-Keys compared to a grandMA2 console that has 20 X-Keys. The 4 grayed out X-Keys can still be operated via screen (see the screenshot of screen 7).
Screen 8 (Letterbox Encoder Screen)
All letterbox screens are static and are only located on grandMA3 consoles.
Screen 8 or letterbox encoder screen is located below screen 1 and functions as its extension.
- Network – displays the devices that are currently in a session at a glance.
- Encoder Bar – displays the preset control bar and the encoder toolbar.
- Time Control – displays program time and exec time.
- Grand Master – is displayed as a virtual fader.
- B.O. – executes the Blackout keyword.
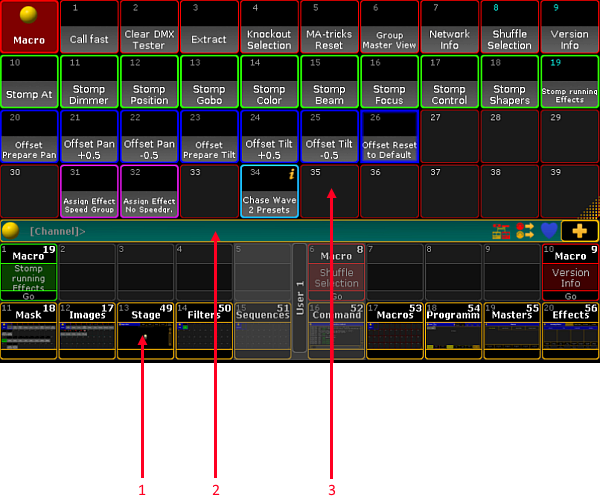
Screen 9 (Right Letterbox Executor Screen)
Screen 9 or right letterbox executor screen is located below screen 2 and functions as its extension.
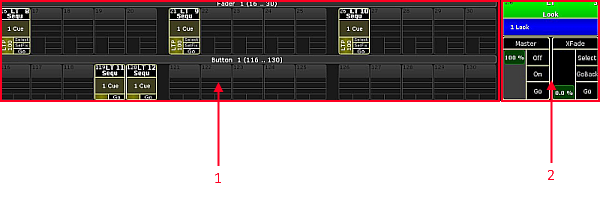
- Executors on screen – screen 9 displays executors 16 to 30.
- Master Section – is displayed on the right of the screen 9.
Screen 10 (Left Letterbox Executor Screen)
Screen 10 or left letterbox executor screen is located below screen 3 and functions as its extension.
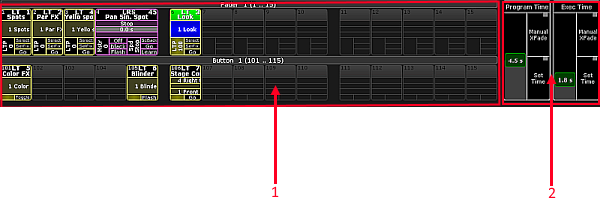
- Executors on screen – screen 10 displays executors 1 to 15.
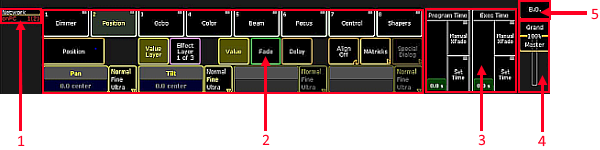
- Time Control – controls Program Time and Exec Time.
On a grandMA3 full-size it is also possible to operate the Time Control in Mode2 using the Custom Section.
Requirement:
- grandMA3 full-size
Program Time:
- To operate the on-screen fader of the Program Time, move Wheel 1.
- To activate Manual X-Fade, press Wheel 1 Upper Button.
- To activate Set Time, press Wheel 1 Lower Button.
Exec Time:
- To operate the on-screen fader of the Exec Time, move Wheel 2.
- To activate Manual X-Fade, press Wheel 2 Upper Button
- To activate Set Time, press Wheel 2 Lower Button.
For more information on the Custom Section see Device Overview in the grandMA3 manual.