

- grandMA2 User Manual
- Introduction
- About this manual
- System requirements grandMA2 onPC
- Installation of grandMA2 onPC
- Help from MA technical support
- Safety Information
- Symbols used
- Intended use
- Dangers caused by electric current
- General safety instructions
- Device Overview
- grandMA2 console
- grandMA2 replay unit (RPU)
- grandMA2 fader wing
- MA onPC command wing
- MA onPC fader wing
- System Overview
- Standalone systems
- Network systems
- What is the replay unit (RPU)
- What is the network processing unit (NPU)
- What is the MA video processing unit (VPU)
- What is the network dimmer processor (NDP)
- What is MA 3D
- What are the MA nodes
- Paramters vs. DMX channels
- Parameter expansion
- Big systems
- Media systems and CITP
- First Steps
- Unpack the device
- Check scope of delivery
- Position the device
- Connect power
- Connect desk lamps
- Connect external screens
- Connect USB mouse and USB keyboad
- Connect DMX
- Connect sound
- Connect SMPTE (LTC)
- Connect Ethernet
- Connect analog remote control
- Connect grandMA2 fader wing
- Setup your PC
- Turn on the console the first time
- Keys & Buttons on the Console
- Key overview
- >>> [GoFastForward]
- <<< [GoFastBack]
- . [Dot]
- Align
- Assign
- At
- Backg [Background]
- Backup
- Blind
- Bt Pg +
- Bt Pg -
- B.O. [Blackout]
- Channel
- Ch Pg +
- Ch Pg -
- Clear
- Copy
- Cue
- Del [Delete]
- Down
- Edit
- Effect
- [Encoder]
- Esc
- Exec [Executor]
- Executor Buttons
- Fd Pg +
- Fd Pg -
- Fix
- Fixture
- Freeze
- Full
- Go + [small]
- Go + [large]
- Go - [small]
- Go - [large]
- Goto
- Group
- Help
- Highlt [Highlight]
- If
- Keyboard
- Learn
- List
- MA
- Macro
- [Minus] -
- Mouse
- Move
- Next
- [Numeric]
- Off
- On
- Oops
- Page
- Pause [small]
- Pause [large]
- Please
- [Plus] +
- Preset
- Prev [Previous]
- Prvw [Preview]
- Select
- Sequ [Sequence]
- Set
- Setup
- Solo
- Store
- Temp
- Thru
- Time
- Top
- Tools
- Up
- Update
- User 1
- User 2
- View
- U1 - U4
- V1 - V10
- X1 - X20
- Workspace
- User interface
- Screen layout
- User-defined area
- Command line
- X-Key labels
- View buttons
- Master section
- Time control
- Encoder bar
- Preset control bar
- Encoder toolbar
- Encoder settings
- Command wing bar
- Command section
- Mini executor bar
- Work with views
- Touch gestures
- Calculator
- Info
- Oops and undo
- Colors
- System
- Marker
- Cue
- Text indicators and symbols
- Icons
- Keyboard shortcuts
- Turn on or turn off the keyboard shortcuts
- Edit keyboard shortcuts
- Add or delete keyboard shortcuts
- Export or import keyboard shortcuts
- User interface
- Windows in General
- Create and manage basic windows
- Clear the screen or delete windows
- Command Syntax and Keywords
- General syntax rules
- Helping keywords
- Object keywords
- Function keywords
- All keywords
- Special characters
- <<< [GoFastBack]
- >>> [GoFastForward]
- - [Minus]
- + [Plus]
- AddUserVar
- AddVar
- Agenda
- Alert
- Align
- AlignFaderModules
- All
- AllButtonExecutors
- AllChaseExecutors
- AllFaderExecutors
- AllRows
- AllSequExecutors
- And
- Appearance
- Asterisk *
- Assign
- At
- At @
- Attribute
- AutoCreate
- Backup
- Black
- Blackout
- BlackScreen
- Blind
- BlindEdit
- Block
- ButtonPage
- Call
- Camera
- ChangeDest
- Channel
- ChannelFader
- ChannelLink
- ChannelPage
- Chat
- CircularCopy
- Clear
- ClearActive
- ClearAll
- ClearSelection
- Clone
- CmdDelay
- CmdHelp
- Copy
- CrashLogCopy
- CrashLogDelete
- CrashLogList
- Crossfade
- CrossfadeA
- CrossfadeB
- Cue
- Cut
- Default
- DefGoBack
- DefGoForward
- DefGoPause
- Delay
- Delete
- DeleteShow
- DisconnectStation
- Dmx
- Dollar $
- DmxUniverse
- Dot .
- DoubleRate
- DoubleSpeed
- Down
- DropControl
- Edit
- Effect
- EffectAttack
- EffectBPM
- EffectDecay
- EffectDelay
- EffectFade
- EffectForm
- EffectHigh
- EffectHZ
- EffectID
- EffectLow
- EffectPhase
- EffectSec
- EffectSpeedGroup
- EffectWidth
- Empty
- EndIf
- EndSession
- Escape
- ExecButton1
- ExecButton2
- ExecButton3
- Executor
- Exit
- Export
- Extract
- Fade
- FadePath
- Fader
- FaderPage
- Feature
- Filter
- Fix
- Fixture
- FixtureType
- Flash
- FlashGo
- FlashOn
- Flip
- Form
- Freeze
- Full
- FullHighlight
- Gel
- Go
- GoBack
- Goto
- Group
- HalfRate
- HalfSpeed
- Help
- Highlight
- IdentifyFaderModule
- If
- IfActive
- IfOutput
- IfProg
- Image
- Import
- Info
- Insert
- Interleave
- Invert
- InviteStation
- Item3D
- JoinSession
- Kill
- Label
- Layer
- Layout
- Learn
- LeaveSession
- List
- ListEffectLibrary
- ListFaderModules
- ListLibrary
- ListMacroLibrary
- ListOops
- ListOwner
- ListPluginLibrary
- ListShows
- ListUpdate
- ListUserVar
- ListVar
- Load
- LoadNext
- LoadPrev
- LoadShow
- Locate
- Lock
- Login
- Logout
- Lua
- Macro
- ManualXFade
- Mask
- Master
- MasterFade
- MAtricks
- MAtricksBlocks
- MAtricksFilter
- MAtricksGroups
- MAtricksInterleave
- MAtricksReset
- MAtricksWings
- MediaServer
- Menu
- Message
- Messages
- MidiControl
- MidiNote
- MidiProgram
- Model
- Move
- Move3D
- NetworkInfo
- NetworkNodeInfo
- NetworkNodeUpdate
- NetworkSpeedTest
- NewShow
- Next
- NextRow
- Normal
- Off
- On
- Oops
- Or
- OutDelay
- OutFade
- Page
- Parentheses ( )
- Park
- Part
- Paste
- Pause
- Plugin
- PMArea
- Preset
- PresetType
- Preview
- PreviewEdit
- PreviewExecutor
- Previous
- PrevRow
- Profile
- Protocol
- PSR
- PSRList
- Quotation marks " "
- PSRPrepare
- Rate
- Rate1
- RdmAutomatch
- RdmAutopatch
- RdmFixtureType
- RdmInfo
- RdmList
- RdmSetParameter
- RdmSetpatch
- RdmUnmatch
- Reboot
- Record
- Release
- ReloadPlugins
- Remote
- RemoteCommand
- Remove
- RemoveIndividuals
- Replace
- ResetDmxSelection
- ResetGuid
- Restart
- Root
- Rotate3D
- SaveShow
- Screen
- Search
- SearchResult
- Select
- SelectDrive
- Selection
- Semicolon ;
- SelFix
- Sequence
- SetHostname
- SetIP
- SetNetworkSpeed
- Setup
- SetUserVar
- SetVar
- ShuffleSelection
- ShuffleValues
- Shutdown
- SnapPercent
- Slash /
- Solo
- SpecialMaster
- Square brackets [ ]
- Speed
- StepFade
- StepInFade
- StepOutFade
- Stomp
- Store
- StoreLook
- Surface
- Swop
- SwopGo
- SwopOn
- SyncEffects
- TakeControl
- Telnet
- Temp
- TempFader
- Thru
- Timecode
- TimecodeSlot
- Timer
- ToFull
- Toggle
- Tools
- Top
- ToZero
- Unblock
- Unlock
- Unpark
- Up
- Update
- UpdateFirmware
- UpdateSoftware
- UpdateThumbnails
- User
- UserProfile
- Value
- Version
- View
- ViewButton
- ViewPage
- WebRemoteProgOnly
- With
- World
- Zero
- Work with lists
- Object list
- Selection list
- Executor list
- Attribute list
- Station list
- General syntax rules
- Using the Backup Menu
- New show
- Load show
- Save show
- Save show as...
- Delete shows
- Using a USB stick
- Setting up a file server
- Partial show read
- ASCII show read
- Single User and Multi User Systems
- The difference between a single user and a multi user system
- Create user profiles and users
- User settings
- Login
- Networking
- What is networking
- Set the IP address in the console
- Set the IP address in the onPC
- Using DHCP in MA devices
- Session control
- How to create a session
- Protecting the session and station
- Adding devices to the session
- How to end or leave a session
- Session collision
- Getting DMX in and out of the system
- Setting up DMX ports on MA devices
- Network DMX protocols
- What affects my DMX output?
- Using CITP
- Streaming CITP
- Thumbnail exchange
- PosiStageNet (PSN)
- FTP connection to console and NPU
- Patching, DMX, and Fixture Setup
- What are channels & fixtures
- Attributes
- DMX break
- What is 3D and stage setup
- Adding fixtures to the show
- Delete fixtures from the show
- Working with layers
- Multipatching
- Live patching
- DMX sheet
- DMX testing
- DMX and parameter lists
- Universe pool
- Stage view
- Virtual 3D cameras
- Position fixtures in the 3D stage
- Auto calibrate fixture positions
- What are channels & fixtures
- Basic Fixture Types
- What are attributes, features & preset types
- ColorMix vs. MixColor
- Different fixture types
- Conventional
- LED
- Mirror
- Moving lights
- Media server
- Virtual fixtures
- Operate Fixtures
- Channel sheet
- Fixture sheet
- Sheet options
- Tools
- Layer mask
- Display
- Title buttons
- Assign executor
- Mask (local)
- Layers in sheets
- Channel sheet and fixture sheet
- Sequence content and sequence tracking sheet
- What is the programmer
- Encoder grouping
- Using the color picker
- Using the shaper dialog
- Using the smart view
- Edit a channel or fixture
- Pools in General
- Manage pool objects
- Adjust pool options
- Call modes
- Groups
- Create groups
- Auto create groups
- Using groups when programming
- Choose copy method
- Change specific group colors
- Group masters
- Presets
- What are special modes
- Preset pools
- Preset pool "Dynamic"
- Create presets
- Preset pool options
- Create preset reference
- Auto create presets
- Auto create additional presets
- Embedded presets
- Edit presets
- Update presets
- Delete presets
- Cues and Sequences
- What are cues and sequences
- Looking at the cue sequence
- Store cues
- Store options and defaults
- Cue timings
- Renumber cues
- Delete cues
- Playing back cues
- Looking at the cue content
- Update cues
- What is tracking
- What is MIB
- Sequence mini executor
- Commands in cues
- Executors
- What are executors
- Executors on the screens
- Assign a function
- Looking at the active executors
- Common executor options
- Advanced Sequence Functionality
- Using different view sets in the sheets
- Working with MIB
- Using cue modes
- Cue zero
- Sequence info window
- Looping cues
- Cue path
- Advanced Executor Functionality
- Executor pages
- Channel pages
- Executor options
- Masters window
- Special masters
- Default masters
- Grand masters
- Speed masters
- Rate masters
- Playback masters
- Clone
- Clone in user interface
- Examples
- Clone presets
- Search and Replace
- Search
- Replace
- Image Pool
- Import images and videos
- Image limitations & guidelines for symbols
- Supported file formats
- Delete images and videos
- Layouts
- Create a layout
- Layout pool options
- Edit layout
- Layout view options
- Worlds, Filters and Masks
- What are worlds
- Create worlds
- Auto create worlds
- Use worlds when programming
- What are filters
- Create filters
- Use filters when programming
- Use temporary filters
- What are masks
- Create masks
- Use masks in the sheets
- Apply worlds or filters to executors and sequences
- MAtricks
- MAtricks toolbar
- MAtricks pool
- MAtricks interleave
- MAtricks blocks
- MAtricks wings
- MAtricks groups
- Chasers
- Create a chaser
- Chaser settings
- Chaser mini executor
- Effects
- Use predefined effects
- Use template and selective effects
- Create an effect in the programmer
- Create an effect that uses presets
- Create effect forms
- Pool options
- Effects in a cue
- Assign effect to executor
- Live edit an effect
- Running effects
- Update effects
- Delete effects
- Bitmap Fixture
- Import bitmap fixture
- Apply bitmap fixture in the layout
- Control bitmap fixture
- Edit bitmap fixture
- Example
- Priorities for bitmap effects
- Disable bitmap for fixtures
- XYZ
- XYZ vs. pan/tilt
- XYZ and pan/tilt in cues and sequences
- Use stage markers
- Link objects to stage markers in MA 3D
- Remote Controlling the System
- Remote input
- MIDI show control (MSC)
- Web remote
- Telnet remote
- Decimal – hex table
- Timecode
- What is timecode and timecode shows
- Record a timecode show
- Edit a timecode show
- Playing back a timecode show
- Organize the show with multiple timecode shows
- Timer
- Timer pool
- Timer pool options
- Agenda
- What is agenda
- Create an appointment in the agenda
- Macros
- What are macros
- Manually create a macro
- Use variables
- Create pop-ups
- Conditional expressions
- Macro timing
- Record a macro
- Edit a macro
- Command line interaction
- Assign a macro to a key
- Example macros
- Plugins
- What is Lua
- Edit plugins
- Partial Show Read
- What is partial show read (PSR)
- How to do a PSR
- RDM
- Turn RDM on
- Match RDM devices
- Auto patch RDM devices
- Work with RDM parameters
- Work with RDM sensors
- Configure RDM notifications
- Use the RDM sheet
- Unmatch RDM devices
- Splitters and mergers that support RDM
- Turn RDM off
- RDM specific keywords
- DMX Profiles
- Other System Tools
- Message center
- Help
- Clock
- Sound input window
- VPU pixel mapper view
- Network dimmer
- Views
- Errors
- Readout
- Edit properties of a rack
- Edit a module
- Desk status
- Performance window
- System monitor
- Export and Import
- Export by using command line
- Export by using user interface
- Import by using command line
- Import by using user interface
- Import predefined objects
- Update the Software
- Update via setup
- Format a USB stick for Linux
- Update or factory reset via boot menu
- Restart from Linux
- Advanced Fixture Types
- Anatomy of a fixture type
- Module manager
- Instance manager
- Wheel manager
- Attribute & Encoder Grouping
- Anatomy of a fixture type
- grandMA2 onPC Details
- Control the MA NDPs
- Add the MA NDPs
- Configure the MA NDPs
- Delete the MA NDPs
- Control the MA Network Switch
- Add MA Network Switch
- Change IP address
- Enable DHCP client
- Change hostname
- Change switch ID
- Configure ports
- Edit groups
- Edit presets
- Edit LAGs
- Mirror ports
- Work with the switch configuration
- Change password
- Update firmware
- Reset to factory defaults
- Delete MA Network Switch
- Control the MA xPort Nodes
- Add the MA xPort Nodes
- Configure the MA xPort Nodes in the console
- Configure the MA xPort Nodes in a browser
- Configure the MA xPort Nodes as splitters or mergers
- Delete the MA xPort Nodes
- Console Settings
- Adjust the intensity of desk lights
- Change screen options
- Local settings
- Wing & monitor setup
- Date & time
- Shut Down the System
- Error Messages
- Technical Data
- Glossary
- Introduction
- grandMA2 Quick Start Guide
- MA 3D
- MA VPU
- Release Notes
New help version
The help version you selected belongs to an older software version. You may want to view the latest help version.
Assign a function
Table of contents of this topic
This topics describes how to assign an object to an executor and how to assign functions to executor keys and faders.
Assigning objects using keys and pools
It is quite easy to assign something to an executor.
Press the Assign key followed by what you want to assign and then where you want to assign it.
Here are three variations on how it works. The examples uses sequences, but it can be any of the allowed types:
Example 1
Using only the keys to assign sequence 3 at executor number 5 on the current page:
Assign Sequ 3 Exec 5 Please
Example 2
It is also possible to use a combination of keys and pools.
Having pool visible on one of the screens makes it possible to combine keys presses with pool selection.
- Press the Assign key
- Tap the sequence in the pool
- Press one of the keys associated with the executor where you want the sequence
Example 3
Pressing the keys are putting keywords into the command line. This means that it is of course also possible to type it as a command line input.
This command will assign (short version is "as") sequence (short version is "seq") to executor (short version is "ex") 5 on executor page 2.
Assign objects using the Assign Menu
The Assign Menu offers a visual approach to assign something to the executors. Using the Assign Menu makes you select the executor first and then select the function.
There are two main way to open the Assign Menu.
- Press the Assign key followed by any of the keys associated with the executor.
- Tap the top part of the Mini Executor Bar.
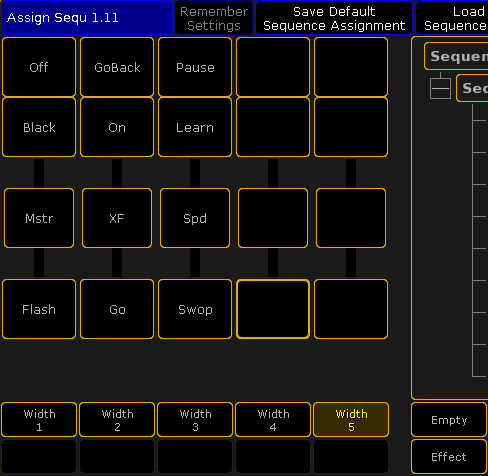
The assign menu can look like this:
This is the Function page of the Assign Menu. You can select this page by tapping the Function button on the right side - or U1 if the menu is on screen 1.
On the lower right side of the menu, there are seven buttons. Most of them will open a selection list above the buttons. The list will contain the possible object of each type. The exception to this functionality is the Empty button. This will empty the executor.
Tapping the Sequence button will open the list of possible sequences. It could look like this:
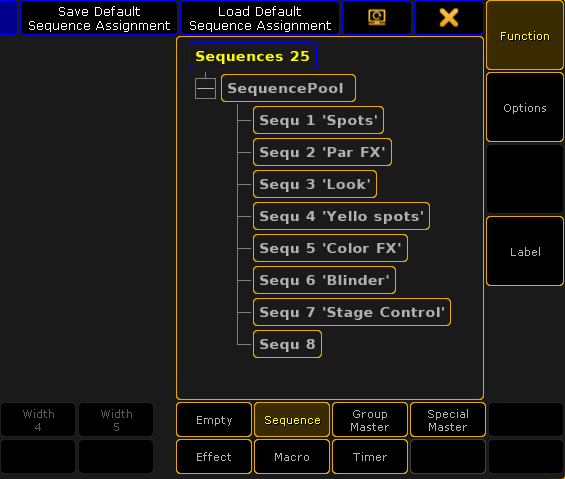
Each of the six allowed types that can be assigned to an executor will provide a tree structured list of the options.
Select the object you want to have on the executor by tapping it or use the screen encoder to scroll through the list and tap the encoder to select the desired object.
Change Key function
When the executor has something assigned, then it is possible to change the functions assigned to the executor keys.
If continuing to work in the Assign menu, then the executor is symbolized on the left side.
It could look like this:
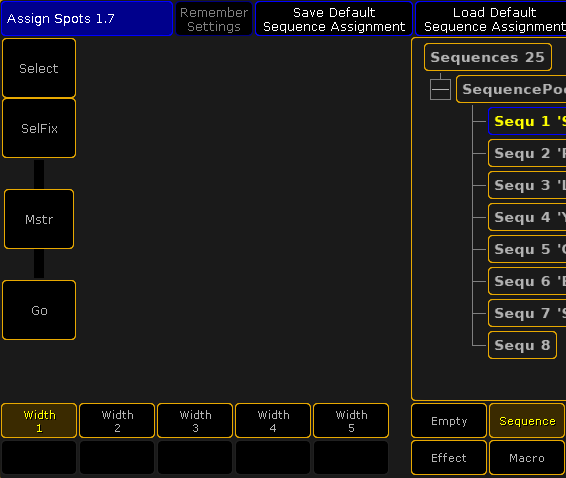
Here is an example showing a Fader Executor. There are two buttons above the fader, the fader, and the bottom button.
Tapping any of the three buttons will open the Select Function pop-up. It looks like this:
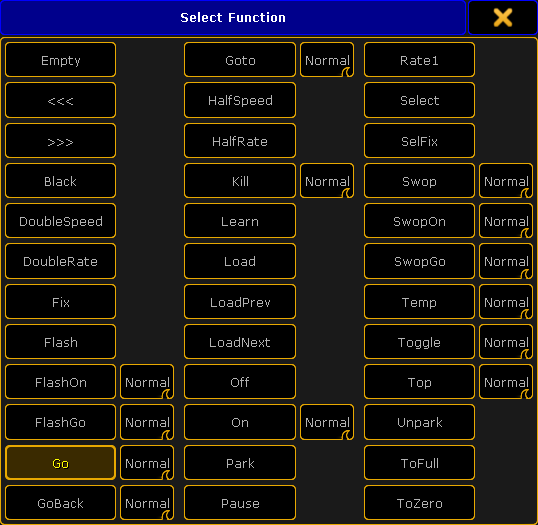
There are many functions here. The pop-up might show a smaller selection. This depends on what type of object that is assigned to the executor.
Some of the functions have and extra option. These are the swipe buttons next to function. The options are:
- Normal:
This is the normal function. - Assert:
This option will perform the function using the Assert option. Assert will force tracked values to the fixtures. - XAssert:
This variation of Assert will force the values using a fade time - typically from the cue going into. - Release:
This option will perform the main function and then turn off the executor.
The main function are:
- Empty:
The key has no function. - <<< (GoFastBack):
This jumps one cue back - The fade timing can be changed in Setup -> Show -> Playback & MIB Timing. - >>> (GoFastForward):
This jumps one cue forward and will not trigger other cues - The fade timing can be changed in Setup -> Show -> Playback & MIB Timing. - Black:
This turns off the intensity of the executor as long as you have the button pressed. - DoubleSpeed:
This will double the speed. - DoubleRate:
This will double the rate. - Fix:
This fixes or unfixes the executor. - Flash:
This turns the executor on and set a virtual intensity master at 100, as long as you have the button pressed. When the button is released it will go back to the status before the button was pressed. - FlashOn:
This performs the same action as the Flash, but it also executes an On command. - FlashGo:
This performs the same action as the Flash, but it also executes a Go command. - Go:
This executes a "Go". It uses the fade and delay times. - GoBack:
This fades backwards - The fade timing can be changed in Setup -> Show -> Playback & MIB Timing. Default is the cue timing. - Goto:
This gives you the Select Cue for Goto pop-up that allows you to select a cue to go to. It could look like this: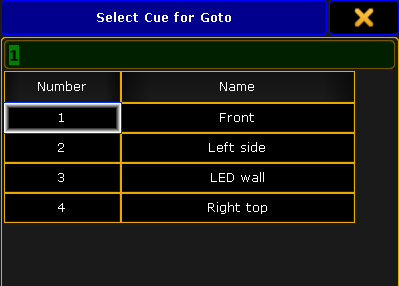
Select Cue for Goto pop-up
The fade timing can be changed in Setup -> Show -> Playback & MIB Timing. Default is the cue timing. - HalfSpeed:
This will half the speed. - HalfRate:
This will half the rate. - Kill:
This is the same as a "Go" but it also turns of all other executors (except those that has "Kill protect" turned on - see Executor Options topic). - Learn:
This sets the speed. By pressing it at least two times it automatically adjusts the speed. - Load:
This gives you the Select Cue for Load pop-up that allows you to select a cue to load. It looks like the Select Cue for Goto pop-up pictured above. - LoadPrev:
This will load the previous cue. If it is pressed multiple times, then it will load the previous cues based on the currently loaded cue. - LoadNext:
This will load the next cue. If it is pressed multiple times, then it will load the next cues based on the currently loaded cue. - Off:
This turns the executor Off. - On:
This turns the executor On. - Park:
This parks the fixtures in the object assigned to the executor. - Pause:
This holds a active fade and/or delay. This also pauses a timecode show. - Rate1:
This resets Rate and Speed faders. - Select:
This selects the executor. - SelFix:
This selects the fixtures used in the object assigned to the executor. - Swop:
When this is pressed, all other fixtures will fade out the dimmer (except those that has "Swop protect" turned on - see Executor Options topic). They return when it is released. - SwopOn:
This performs the same action as the Swop, but it also executes an On command. - SwopGo:
This performs the same action as the Swop, but it also executes a Go command. - Temp:
This turns the executor on as long as it is pressed. The temp function uses the fade times from the cues and it uses the level set by the intensity master. - Toggle:
This turns an active executor Off and an inactive executor On. - Top:
This fades to the first cue in an assigned sequence. - Unpark:
This unparks the parked fixtures used in the object assigned to the executor. - ToFull:
This will move the intensity master at full. - ToZero:
This will move the intensity master to zero.
These main functions are keywords - they can be found in the All keywords topics. Here are detailed descriptions of all keywords.
The functions can be assigned using the keys or commands. Not all functions has a physical key that can be used, then you will need to write the command.
Key Example
If the desired function has a physical key, then it is very easy to assign it to an executor key. Simply press the Assign key, then function key you want, and finally the executor key where you want the function.
Example 1
For instance to assign the Off function to the top key associated with executor number 1, you need to press the following keys:
Assign Off (the top executor key labeled:) 1
Example 2
Assign in a Load function to an executor key
Assign Goto Goto [desired executor key]
Pressing the the "Goto" key twice will give the "Load" command.
Command Example
Functions can be assigned using the command line.
This is the general syntax:
Assign [function] (at) [location]
The location needs to be a specific physical key associated with an executor. The keys are called "ExecButtons". They are numbered. The key below the fader and the single key for executors without faders are named "ExecButton1". The key right above the fader is "ExecButton2" and the top key is called "ExecButton3".
To assign the ToFull function to the top key associated with executor 5 on executor page 8 you would need to type the following command
Change Fader function
It might be possible to change the function of the fader. This depends on what type of object an executor has. They are changed just as the executor keys - by tapping the onscreen representation in the Assign menu (see above).
The Select pop-up could look like this:
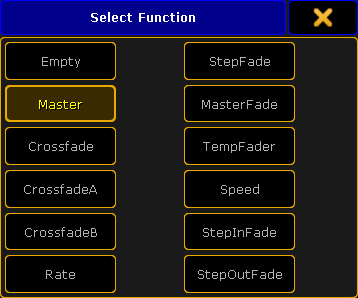
The pop-up might present a smaller selection. This depends on the object on the executor.
- Empty:
Fader has no function. - Master:
Controls the intensity. - Crossfade:
Crossfades between two cues. Current cue and next cue. The current cue will change when the fader reaches the other end position from where it started. - CrossfadeA:
Is the first of a two fader manual crossfade between two cues. Works along with CrossfadeB. The crossfade function can be changed in the Executor options. - CrossfadeB:
Is the second of a two fader manual crossfade between two cues. Works along with CrossfadeA. The crossfade function can be changed in the Executor options. - Rate:
Divides the fade and delay time in a sequence by the value of the fader. If Link Effect to Rate is on, it is also valid for effect speed stored in cues - see Executor options topic. - StepFade:
Controls the fade time between steps in a chaser (=softness). - MasterFade:
Controls the on and off fade time of chasers and effects. It controls also the off time of executors. - TempFade:
Cossfades the cue on when pulled up, and off when pulled down. - Speed:
Controls the fade and delay times in effects in a cue, and chase speed in chasers. - StepInFade:
Controls the step in time of the chaser steps. - StepOutFade:
Controls the step out time of the chaser steps.
The above functions are described in more details in each of their keyword topics. They can be found under All Keywords.
The functions can also be assigned using the command line.
The syntax is the same as the key functions. The difference is that there is only one fader per executor.
Examples
Example 1
To assign the rate function to executor number 9 on the current page, you will need to type the following command:
Or address the actual fader:
Example 2
If you want to assign the "Empty" function to the executor fader, then it is necessary to use the fader as the location
Save the Key and fader assignment
The current assignment of key and fader functions can be saved, to the current user profile, using the Assign Menu.
In the Title bar there are two buttons. Tapping the Save Default [object type] Assignment will store the current assignment to the defaults for that type of object. This means that a sequence have one set of defaults and an assigned Effect will have a different set of defaults.
The defaults are used when the executor gets something assigned.
Tapping the Load Default [object type] Assignment will load the currently saved default to the keys and faders.
Executors can be extended to use up to 5 executors in the width. Read more about this below. The number of keys and faders are then changed. Each width size has a different set of default key and fader assignment for each object type.
This means that a sequence using 1 executor width have one set of defaults and the same sequence using two executor widths will have a different set of defaults.
Change the Width of Executors
Sequence and Effects assigned to an executor can use more than one executor in the width - up to five.
A timer assigned to Button Executors can use up to two executors in the width.
This is changed using the Assign Menu (see the top of this topic for more about using the Assign menu). The left side of the Function page of the Assign Menu could look like this:
The bottom of the left side will show how much the executor can be extended.
The executors are organized in groups of five. It is not possible to extend into a different group of five. It is also not possible to extend into executor that already has something assigned. So to extend an executor to five in width, it needs to be originally assigned to executor 1, 6, 11, 16, 21, 26, and so on AND the following five executors needs to be empty.
When fully extended it could look like this:
Each key and fader can have a function that will execute the selected function to the assigned sequence or effect.