

- MA Network Switch
- Introduction
- Intended Use
- Dangers caused by Electric Current
- General Safety Instructions
- System Requirements
- SFP Transceiver Compatibility
- Device Overview
- Front Panel
- Rear Panel
- LED Indicators
- Factory Defaults
- First Steps
- Unpack the Device
- Install Mini-GBIC (SFP)
- Installation in a Rack
- Connect the Hardware
- Set the IP Address on the PC
- Access the Web Interface
- Display Navigation
- Groups View
- Name View
- Workload View
- LAG View
- Reset View
- Ports / Groups
- Change Port Description
- Assign Groups to Ports
- Edit LAGs
- Edit RSTP
- Edit Speed Setting
- Change Group Name
- Edit IGMP Snooping
- Edit IGMP Querier
- Edit Unknown Flooding
- Change VLAN ID
- Presets / Filters
- Assign Presets to Ports
- Apply Filters to Ports
- Create New Presets
- Update Presets
- Create New Filter
- View Filters
- Delete Presets
- Delete Filter
- General Settings
- Change Name
- Change ID
- Change DHCP Client
- Change IP Address
- Change Subnet Mask
- Change Default Gateway
- Change SNMP Status
- Change Password
- Update Firmware
- Fallback to Backup Firmware
- Get Switch Configuration
- Edit Port Mirroring
- Upload Switch Configuration
- Reset Settings
- Web Interface and grandMA2
- Specifications
- Support
- Glossary
- Introduction
Version 3.9
Edit Port Mirroring
In Port Mirroring, the entire traffic that arrives at a port is mirrored onto a mirror port of the MA Network Switch.
It is most commonly used in debugging or for the analysis of the network traffic such as the network load.
Important:
The MA Network Switch mirrors several source ports to one destination port. Vice versa, it is possible to set a single destination port at a time.
The MA Network Switch mirrors several source ports to one destination port. Vice versa, it is possible to set a single destination port at a time.
Use the Web Interface
Requirement:
- Click Tools / Edit General Settings.
- Click Edit Port Mirroring.
- The editor opens.
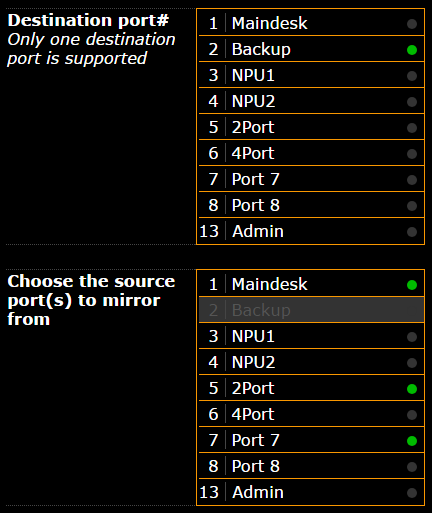
- To select a destination port, click the corresponding port in the upper column of the editor.
- Select the source ports:
-Click the corresponding ports in the lower column of the editor. - Click Apply settings and stay where your are or Apply settings and leave edit.
Settings have been adjusted and are saved in the startup configuration.
Hint:
A port is never destination and source at the same time.
A port is never destination and source at the same time.