- MA Network Switch
- Introduction
- Intended Use
- Dangers caused by Electric Current
- General Safety Instructions
- System Requirements
- SFP Transceiver Compatibility
- Device Overview
- Front Panel
- Rear Panel
- LED Indicators
- Factory Defaults
- First Steps
- Unpack the Device
- Install Mini-GBIC (SFP)
- Installation in a Rack
- Connect the Hardware
- Set the IP Address on the PC
- Access the Web Interface
- Display Navigation
- Groups View
- Workload View
- Reset View
- Ports / Groups
- Change Port Description
- Assign Groups to Ports
- Edit RSTP
- Edit Speed Setting
- Change Group Name
- Edit IGMP Snooping
- Edit IGMP Querier
- Edit Unknown Flooding
- Change VLAN ID
- Presets / Filters
- Assign Presets to Ports
- Apply Filters to Ports
- Create New Presets
- Update Presets
- Create New Filter
- View Filters
- Delete Presets
- Delete Filter
- General Settings
- Change Name
- Change ID
- Change DHCP Client
- Change IP Address
- Change Subnet Mask
- Change Default Gateway
- Change Password
- Update Firmware
- Fallback to Backup Firmware
- Get Switch Configuration
- Upload Switch Configuration
- Reset Settings
- Specifications
- Support
- Glossary
- Introduction
Hint:
New help version
The help version you selected belongs to an older software version. You may want to view the latest help version.
New help version
The help version you selected belongs to an older software version. You may want to view the latest help version.
Version 3.1
Install Mini-GBIC (SFP)
Table of contents of this topic
The MA Network Switch comes with up to four SFP cages. These cages accept mini-GBIC transceivers.
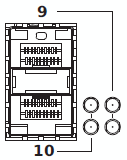
Two are at the rear panel, port 9 and 10. Two are inside the MA Switch.
To install mini-GBIC transceivers inside the switch at port 11 and port 12, call your local distributor.
Install mini-GBIC at port 9 and 10

1. Remove the mini-GBIC from its protective packaging.
Be aware of the insertion direction.
Port 9 must have the bail wire delatch on the top.
Port 10 must have the bail wire delatch at the bottom.
Port 9 must have the bail wire delatch on the top.
Port 10 must have the bail wire delatch at the bottom.
2. Install the mini-GBIC into the slot 9 or 10 at the rear panel, until the mini-GBIC clicks into place.
For detailed description of your mini-GBIC transceiver, refer to the transceiver manual.
Remove mini-GBIC from port 9 and 10
- Open the ball wire delatch to disengage and remove the mini-GBIC transceiver.
- Replace the protective plastic cover on the mini-GBIC.
The mini-GIBC is removed from the port.


