

- dot2 User Manual
- New in the Manual
- Introduction
- Intended Use
- System Requirements dot2 onPC
- Installation of dot2 onPC
- What are...
- System Colors
- Command History
- Executor
- Values
- Background
- Programmer
- Groups
- Presets
- Tracking
- Cues
- Executors
- Chasers
- Effects
- Preview and Blind
- Network
- IPv6
- DMX Tester
- System Colors
- How to...
- Turn the console on and off
- Update the console
- Add, patch, change, and delete fixtures
- Save and load your show
- Use the command line
- Use Encoders in the onPC
- Work with groups
- Work with presets
- Work with cues
- Work with chasers
- Work with effects
- Connect nodes, wings, 3D and onPC
- Use external input triggers
- Use MIDI and MIDI Show Control (MSC)
- Use the external screen
- Use web remote
- Reset the console
- Keys
- Align
- At
- Backup
- Blind
- B.O.
- Clear
- Copy
- Cue
- Delete
- DMX
- [dot]
- Down
- Edit
- Effect
- [Encoder]
- Esc
- Exec (Executor)
- [Exec Flash]
- [Exec Go]
- Fix
- Fixture
- Flash
- Full
- Go-
- Go- (Large)
- Go+
- Go+ (Large)
- [GoFastBack] <<<
- [GoFastForward] >>>
- Goto
- Group
- Help
- Highlt (Highlight)
- Label
- If
- MA
- Macro
- Magic
- [Minus] -
- Move
- Next
- [Numeric keys]
- Off
- On
- Oops
- Page
- Page+
- Page-
- Pause
- Pause (Large)
- Please
- [Plus] +
- Preset
- Prev (Previous)
- Prvw (Preview)
- Select
- Set
- Setup
- Speed
- Store
- Thru
- Time
- Toggle
- Tools
- Up
- Update
- View [Eye]
- Views & Windows
- Control Elements
- Command Line
- Encoder Bar
- Executor Bar
- Preset Type Bar
- Title Bar
- View Bar
- Icons
- Add New Fixtures
- Backup
- Beam Preset Type
- Calculator
- Calibrate Screens
- Change Functions of Executor
- Choose Clone Method
- Choose Copy Method
- Choose Delete Method
- Choose Store Method
- Choose Update Method
- Clock
- Color Preset Type
- Command Line
- Configure Slot
- Control Preset Type
- Cues
- Dimmer Preset Type
- DMX
- Edit Cue Number(s)
- Effects
- Empty Executor
- Enter Name for
- Executor Bar
- Executor Pool
- Fixtures
- Fixture Schedule Overview
- Focus Preset Type
- Gobo Preset Type
- Global Settings
- Groups
- Help
- Import Fixture Type
- Key Backlight
- Leaving Patch & Fixture Schedule...
- Load Show
- Macros Pool
- Magic Speeds
- MIDI Configuration
- MIDI Monitor
- MIDI Show Control
- Network Interface
- Network Protocols Configuration
- Network Setup
- New Show
- Off...
- Oops
- Page Pool
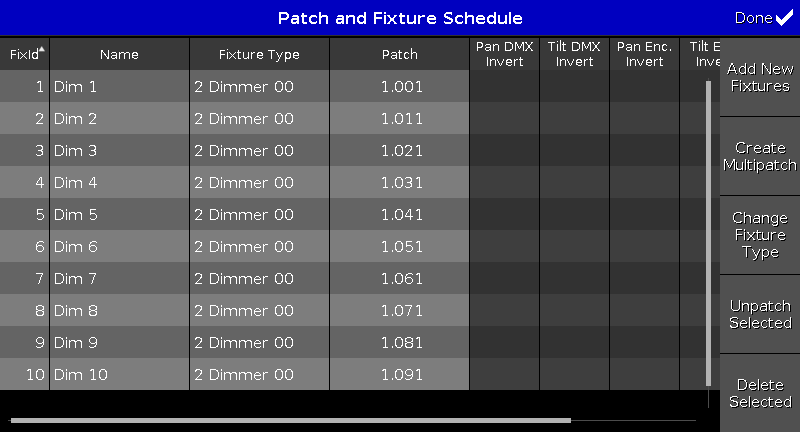
- Patch and Fixture Schedule
- Position Preset Type
- Presets Pools
- Remote Inputs Configuration
- Save Show As...
- Select DMX Address...
- Select DMX Ports
- Select Fixtures ID(s)
- Select Fixture Type...
- Select Function for Remote Inputs Configuration
- Select Function of Executor
- Select Language...
- Select Session Number
- Select Station...
- Select Trig
- Select Type
- Select View
- Select View for External Screen
- Select Wing...
- Session Collision
- Settings of Executor
- Setup
- Shapers Preset Type
- Software Update via USB
- Sound Input Configuration
- Status and Messages
- System Clock
- System Information
- Time defaults
- Timecode Configuration
- Tools
- Video Preset Type
- Virtual Playbacks
- Window Settings
- Wings
- Wings & Nodes Diagnosis
- Control Elements
- Commands
- >>> [GoFastForward]
- <<< [GoFastBack]
- - [Minus]
- + [Plus]
- Assign
- At
- Black
- Blind
- Call
- Clone
- Copy
- Cue
- Default
- Delay
- Delete
- Dmx
- DmxUniverse
- Edit
- Effect
- Executor
- Fade
- Fix
- Fixture
- Flash
- Full
- FullHighlight
- Go
- GoBack
- Goto
- Group
- Help
- If
- IfOutput
- Invert
- Label
- Learn
- Macro
- MidiNote
- Move
- Off
- On
- OutDelay
- OutFade
- Page
- Park
- Pause
- Preset
- PresetType
- Preview
- Rate
- Record
- Release
- Remove
- Replace
- Select
- Selection
- SetIP
- SnapPercent
- Solo
- Stomp
- Store
- StoreLook
- SyncEffects
- Temp
- Thru
- Toggle
- Top
- Unpark
- Update
- View [Eye]
- Zero
- Hints for Operating
- Error Handling
- CrashLogCopy
- CrashLogDelete
- CrashLogList
- Error Messages
- Glossary
- dot2 Quick Start Guide
- dot2 3D
- dot2 Release Notes
Add New Fixtures Window
The Add New Fixtures Window is located in the Setup, column Show, Patch & Fixture Schedule, Add New Fixtures.
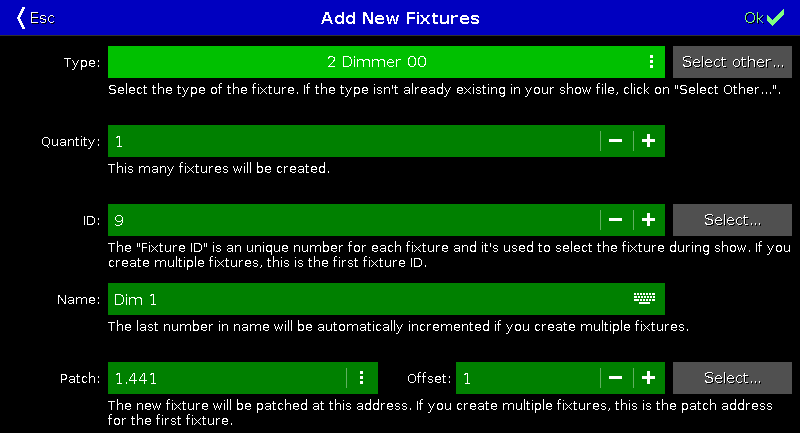
In this view, you select your fixture type, the quantity, the fixture ID, the fixture name, the patch address, and the offset.
There are six edit lines.
To confirm your settings and add new fixtures, tap  in the title bar.
You are back in the Patch and Fixture Schedule.
To leave the Add New Fixtures Window, tap  in the title bar or Esc on the console.
You are back in the Patch and Fixture Schedule.
Type
The type edit line contains a drop down list with four standard fixture types
- 2 Dimmer 00
- 3 LED - RGB 8 bit
- 4 LED - RGBA 8 bit
- 5 LED - RGBW 8 bit
and those which are already in the current show file exist.
To open the drop down list, tap the three dots  in the edit line.
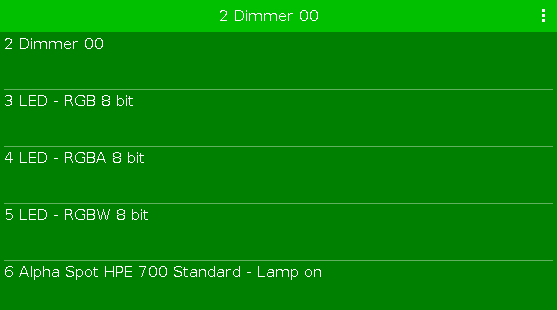
To import another fixture type from the library into the show file, which is not in the drop down list, tap Select other... on the right.
It opens the Import Fixture Type Window.
Quantity
The quantity edit line displays how many fixtures will be created.
To select the quantity, tap the plus or minus.
ID
The ID edit line displays the next available fixture ID.
To select a fixture ID, tap the plus or minus.
To get an overview about assigned and available fixture IDs, tap Select... on the right. The Select Fixture ID(s) Window opens.
Name
The name edit line displays the name of the fixture.
To edit the name, tap at the keyboard  . The edit name window opens.
If you create multiple fixtures with the same name, the name will get a consecutive number at the end of the name.
Patch
The patch edit line displays the next available patch address.
To select another universe or address, tap the three dots in the edit line. The drop down opens.
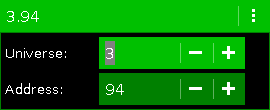
To get an overview about assigned and available DMX addresses, tap Select... on the right. The Select DMX Address... Window opens.
Offset
The offset displays the selected patch offset.
The offset is the free DMX address space between one fixture and another fixture. A patch offset gives you a better overview about the fixtures and their patch address.
To patch a few fixtures and with a start address of x.xx1, select a patch offset of 10.
To select the quantity, tap the plus or minus. By default the offset is 1.
Encoder Bar Functions

Type:
To scroll in the drop-down list from the edit line Type, turn the encoder left or right.
To open the Import Fixture Type Window, press or tap the encoder.
Quantity:
To select the quantity in the edit line Quantity, turn the encoder left or right.
Fixture ID:
To select the fixture ID in the edit line ID, turn the encoder left or right.
To open the Select Fixture ID(s) Window, press or tap the encoder.
Patch Break 1:
To select the DMX address, turn the encoder left or right.
To open the Select DMX Address... Window, press or tap the encoder.
Patch Offset:
To select the patch offset, press and hold  and turn the encoder left or right.
To open the calculator to select the patch offset, press and hold and press the encoder.