

- dot2 User Manual
- dot2 Quick Start Guide
- 1 - Introduction
- 2 - Physical setup and layout
- 3 - Create a new empty show
- 4 - Adding and patching dimmers
- 5 - Controlling dimmers
- 6 - Fixture view
- 7 - The programmer
- 8 - Making and working with groups
- 9 - Store a cue and play it back
- 10 - Making more cues in the cue list
- 11 - Adding LED fixtures
- 12 - Working with colors
- 13 - Creating presets
- 14 - External screen
- 15 - Adding moving lights
- 16 - Controlling moving lights
- 17 - Making more groups and Presets
- 18 - More about cues and playback
- 19 - A look at Blind, Preview and DMX tester
- 20 - Fun with macros
- 21 - Building chasers
- 22 - Building dynamic effects
- 23 - Connect to onPC, 3D, Wings and Nodes
- 24 - Happy programming
- dot2 3D
- dot2 Release Notes
Getting Started Guide - External screen
I asked that you connect an external screen. So let's have a look at what we can do with it.
If you don't have a touch screen, then you should connect an external mouse. This allows you to use the external screen better.
In the lower right part of the external screen, there's a button called More.... When you press this you'll get the Select View window. On the left side of the window there's an area called Arrangement:
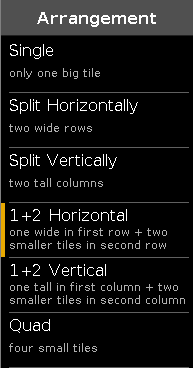
This allow us to select 6 different view arrangements. Try to select the different ones.
On the middle top part you can see what the different arrangements look like.
The lower section of the middle part is the different special views you can assign, the standard views are on there usual position in the right side bar.
When you have selected a nice arrangement you can select a tile (top middle section) and then select a view for this tile.
This closes the Select View window.
You can always change what view you got, by selecting the title bar of the view and then select a different view in the view bar on the right side of the screen or by opening the Select View window.
There's one more way you can change what's on the external screen. Press the Setup key and then the Select Views for External Screen.
This is the same view as Select View on the actual external screen. In the version displayed on screen 1 you'll keep it when you select different views for the different tiles. You can also use the encoders to change the arrangement and views.
In the next chapter we are going to add some moving lights.