

- dot2 User Manual
- dot2 Quick Start Guide
- 1 - Introduction
- 2 - Physical setup and layout
- 3 - Create a new empty show
- 4 - Adding and patching dimmers
- 5 - Controlling dimmers
- 6 - Fixture view
- 7 - The programmer
- 8 - Making and working with groups
- 9 - Store a cue and play it back
- 10 - Making more cues in the cue list
- 11 - Adding LED fixtures
- 12 - Working with colors
- 13 - Creating presets
- 14 - External screen
- 15 - Adding moving lights
- 16 - Controlling moving lights
- 17 - Making more groups and Presets
- 18 - More about cues and playback
- 19 - A look at Blind, Preview and DMX tester
- 20 - Fun with macros
- 21 - Building chasers
- 22 - Building dynamic effects
- 23 - Connect to onPC, 3D, Wings and Nodes
- 24 - Happy programming
- dot2 3D
- dot2 Release Notes
Getting Started Guide - Selecting and controlling dimmers
So, we got our 12 dimmers patched and ready. In the console they are identified as fixtures. All fixtures should have a unique fixture ID that allows you to select each of them individually.
Let's have a look at them. Press the Fixture key on the console.
Your screen 1 should now have a Fixtures view that looks like this:
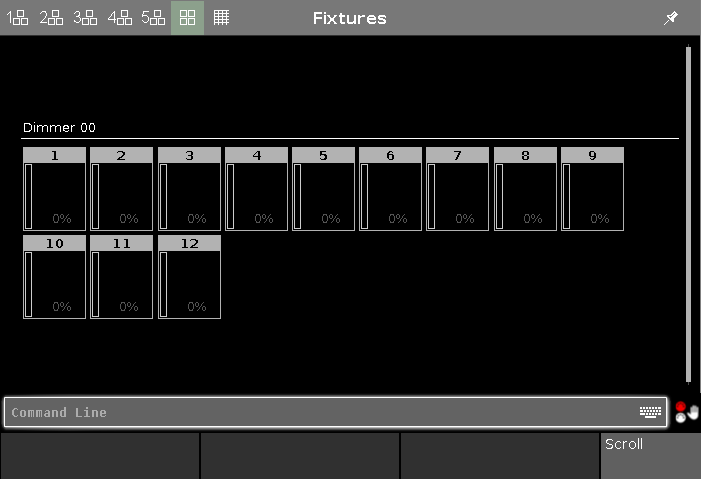
Each rectangle represents each of our 12 fixtures. We can see that they all currently have a value of 0% - so they are turned off. This is their default value. That means that if they are not told anything else, then they go to 0%.
Cool, let's try to change the value. If you move the level wheel then nothing happens with our fixtures. The first thing we need to do is to select what fixtures we want to change.
Try to touch number 1 on the screen. This should change the frame around the rectangle to a yellow color - like this:

This indicates that this fixture is now selected and if you now move the level wheel, you'll see that the value changes.
All right, so now you know how to use the level wheel to change the value.
Let's explore some other ways. Still with fixture one selected try to press the following keys: At 5 0 Please. This will put the fixture at 50%. Now press At - 1 5 Please. This will take your fixture 15% down, so we are now at 35%. Now try to press + twice. That added 10% and a double press on - will take 10% off.
If you double press the . you put your fixture at 0% and if you press the Full key you get 100%.
Try some different combinations until you feel comfortable.
If you make a typo or maybe hit a wrong key, you can use the Oops key as a backspace. If you want to abandon the whole thing (not the console as such, but just what you started typing) you can press Esc to cancel the command you are typing.
When you are ready to move on you should press the Clear key two times.
Notice that this removes the value (if you had any) and the frame around fixture 1 turned gray again. What does this mean? If you guess that it's no longer selected and back at 0%, then you are right!
It's very easy to select the fixtures on the screens. You can even move your finger around to select a bigger group of fixtures. When you tap a fixture in the Fixtures view, then it toggles the selected status of the fixture.
You can tap single fixtures to deselect them or press Clear once (when you have a selection) to clear the entire selection.
We are now going to use the keys to select the fixtures. Press the following:
Clear Clear
Fixture 1 Thru 1 0 Please
At 4 0 Please
That should select the first ten fixtures and put them all to 40%. We did more typing than we actually needed. Often this operation can be done faster. Press the Clear key two times again and then press the following:
1 Thru 1 0 At 4 0 Please
This gives you the same result. The long way is the more correct command and what the console is actually doing, but you can often do with the short version. If for some reason the short version doesn't always work for you, then you should try the longer and more correct commands before you start throwing things around the room.
We don't need to give all the fixtures the same value - we could spread it out. Without pressing clear do this: At 1 0 Thru 1 0 0 Please
This will fan out the values from 10% to 100%. Please have a look at the Fixtures view. If you haven't already you might want to look at the little dimmer bar on the left side of each rectangle and the big square. The dimmer bar indicates the dimmer value. The square shows a combination of the dimmer intensity, color and gobo.
You can actually even spread it out over three (or even more) values: At 1 0 Thru 5 0 Thru 1 0 Please.
Selection matters
As you have seen above, you are allowed to select fixture using ranges. And you can also use - and + to remove or add fixtures to you selection. Try to do this:
Fixture 1 Thru 5 - 2 + 7 Please, then you have selected fixtures 1, 3, 4, 5 and 7.
But the selection order is also important. Press Clear once and then do the following:
1 Thru 1 2 At 1 0 Thru 1 0 0 Please, this will do a nice spread of values with fixture one on 10% and fixture 12 at 100%. But let's try something else. Press Clear two times and then do the following:
1 2 Thru 1 At 1 0 Thru 1 0 0 Please, then the spread is reversed. Now fixture 12 is at 10% and fixture one in on 100%.
We selected the fixtures in the reverse order and then applied the same range of values.
If you use the screen to select the fixtures in a random order (you might need to press Clear first) and then do the At 1 0 Thru 1 0 0 Please, you'll see how the values are distributed.
So, selection order matters.
Attribute control
There's two more ways to change the value, that I want to tell you about.
If you have pressed clear, then please select fixture 1 to 10 again.
Now on the right side of screen 1 you need to press where it says Dimmer.
This opens a view that allows us to do more. This becomes very useful in the future when we add more complex fixtures. This is called Preset Type view. We'll talk more about preset types later.
This is how it looks for the dimmer:
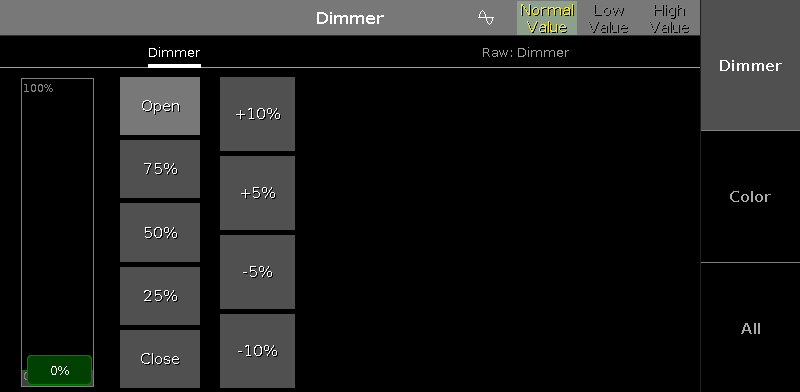
Here you'll have some predefined dimmer values that you can select and change the values in plus and minus 5% and 10% intervals. You can see that the slider follows the values, and you can use the slider to set a value.
Notice that you can now also use the leftmost encoder to change the dimmer value.
You might want to open a Fixtures view on one of the other screens. On the top right side of screen 2 you should press the Fixtures button. This will open a Fixtures view on screen 2.
Now press the leftmost encoder. This will open The Calculator. It could look like this:
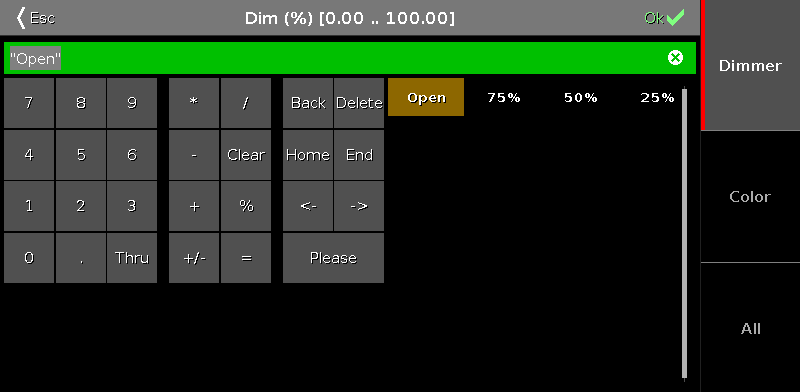
This also allows you to type a value on the screen. But you can also use some predefined values. On the picture above there are four buttons: Open, 75%, 50% and 25%.
'Open' is the same as 100% (full open). Pressing one of the four options will close the calculator and put the selected fixtures at that value.
Align
Until now we have used the keys to spread out values over more than one fixture. But this is actually a function we call Align. You find out in later chapters that the Align function can be used on almost anything. But for now we only have dimmer. So try to select fixtures 1 thru 10 (in that order) and then give then all 50%. Please press the Dimmer button in the preset type bar so we have the dimmer control on the left encoder. Now press the Align key once. Now a small information pop-up tells you that you are now in the "Align <" mode. There are five different modes and we are now going to explore them a little bit. It's important that you keep the same selection order in all the examples below. With this first mode activated try to turn the dimmer encoder down, notice how the value stays at 50% for fixture number 1 but is spread out evenly to fixture number 10. It could look like this:

Now let's reset and give all the fixtures 50% again (At 5 0 Please). Now press the Align key until the pop-up says the mode is "Align >". And now try to turn down the dimmer encoder again. Now the result is that we change fixture 1 and the value is spread up to fixture 10, that doesn't change. It could look like this:

Reset again with a 50% to all fixtures. Now press the Align key until the mode is "Align ><" and then turn the encoder. Now it's like we have a pivot point in the middle of our 10 fixtures and we can tip the values one way or the other. It could look like this:

Reset one more time with all the fixtures at 50%. Press the Align key until the mode is "Align <>" and then turn the encoder. Now the first and last fixture stay fixed at 50% and the middle moves the most. It could look like this:

Did you notice that every time you reset the value to 50% then the align key doesn't light up anymore, and when you press it then you needed to go through all the mode we have already tried. This is actually the fifth and default mode called "Align Off". Every time you do something other than rotating the encoder (after having activated one of the active align modes), then it resets the align mode to off.
Ok, you might wanna play around a little bit with the controls. When you feel happy and comfortable, you should press Clear two times and move on to the next chapter, where we are going to have a closer look at the Fixture view.