

- dot2 User Manual
- dot2 Quick Start Guide
- 1 - Introduction
- 2 - Physical setup and layout
- 3 - Create a new empty show
- 4 - Adding and patching dimmers
- 5 - Controlling dimmers
- 6 - Fixture view
- 7 - The programmer
- 8 - Making and working with groups
- 9 - Store a cue and play it back
- 10 - Making more cues in the cue list
- 11 - Adding LED fixtures
- 12 - Working with colors
- 13 - Creating presets
- 14 - External screen
- 15 - Adding moving lights
- 16 - Controlling moving lights
- 17 - Making more groups and Presets
- 18 - More about cues and playback
- 19 - A look at Blind, Preview and DMX tester
- 20 - Fun with macros
- 21 - Building chasers
- 22 - Building dynamic effects
- 23 - Connect to onPC, 3D, Wings and Nodes
- 24 - Happy programming
- dot2 3D
- dot2 Release Notes
Getting Started Guide - Connect to onPC, 3D, Wings and Nodes
Table of contents of this topic
So, now that we are getting real close to the end of this Getting Started Guide, I would like to take you through the process of adding some external equipment.
The dot2 family consists of three different consoles. The smallest is called "dot2 core". This is the commands section and a special Core Fader section. Then there's the "dot2 XL-F". This is the same as a core with an extra fader wing build in. The "dot2 XL-B" is like a core with a Button Wing. A "dot2 F-Wing" have 8 executors with faders and 16 extra executors without faders. A "dot2 B-Wing" have 48 executors without faders.
A dot2 core can have a maximum two dot2 F-Wings and two dot2 B-Wings connected. The same amount is used with the dot2 XL consoles, but their build in wing counts as one from the beginning, so you can only connect three wings.
You can connect 10 dot2 Node4 (1K)s to your system. The nodes are used to output DMX universes. They connect to the network and can be positioned at remote locations. You can decide which one of the 8 DMX universes each port on the console and node should output.
You can connect up to 5 dot2 consoles or onPCs and up to 5 3D visualizers in one system.
All these devices connect together using a 100MB (minimum) Ethernet switch. You need to use a quality switch that allow something called multicast. Today most switches do. Please also use good quality Ethernet cables of minimum cat.5e specifications. The dot2 devices talk together using IPv6. This is a unique number that functions as an address for each device. If your are using dot2 onPC or dot2 3D, then your computer needs to have an IPv6 address. All new computers have this automatically, but if yours doesn't then you'll need to set it up. There is another help page called What is IPv6, that might offer you some help with this.
dot2 Wings
When you have made all the physical connections, you need to connect the equipment to the console. Press Setup and then dot2 Wings.
The window could look like this:
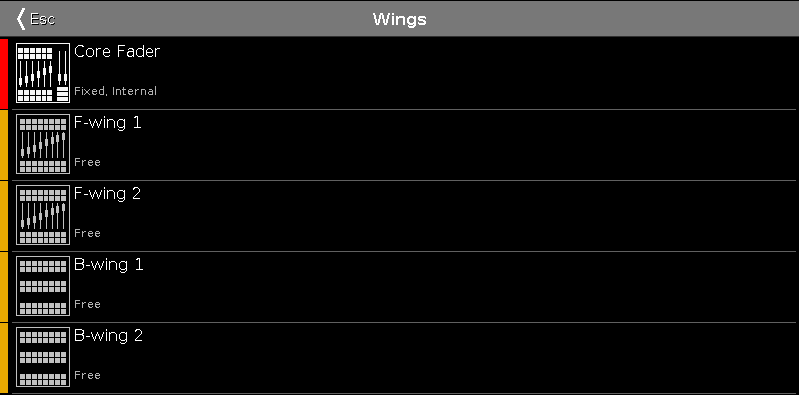
Here you can choose a free wing slot (of the right kind) to connect a wing.
When you select a free slot then you get a list of available wings in your network. When you select a wing in the list, then it begins to flash. This identifies what wing you have selected. Select the device you want and press Assign selected.
That's it for wings.
dot2 console, dot2 onPC, dot2 Node4 (1K) and dot2 3D visualizers
The story is a little bit different for the rest of the dot2 devices.
To connect consoles, onPC, nodes and 3D visualizers we need to have a session running. Press Setup and then Sessions. If your console is already part of a session then the top right button will say Stop/leave session and the text next to it tells you what session you are a part of. If you don't have a running session then the button says Start new or join an existing session. There can be four different sessions running in a network. To connect your consoles, onPC, nodes and 3D, then they need to be in the same network and they need to join the same session number. When you press the Start new or join an existing session button then you get four buttons - one for each session. If a session number is already used then the button will say Join session. If there's no session running you have the option to tap New Session and begin you own new session.
You can add Consoles, onPCs, 3D and DMX Nodes into your session by having a session running and then in the Sessions view under "Connected Devices" you can tap the Add button. This will give you a list of all available devices in your network.
When you tap each section then you can see the different devices in each section. If the console or onPC have a bright green background, then it's the device you are sitting in front. A dark green background is a device that's a part of your session. Red backgrounds are devices that should be in your networks but is missing.
You can remove a device from your network by selecting it and press Remove.
As written above: The limit for each session is five dot2 consoles/onPC's, five dot2 3D visualizers and 10 dot2 Node4 (1K)s.
You can set what universes a connected node or console outputs on each XLR port. You can change this by selecting the node/console you want to change and then the cell below each of the XLRs. Tap the right encoder and write the universe number you want it to output - you can select 1 through 8.
The show remembers what different devices it should connect to and their DMX universe assignment.
Last chapter coming up!