- dot2 User Manual
- dot2 Quick Start Guide
- dot2 3D
- Install and Uninstall
- System Requirements
- Installation
- Uninstall dot2 3D
- First Steps
- Hardware Connection
- Create session and connect 3D
- Data Management
- Master/Slave
- Coordinate system
- Program Surface
- Menu Bar
- File Menu
- File - Settings
- Edit
- Functions
- Tools
- View
- Help
- File Menu
- Tool Bar
- Main Windows
- Stage View
- Mouse + Keyboard Actions
- Arrangement of Objects (Align Objects)
- Duplicate (copy 3D Objects)
- 3D Objects
- Assets (Information Window)
- Properties
- Media Database
- Materials
- Video Player
- Moving Paths
- Sessions
- Status Bar
- Window Layout
- Menu Bar
- Fixture Types
- 3D Modeling and Import
- 3D Models Principles
- Parameters
- Axes
- Rotation Axes
- Linear Axes
- Beam of Light
- Automated Import
- Assigning of Models to Fixture Types
- Checklist for 3D Modeling
- Creation of a 3D Model
- Keyboard Shortcuts
- dot2 3D FAQ
- Install and Uninstall
- dot2 Release Notes
Version 1.9
Arrangement of Objects (Align Objects)
dot 2 3D allows automatic arrangement of 3D objects. Therefore select the objects to arrange via 'Ctrl + mouse click’ or multiple selections in the assets tree.
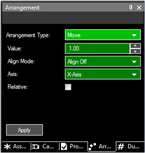
Via the menu entry 'Functions - Arrangement’ the Arrangement Window opens:
|
|
Objects can be arranged in several ways like:- Moved along the X,Y,Z axis- Moved along a circle line in X,Y,Z space- Arrange in a 2D matrix Corresponding to the grandMA2 console alignment function objects can be arranged in relation to the origin object like:- <, >, ><, and <>If the 'Relative’ flag is set every push of the 'Apply’ button increments the arrangement by the given value. Note: The origin is 0,0,0 if the 'Relative’ flag is off. Otherwise it is the own position. |
 |
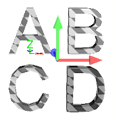
Example: Several objects inserted into the Stage View at the origin (0,0,0). |
 |
Objects aligned via 'Move’ and 'Align <’ function along the X-axis. |
|
|
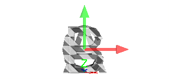
Objects aligned as a matrix via 'Matrix (2D)’ function. |