

- grandMA2 User Manual
- grandMA2 Quick Start Guide
- MA 3D
- MA VPU
- Introduction
- Help from MA technical support
- System requirements
- For your Safety
- Functions and Features
- Transition from grandMA video to MA VPU
- Teaser Mode
- Comparison VPU plus / VPU basic / VPU light
- Main Features
- Installation and Maintenance
- Startup
- Software update
- Service Packs
- Update of Fixture Types
- Backup
- Handling backups with the VPU
- Start Acronis on VPUs with serial Numbers up to # 86 on
- Start Acronis on VPUs with serial Numbers from # 87
- Restoring an image with Acronis
- Storing an image with Acronis
- Backup the VPU content after shipment
- Access VPU via Network
- Version of grandMA desk or grandMA onPC (off-line)
- IP Addresses
- IP Address of the PC
- Art-Net IP Address
- EDID Manager
- CITP / MSEX Protocol
- Installation and Maintenance
- Communication with the grandMA Desk Series
- Connection with the grandMA desk
- Connection with the grandMA onPC (off-line) software
- Connection States
- Data Management
- Master slave
- Principle function diagram
- Layer Properties
- Layer Reference
- Virtual Outputs
- Virtual Output: Configuration of a TripleHead2Go Digital Port
- Predefined Constellation
- Several MA VPU applications in one grandMA show
- Quickstart with grandMA2
- Program surface
- Internal Touch-Screen VPU plus
- Internal Screen VPU light
- Menu Bar
- File...
- View...
- Render...
- Help...
- Toolbar
- Status Bar
- Preview
- Multi Preview
- Content Editor
- Content: Image Pool (I-Pool)
- Content: Text Ticker
- Content: Eff1 Type...Eff4 Type
- Content: 3D Objects
- Content: Mask
- Warper
- Warper Fullscreen View
- Warper Basic Operation
- Warping
- File Browser
- Features Attributes and Functions
- Order of Effect Execution
- Softedging
- Keystoning
- Pixel Mapper
- VPU - Pixel Mapper Graphical View
- Pixel Mapper Toolbar
- Pixel Mapper Editor
- VPU - Pixel Mapper Grid View
- Console - VPU Pixel Mapper View
- VPU - Pixel Mapper Graphical View
- Creation of customized 3D Objects
- Content Specifications
- Rovi Total CodeStudio for converting your content into MPEG2
- Hap Content Converter
- Warnings
- Keyboard Shortcuts
- Supplement MA Lighting
- Intended use
- Data
- Symbols and warning labels
- LIMITATIONS
- Transport
- General Safety Instructions
- IMPORTANT SAFETY INSTRUCTIONS
- Electric shock warning on the rear of the grandMA
- Safety and Environment
- Quickstart Connect VPU plus
- Quickstart Connect VPU light
- Switching the apparatus On/Off
- Maintenance
- Conformity
- Introduction
- Release Notes
New help version
The help version you selected belongs to an older software version. You may want to view the latest help version.
File...
| New Show | Creates a new show with 2 VPU fixture layers each with 6 Layers, 1 Master fixture and 4 Camera fixtures. |
| Load Show… | Opens a dialog to load a show file (.gz - grandMA 2 file). |
| Save show as... | Opens a dialog to save the current show at a given filename. |
| Make a screenshot... | Opens a dialog to set the screenshot parameters. |
| Settings… | Opens the Settings dialog: Within this dialog you can set: - Display settings - Network settings - Main settings e.g. FOH feature - Global VPU Settings - Video In settings |
|
Take a screenshot |
|---|
| Enter a path where the screenshot is stored. |

|
|
With the button "Take a screenshot" a screenshot is made with the settings above. |
| There are 4 possibilities to take a screenshot: |
| 1. With the already described button |
| 2. Via the "print" button of the keyboard |
| 3. Via the command line of the console VPUScreenshot <IP> e.g.: |
|
VPUScreenshot 192.168.0.101
|
| 4. In the console MA Network Configuration: |
|
Setup |
| Select the VPU and press the button: Take a Screenshot |
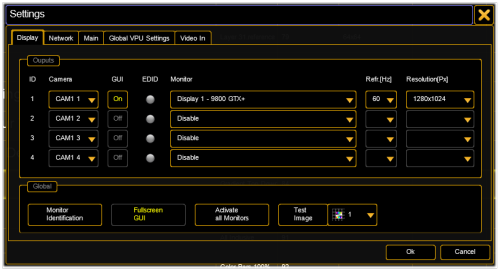
| Settings… Display |
|---|
| Set the display properties: |
|
Output: Up to 4 monitor outputs are supported.
- Camera: Each output can display a different camera.
- GUI: Select the output for the GUI (Graphical User Interface).
- EDID: State of EDID Manager see: EDID Manager
- Monitor: Name of the physical interface card.
- Refresh rate in Hz: Select the refresh rate for the output device.
- Resolution: of the output in X x Y pixels.
- Delay: To each graphic output a delay of 0...15 frames can be assigned. The value accords to the refresh rate of the graphic output (not of the video clip).
The delay also can be defined via the desk setting:
Setup - MA Network Configuration - Tab VPU - Edit - Display
Global:
- Monitor Identification: Shows an overlay to identify each output.
- Fullscreen GUI: Indicates if the Graphical User Interface is displayed.
- Activate all Monitors: Activates all outputs of the graphic card.
- Test Image: Outputs one of ten selectable test images related to the connected outputs ratio and resolution. These images can be used to adjust the output geometry and colors.
To get the 1:1 pixel correct display of the test pattern make sure to use the @Native Object only!
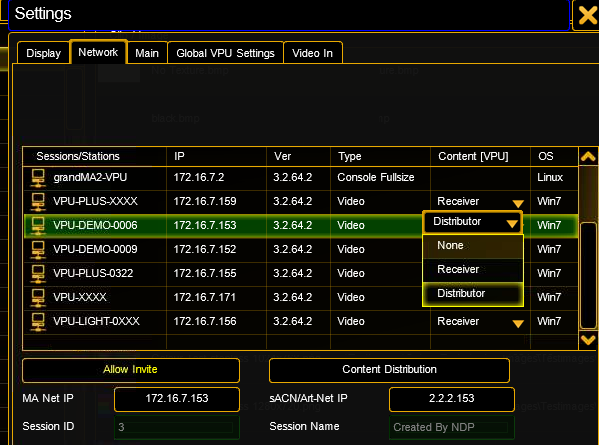
| Settings… Network |
|---|
| Within this dialog you can set the properties for the network. |
|
The dialog shows the actual state of all machines in the MA net:
Red text: Allow Invite Disabled.
Green background: selected station.
Red background: version is not compatible.
The different states in the network are described in detail in chapter Connection.
You can select the role of the VPU for the content distribution like 'Receiver' or 'Distributor'.
A click on the button 'Start Distribution' will start the distribution process.
| Change… MA/sACN/Art-Net IP | |
|---|---|
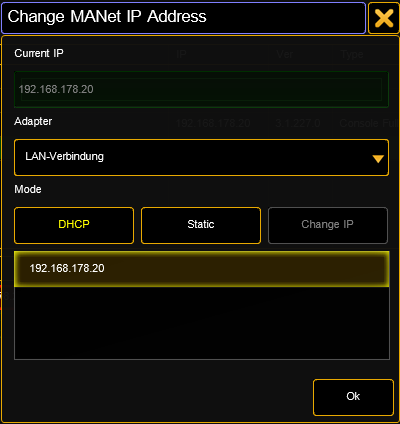 |
Current IP shows the current IP address Adapter allows the selection of the network adapter.… Mode: - DHCP - The Adapter tries to receive an IP address from a DHCP server in the network. If this fails the VPU generates an (APIPA class B) address like 169.254.x.y… Mode - Static - allows to enter a static IP address. |
| Settings… Main | |
|---|---|
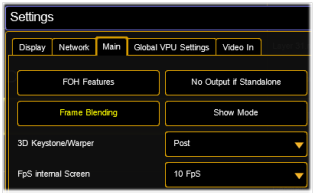 |
Within this dialog you can select the FOH features: If this button is checked an additional buttons appears at the toolbar. The button "Blind" preserves the blind programming preview. No Output if Standalone: If no desk is connected the output is suppressed. Frame Blending: Frame interpolation allows smoother motion when you slow down or speed up a layer. Show Mode:This mode avoids interruptions of the running show caused by manual operations of a user. It can be set by a channel in the Master fixture or this button. See also: Toolbar |
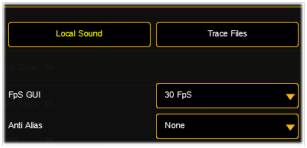 |
Local Sound Disable playback of audio on this VPU. Trace Files: To get log files (in case of crashes) this must be switched on. The trace files can be found in the trace file folder on the desktop. Fps Internal Screen or GUI:Set the Framerate per second for the internal screen and the VPU Graphical User Interface to optimize the performance. The lower the rate the better the performance. |
| Anti Alias:This filters are useful for Warper and Keysone projections. Examples: | |
| none: no Anti Alias filter | |
 |
|
| Multi Sampling: | |
 |
|
| Super Sampling: | |
 |
|
| Note: Multi and Super Sampling costs performance! | |
 |
Content Redirection If your content has moved to another location you can redirect the search folder e.g. from drive “D:” to drive “E:” The redirection is indicated by a button in the toolbar: |
 |
|
| and can be switched on or off | |
| Settings...… Global VPU Settings | |
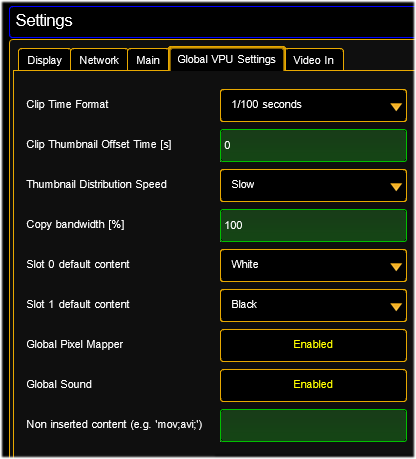 |
Clip Time Format: Clip timing calculation, e.g. clip with 30 fps and clip time Format 30 Fps, Encoder Speed finest/ultra: you can step framewise through the clip. If you prefer to step Frame Index in seconds you select „seconds“. The setting will be spread via network so all VPUs have the same clip time format. Clip Thumbnail Offset Time(s): Thumbnails show the first frame of a clip, if this is empty you can add an offset to get a meaningful image. Thumbnail Distribution Speed: Thumbnails are distributed in the background. If new content is inserted after the program start this parameter has to be set. Copy bandwidth: Sets the copy bandwidth for the content distribution. The distribution of new content stresses the network so reduce this value if you have too much network load. Slot 0/1 default content: Set the default image of the first slot to black or white. This affects only new created Function Blocks. Global Art-Net: Enable or disable Art-Net. Global Sound: Enable or disable Sound. Ignore when inserting content…: If a whole folder of content is importet you can ignore files by specifying the extension e.g. if the folder contains also '.avi’ files and you only want to import the '.mov’ files the '.avi’ entry suppresses importing of all '.avi’ files. |
The following dialogs are only available in the Windowed Mode:
| Video in... | |
|---|---|
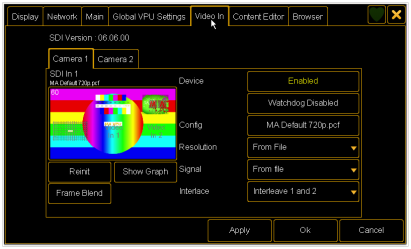 |
SDI In Configuration:The first line shows the actual status of the SDI input signal. Device: Enable/disable SDI input. Watchdog: If SDI signal is missing an automatical initialization is done every 30 ms. Config: There are 3 preconfigured files for SDI In MA provides: MA default 1080i (Full HD 1920x1080) MA default 720p (HD 1280x720) MA default 576i (PAL 720x576) i (interlaced) p (progressive) Resolution: Select SDI input resolution Signal:Interlaced or progressive Interlacing: see list below: |
Reinit: Reinitializes the SDI input
Show Graph: Shows a performance graph
Frame Blend: Use Frame Blending to enhance the quality of time-altered motion.
Interlacing Formats: Here you can define how images are handled within the application. Since grandMA VPU does only output progressive scanning via DVI these settings may effect your image quality.
- Interleave 1 and 2: field one is interleaved into field two
- Field 1 then 2: field one is displayed first (and stretched to full ratio) then field two
- Field 1 only: field one is displayed (and stretched to full ratio), field two is not displayed
| Video in… Start external Configuration | 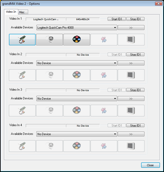 |
If you are not using SDI but want to use other external video feed like a webcam you can run 2 external devices: You cannot access this button via the touch screen, only via the GUI. External Video Configuration: This interface allows the input of a live video stream. It is realized via the Microsoft® DirectShow mechanism. Video In 1…4: In this dialog up to 4 different „Video In? devices can be assigned. Every Video Capture Device supported by Windows can be used as input source for MA VPU. Available Devices: All recognized Video Capture Devices are listed in this selection bar. By selecting one device this will be assigned to the „Video In? source and is available for MA VPU. Start / Stop [D]:Additional options to restart drivers in case of synchronization faults. |
| Video in… Device | 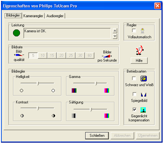 |
Device…: If a Capture Device with a driver is installed, its property dialog will be opened after the selection of this button. In this dialog the device specific properties of the manufacturer can be managed. The following example shows the property dialog of a webcam: If no device property is available, nothing happens. |
| Video in… Device Settings | 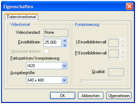 |
Stream…: If a Capture Device with a driver is installed, its streaming dialog will be opened after the selection of this button. In this dialog the device specific streaming properties of the manufacturer can be managed. The following example shows the property dialog of a webcam: If no device property is available, nothing happens. |
| Exit | Leave the application. |