- grandMA2 User Manual
- grandMA3 Mode2
- grandMA2 Quick Start Guide
- grandMA2 Quick Manual onPC solutions
- MA 3D
- MA VPU
- Introduction
- Help from MA technical support
- System requirements
- For your Safety
- Functions and Features
- Transition from grandMA video to MA VPU
- Teaser Mode
- Comparison VPU plus / VPU basic / VPU light
- Main Features
- Installation and Maintenance
- Startup
- Software update
- Service Packs
- Update of Fixture Types
- Backup
- Handling backups with the VPU
- Start Acronis on VPUs with serial Numbers up to # 86 on
- Start Acronis on VPUs with serial Numbers from # 87
- Restoring an image with Acronis
- Storing an image with Acronis
- Backup the VPU content after shipment
- Access VPU via Network
- Version of grandMA desk or grandMA onPC (off-line)
- IP Addresses
- IP Address of the PC
- Art-Net IP Address
- EDID Manager
- CITP / MSEX Protocol
- Installation and Maintenance
- Communication with the grandMA Desk Series
- Connection with the grandMA desk
- Connection with the grandMA onPC (off-line) software
- Connection States
- Data Management
- Master slave
- Principle function diagram
- Layer Properties
- Layer Reference
- Virtual Outputs
- Virtual Output: Configuration of a TripleHead2Go Digital Port
- Predefined Constellation
- Several MA VPU applications in one grandMA show
- Quickstart with grandMA2
- Program surface
- Internal Touch-Screen VPU plus
- Internal Screen VPU light
- Menu Bar
- File...
- View...
- Render...
- Help...
- Toolbar
- Status Bar
- Preview
- Multi Preview
- Content Editor
- Content: Image Pool (I-Pool)
- Content: Text Ticker
- Content: Eff1 Type...Eff4 Type
- Content: 3D Objects
- Content: Mask
- Warper
- Warper Fullscreen View
- Warper Basic Operation
- Warping
- File Browser
- Features Attributes and Functions
- Order of Effect Execution
- Softedging
- Keystoning
- Pixel Mapper
- VPU - Pixel Mapper Graphical View
- Pixel Mapper Toolbar
- Pixel Mapper Editor
- VPU - Pixel Mapper Grid View
- Console - VPU Pixel Mapper View
- VPU - Pixel Mapper Graphical View
- Creation of customized 3D Objects
- Content Specifications
- Rovi Total CodeStudio for converting your content into MPEG2
- Hap Content Converter
- Warnings
- Keyboard Shortcuts
- FAQ and Troubleshooting
- Supplement MA Lighting
- Intended use
- Data
- Symbols and warning labels
- LIMITATIONS
- Transport
- General Safety Instructions
- IMPORTANT SAFETY INSTRUCTIONS
- Electric shock warning on the rear of the grandMA
- Safety and Environment
- Quickstart Connect VPU plus
- Quickstart Connect VPU light
- Switching the apparatus On/Off
- Maintenance
- Conformity
- Introduction
- Release Notes
New help version
The help version you selected belongs to an older software version. You may want to view the latest help version.
Console - VPU Pixel Mapper View
The VPU Pixel Mapper can be configured in the grandMA2 desk too.
A visual representation of the Pixel Mapper editor of the VPU is implemented in the grandMA2 console:
Create a new window in Other / VPU Pixel Mapper View. This window looks very similar to the window in the VPU.
Only the library tab is missing. To work with this window, you can do the following:
Areas and Outputs can be created, deleted, and edited as known from the VPU.
To store fixtures and channels into an existing Pixel Mapper Output, select them, press Store and click into the area of your chosen output.
If fixtures or channels have been selected, you can also use
to store into Area 1, Output 2 with the Axis +X +Z.
All parameters of each Pixel Mapper Area / Output can be controlled by the command line, too.
Use "cd PM" to get to the Pixel Mapper containers in the root.
Pixel Mapper setups can also be copied or deleted. They can also be merged via command-line. E.g.
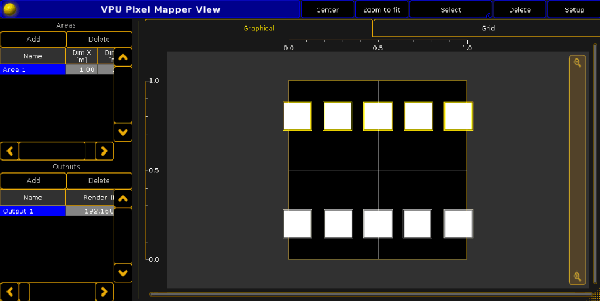
The following example shows 10 LED Tiles arranged on a 1 x 1 meter square:

After the Fixtures have been inserted into the Pixel Mapper, they can be selected by a rubber-band, moved and rotated, just as in the VPU Pixel Mapper editor.
Use the top-line buttons select / move to change mouse behavior.
To allow editing, activate the Setup button in the headline of the window.
Also the encoder bar can be used to change these values.
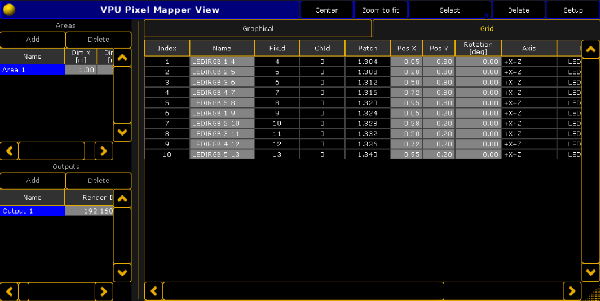
The Grid View shows the numerical representation of the mapped fixtures:

The grid mode shows all the options of each panel (the abstraction of fixtures and channels in the Pixel Mapper Editor) in a tabular view.
Values can also be edited here, too. To send the data via MA-Net2, select the protocol in the options of the Output and enable the Pixel Mapper Main Render flag.
A maximum of 256 universes can be send, and all 3 protocols share the same amount.
So e.g. you can send 200 universes of MA-Net2, 20 Universes Art-Net and 36 Universes sACN.
MA-Net2 is put out on Ethernet1, sACN and Art-Net are put out on Ethernet 2(on a VPU).
To send the Pixel Mapper data back into the console, no additional Ethernet cable is required.


