

- grandMA2 User Manual
- grandMA3 Mode2
- grandMA2 Quick Start Guide
- grandMA2 Quick Manual onPC solutions
- MA 3D
- Help from MA technical support
- Symbols used
- Introduction
- Install and Uninstall
- System Requirements
- Installation
- Uninstall MA 3D
- First Steps
- Hardware connection
- Start MA 3D
- Create a Session
- Data Management
- Master/Slave
- Coordinate system
- Program Surface
- Menu Bar
- Menu Bar - File Menu
- Settings
- Edit
- Functions
- Tools
- View
- Help
- Tool Bar
- Main Windows
- Stage View
- Mouse + Keyboard Actions
- Arrangement of Objects (Align Objects)
- Duplicate (copy 3D Objects)
- 3D Objects
- Assets (Information Window)
- Properties
- Media Database
- Materials
- Video Player
- Moving Paths
- Sessions
- Status Bar
- Windows Layout
- Menu Bar
- Fixture Types
- 3D Modeling and Import
- Workflow
- 3D Modeling Principles
- Creation of a 3D Model
- Creation of a 3D Fixture Model
- Import 3D Model to MA 3D
- Assigning of 3D Models to Fixture Types
- Checklist for 3D Modeling
- Automated import
- Parameters
- Axes
- Rotation Axes
- Linear Axes
- Beam of Light (Cone)
- Keyboard Shortcuts
- MA 3D FAQ
- MA VPU
- Release Notes
Beam of Light (Cone)
Cone for conventional spots or washes
Parameter:
- _XB

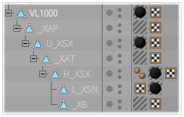
Similar to the rotation axes the position of the beam (cone) is marked with a square. The center of the square marks the origin of the cone (e.g. _XB).
The normals mark the direction. The position inside the fixture body can be determined with an auxiliary cone that is placed temporarily into the body.
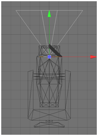
The radius (r) of the cone can be calculated with the following formula:
r = tan([max. open radius / 2]) * [height of the cone].
Normally the cone uses the complete lens hole of the fixture. The square is placed at the top of the cone:

Cone frustum for LED spots or washes
Parameters:
- _XLD
- _XLC

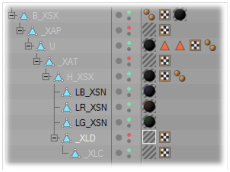
At LED spots with flat housings the light beam is a cone frustum.
This needs 2 parameters (squares) for the beam
- LD marks the diameter of the beam output.
- LC marks the clipping plane of the beam where the beam is cut.
The direction of the beam is marked via the normals.
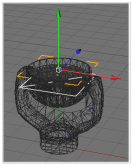
The upper square shows the _XLD square and the lower square shows the _XLC square where the beam is cut.