

- grandMA2 User Manual
- grandMA3 Mode2
- grandMA2 Quick Start Guide
- grandMA2 Quick Manual onPC solutions
- MA 3D
- Help from MA technical support
- Symbols used
- Introduction
- Install and Uninstall
- System Requirements
- Installation
- Uninstall MA 3D
- First Steps
- Hardware connection
- Start MA 3D
- Create a Session
- Data Management
- Master/Slave
- Coordinate system
- Program Surface
- Menu Bar
- Menu Bar - File Menu
- Settings
- Edit
- Functions
- Tools
- View
- Help
- Tool Bar
- Main Windows
- Stage View
- Mouse + Keyboard Actions
- Arrangement of Objects (Align Objects)
- Duplicate (copy 3D Objects)
- 3D Objects
- Assets (Information Window)
- Properties
- Media Database
- Materials
- Video Player
- Moving Paths
- Sessions
- Status Bar
- Windows Layout
- Menu Bar
- Fixture Types
- 3D Modeling and Import
- Workflow
- 3D Modeling Principles
- Creation of a 3D Model
- Creation of a 3D Fixture Model
- Import 3D Model to MA 3D
- Assigning of 3D Models to Fixture Types
- Checklist for 3D Modeling
- Automated import
- Parameters
- Axes
- Rotation Axes
- Linear Axes
- Beam of Light (Cone)
- Keyboard Shortcuts
- MA 3D FAQ
- MA VPU
- Release Notes
Import 3D Model to MA3D
Table of contents of this topic
Import 3D Models into MA 3D
Open MA 3D
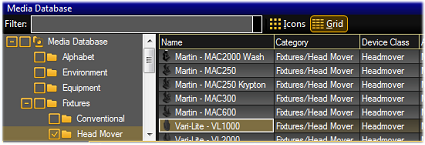
In the Media Database (View - Media Database Window) you can find all 3D objects ordered in a hierarchical structure. Types of fixtures are located in the corresponding folder. All fixtures of the type Head Mover are located in the folder "Head Mover".
Open the Import Tool
- Open the import tool the menu entry ‘File – Import – Import 3D Model’.
- Select ‘Import 3D Model’.
- Select the 3D file ‘Vari-Lite_VL1000.3ds’ you have created.

Entering 3D Model Properties
When import is done an .xml description file is generated and stored in the folder parallel to the .3ds file. For example ‘Vari-Lite_VL1000.import.xml’.
This file is only created once during the first initation of the import. The unique model key will be only generated in this step.
If the file already exists, the importer uses the data from this file to fill out the following fields:
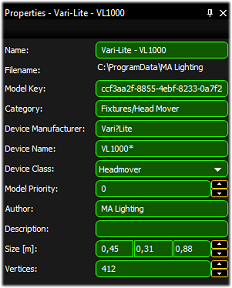
Fill out the property fields of the model.
Mandatory fields are:
- Category - places the model within the hierarchic structure of models
- Device Manufacturer and Name - finds the correct model in case of variant spelling
- Device Class - assigns the right parameters
- Model Priority - prioritization in the selection of a model. Higher numbers are more likely to be prioritized see also Assigning of 3D models to fixture types
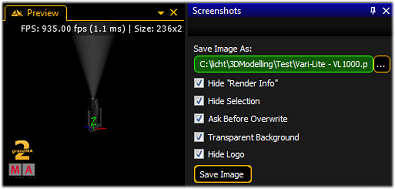
Preview Image
- Generate a significant preview image of the fixture position in the preview window.
- Save the image as… (Browse to the folder of the .3ds file) parallel to your model. Use the model's name e.g., ‘Vari-Lite-VL1000.png.
Save the 3D Model
To save the 3D model as grandMA Media file, use the save function ‘File’ - ‘Save’ e.g., ‘test.gmamedia’.
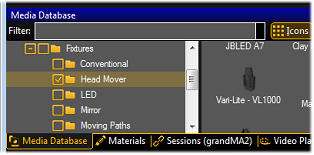
The fixture is now saved in the media database in the category Fixtures/Head Mover. The image is displayed as a thumbnail.