- grandMA2 User Manual
- grandMA3 Mode2
- grandMA2 Quick Start Guide
- Welcome
- 01 Create a New Show
- 02 Patch Dimmers
- 03 Use Screens and Windows
- 04 Control Dimmers or Channels
- 05 Working with Groups
- 06 Store the First Cue
- 07 Create More Cues
- 08 Edit a Sequence
- 09 Add Moving Lights
- 10 Fixture Sheet
- 11 Control Fixtures
- 12 Preset Pool
- 13 Making Presets
- 14 A Second Sequence
- grandMA2 Quick Manual onPC solutions
- MA 3D
- MA VPU
- Release Notes
Controlling fixtures
Table of contents of this topic
Being able to control your fixtures is one of the most important things using a grandMA.
The Preset (Type) Control Bar
The key to controlling fixtures is this bar:

It is the "Preset Control" bar. With this you can control what Preset Type you are controlling with your encoders.
All fixtures are separated into different function sections. This is called Preset Types.
The bar will only display the preset types you have access to. You might have noticed that before we added the Mac 700s the only thing in the bar was the 'Dimmer' button.
The bar might disappear when you move focus to something else. But you can always bring it back by pressing somewhere in your Fixture Sheet or Channel Sheet.
If you select a fixture, then the frame around each button in the bar might change (from gray to light green). The green frame indicates the Preset Types you can use for the selected fixture. If you clear your programmer and try to select channel 1, then you can see that it is only the 'Dimmer' button that got a green frame.
Playing with the movers
To control fixtures you need to select them. Let us try with fixture 111. Clear your programmer and press: 1 1 1 Please. This selects the fixture.
Dimmer
You can assign a dimmer value using the methods you learned on the previous pages or you can select the Dimmer preset type by touching the bar and turn the left encoder to turn up the lights.
Position
Select Position by tapping it in the bar. Notice how your encoder changes function according to what preset type you have selected. With the "Position", your encoders look like this:

Turning the encoders changes the values. Turning them with the encoder pressed changes the value faster. if you want to make smaller movement with a turn (increasing the resolution) you can tap the "Normal / Fine / Ultra" button next to the value.
Notice how some of the buttons in the Preset Control Bar have a red square and some a gray one. The red one indicates that you have changed values in that preset type. This value will be saved if you press the 'Store' key (do not do it now).
Gobo
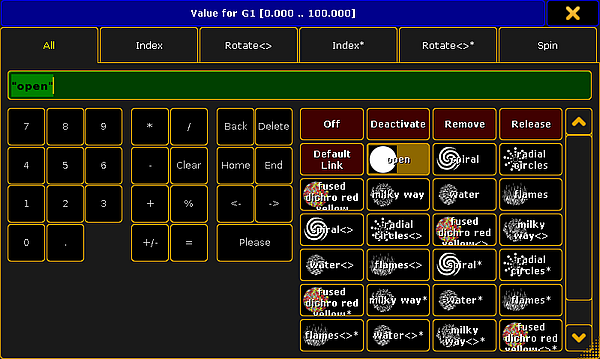
Tap the Gobo button in the bar. Now instead of turning the first encoder - now labeled "G1" - just press it shortly. This is where the "calculator" pop-up proves its power. The "calculator" is the pop-up that allows you to input values to attributes using a graphic interface instead of just numbers. This is what it looks like with "Gobo 1" selected:

Next to the usual buttons with numbers, there is a lot of buttons that changes according to your selections. When gobo is selected you have easy access to all the different gobos. Try to tap the button called "Water".
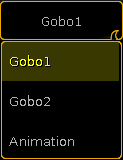
When our fixture has more than one gobo wheel you can choose the others by using the "Feature" button. It looks like this:

You can tap the text (Gobo1) to toggle thru the possible features. All buttons on the screen with the little "wave" icon in the lower right corner have a swipe function. Try to press/click and hold while you move out of the frame of the button, then you can release the hold. This will open a small list with the possible choices:

Here you can tap the feature you want to control.
Color
The last thing I will introduce you to, is how to control colors.
Tap the Preset Type button Color. The first thing you see is the attribute "C1" - This is the first color wheel. This works just like the gobo wheel we just looked at.
Now try to select "MixColor" using the "Feature" button. This assigns R (red), G (green) and B (blue) to the first three encoders (in that order). Now you can control these three attributes manually.
When you work with colors, then you can also use some special dialogs. There is a small button called "Special Dialog". It is located between the Preset bar and the labels for the right encoder. Please tap it.
It gives you a pop-up that is called "Color Picker". Here you can tap anywhere in the colored area to give your fixtures the color you tapped.
It uses the MixColors as a default and sets the colors wheels to open white.
The color picker have four different modes. You can change between them by pressing the buttons on the right side on the screen.
Fader:
This is three different ways to mix colors. HSB (Hue, Saturation and Brightness), CMY and RGB.
HSB:
This is a big color area where you can choose a color.
Swatch Book:
This is a list of the most used gel manufacturers and their gel catalog. You can choose a manufacturer and then one of their colors. This is not hundred percent accurate, but it will give you something close.
Raw Faders:
The faders will give you direct access to the MixColors. As a default it is displayed as RGB even though your fixtures might use a CMY color system internally (like the Mac700). This can be changed in the setup.
The color picker looks the same no matter what color system your fixtures are using. The exception is the "Raw Faders". They might show you more faders when you use LED fixtures with multiple colored LEDs.
Notice how your Fixture Sheet changes and always shows you what your fixture is outputting.
Take some time to experiment with the fixture controls. When you are done, clear your programmer and move on to the next page.


