

- grandMA2 User Manual
- grandMA3 Mode2
- grandMA2 Quick Start Guide
- Welcome
- 01 Create a New Show
- 02 Patch Dimmers
- 03 Use Screens and Windows
- 04 Control Dimmers or Channels
- 05 Working with Groups
- 06 Store the First Cue
- 07 Create More Cues
- 08 Edit a Sequence
- 09 Add Moving Lights
- 10 Fixture Sheet
- 11 Control Fixtures
- 12 Preset Pool
- 13 Making Presets
- 14 A Second Sequence
- grandMA2 Quick Manual onPC solutions
- MA 3D
- MA VPU
- Release Notes
Working with the Fixture Sheet
The Fixture Sheet is used for displaying all the attributes of the fixtures. The Channel Sheet only shows the dimmer attribute.
Creating the Fixture Sheet Window
Now that we have fixtures it would be nice to see what they are doing. To do this we need the Fixture Sheet window.
It might be a good idea to have the fixture sheet on a screen that is close to the encoders. If you are on a console it would be a suggestion to have it on screen 2. If you are using the onPC, then you could try to put it on screen 1.
To empty a screen and start on a fresh, press and hold the  (you do not have to "hold" in the onPC). Now you got a small pop-up in the lower right corner of your screens. It looks like this:
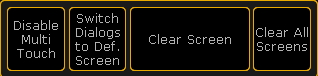
Tap where it says Clear Screen. This will delete any windows you have on that screen. If you tap "Clear All Screen" then you empty all your screens.
Now you need to add the Fixture Sheet.The Fixture Sheet is in the Sheet tab in the Create Basic Window.
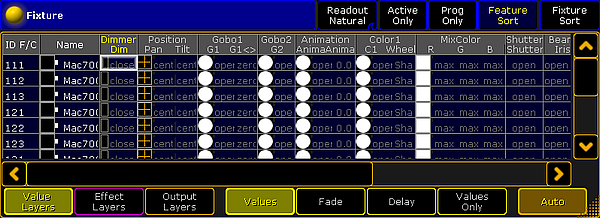
In the Fixture sheet your fixtures are (as a default) represented as a list. Your fixtures are in rows and the different attributes (like Dimmers, Pan/Tilt, Gobos, etc.) are sorted in columns.
Also notice that you now got three "FT" fixtures at the bottom of the list. These are the automatically created "Fixture Type" fixtures - that you do not have to worry about.
Sheet Options
When you press the yellow ball in the upper left corner of the sheet you get the sheet options (it is also here you can delete a single window - if you have not noticed).
The options are separated into different areas. Each area have a tab.
The Tools tab gives you the option to add different elements to your view - scrollbars etc.
The LayerMask options allows you to activate and control some masking in your sheet (masking hides different elements).
The Display controls how your Fixture sheet looks.
In Title Buttons you can turn on or off the different buttons in the sheets title bar.
Mask (Local) is a mask you can apply to this specific sheet (if activated in the LayerMask tab).
In some sheets there might be more tabs and other options then the ones you can see in the options for the Fixture Sheet.
Most of these options are outside the scope of this Quick Start Guide. But there are some that you should change.
Open the Display tab and make the following changes:
- Symbol Output - Auto
- Symbol Feature - On
- Feature Sort - On
- Hide Empty Cells - On
- Merge Same Values - Off
Now tap the Save to Default button the title bar of the options.
What did all this mean? Well, let us have a look each of them.
Symbol Output is a small square in the Name cells. This square is displaying the current output (Dimmer and Color) of the fixture.
Symbol Feature is symbols in many of the cells. This shows you what the current Color, Gobo, Dimmer value and so on are in each of the relevant columns.
Feature Sort will move the selected feature/preset type (next page deals with these) next to the Name column. This means that you do not need to scroll left and right in your fixture sheet to see what you are currently changing on the fixture.
Hide Empty Cells can be very useful if you have a show with different fixture types. Then some fixtures will have some functions that others do not. Removing the empty cells can increase the readability of the sheet.
Merge Same Values is a function that will only write a value once in some columns, if the current value is the same for all elements. If for instance you have a RGB fixture and all three colors are at "Full", then it will combine the three RGB columns and just write "Full" once. When the cells are not combines then it will write "Full" three time. Having combined values can make it a little hard to see what each of the RGB colors are doing. In the RGB example, try to imagine that the column displays "Full Closed". Now you need to find out what two colors are at "Full" or "Closed". Having all three values visible all time means that you do not have to think about it. Sorry for the long explanation :-)
'Save to Default' means that the changes you just made, will be used every time you create a new Fixture sheet.
The Fixture Sheet should now look something like this:
On the next page we are going to have a look at how to control fixtures.