

- grandMA2
- grandMA3 Mode2
- grandMA2 Quick Start Guide
- Welcome
- 01 Create a New Show
- 02 Patch Dimmers
- 03 Use Screens and Windows
- 04 Control Dimmers or Channels
- 05 Working with Groups
- 06 Store the First Cue
- 07 Create More Cues
- 08 Edit a Sequence
- 09 Add Moving Lights
- 10 Fixture Sheet
- 11 Control Fixtures
- 12 Preset Pool
- 13 Making Presets
- 14 A Second Sequence
- grandMA2 Quick Manual onPC solutions
- MA 3D
- MA VPU
- Release Notes
Adding and patching dimmers
Table of contents of this topic
Now we are going to add and patch 40 dimmer channels.
During this tutorial we are going to create a show with many different fixtures that can do a lot of exiting things. It is just virtual lights so they do not cost anything :-)
Before we can dance ballet, we have learn to crawl, so we begin with a simple design with some general stage wash.
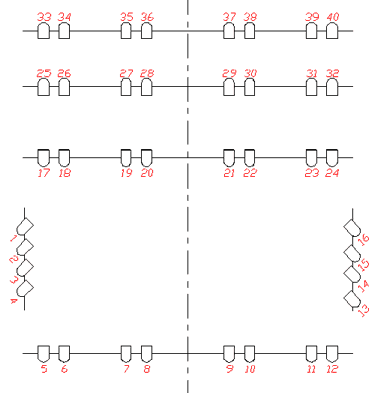
This gives you a total of 40 dimmer channels.
Enter the Fixture Schedule
Press the Setup key. Tap the Patch & Fixture Schedule button.
Now you will see a pop-up that is called "Layer Name". Here you write: Dimmers followed by a 'Please'/enter.
Next thing you see is the "Fixture Wizard" - I know, you expected that to be an old guy with a pointed hat and a wand. Sorry, it is not.
The left part of the wizard should look like this:
We need to put information in all the green areas to add the dimmers.
The right side of the screen will help filling out the data in the green fields. It changes depending on what field is selected on the left side.
Select the fixture type
Make sure you have selected the first thing that needs to be filled out - tap the button called Please select fixturetype.
The right side now shows you the the fixture types that currently exist in our show.
There is one called "2 Dimmer 00 (DMX 1)". This is a general dimmer that uses one DMX channel to control the output from a dimmer.
That fits perfectly to what we need right now - please tap it.
Give it a name
Selecting the fixture type changes the left side of the screen. It has changed the fixture type to the one you have selected. It has put something in the Name field as well. It automatically calls it "Dim 1". This means that the first dimmer channel that we add will be named "Dim 1".
Because of the space between the text and number, the following fixtures will be enumerated. So the second fixture will be called "Dim 2", third one is "Dim 3", and so on.
This is a fine name for now.
Adding multiple fixtures in one go
The field that is highlighted on the left side is called "Quantity".
Here we can type the number of fixture we want to add.
Write: 40 followed by a 'Please'/enter.
Fixture and channel ID
We call a dimmer a "fixture" even though it might be a dimmer in a rack of multiple dimmers somewhere.
All fixtures need a unique ID number that allows you to select the fixture and give it a value.
All the fixtures can have two ID numbers; a "Fixture ID" and a "Channel ID". There is naturally a difference. A fixture can have both a Fixture ID and Channel ID and they can be different, but it needs at least an ID number in one of them.
In this guide we need the dimmers to only have a Channel ID, so leave the "0" in the "Fixture ID" field.
We want the first dimmer to use Channel ID number 1. Make sure the green field in the "Channel ID" says "1".
Automatically the rest of the dimmers will be enumerated from this.
DMX patch
Now we need to tell the grandMA2 the DMX address for the first dimmer. The rest will be enumerated from this.
We want the dimmers to begin at DMX address 1 in the first DMX universe.
Type 1.001 followed by 'Please'.
This is Universe 1, a dot, and then address number 1.
Finish and confirm
Now the left side should look like this:
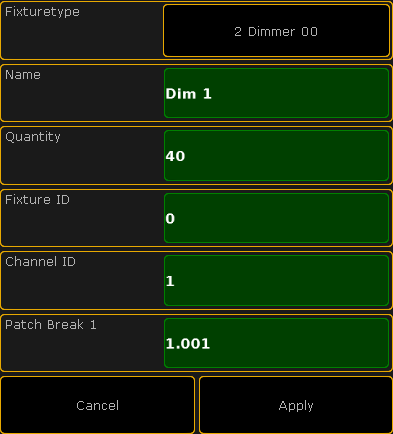
Press the Apply button. You have now added 40 dimmers in the fixture schedule.
Close the two setup screens using the yellow X. Do not worry to much about their content, we will return to them again later.
You are asked to confirm the changes you have made. This means if we want to save what we did in the fixture schedule. Please save it.
On the next page we are going to look at controlling those channels.