

- dot2 User Manual
- New in the Manual
- Introduction
- Intended Use
- System Requirements dot2 onPC
- Installation of dot2 onPC
- What are...
- System Colors
- Command History
- Executor
- Values
- Background
- Programmer
- Groups
- Presets
- Tracking
- Cues
- Executors
- Chasers
- Effects
- Preview and Blind
- Network
- IPv6
- DMX Tester
- System Colors
- How to...
- Turn the console on and off
- Update the console
- Add, patch, change, and delete fixtures
- Save and load your show
- Use the command line
- Use Encoders in the onPC
- Work with groups
- Work with presets
- Work with cues
- Work with chasers
- Work with effects
- Connect nodes, wings, 3D and onPC
- Use external input triggers
- Use MIDI and MIDI Show Control (MSC)
- Use the external screen
- Use web remote
- Reset the console
- Keys
- Align
- At
- Backup
- Blind
- B.O.
- Clear
- Copy
- Cue
- Delete
- DMX
- [dot]
- Down
- Edit
- Effect
- [Encoder]
- Esc
- Exec (Executor)
- [Exec Flash]
- [Exec Go]
- Fix
- Fixture
- Flash
- Full
- Go-
- Go- (Large)
- Go+
- Go+ (Large)
- [GoFastBack] <<<
- [GoFastForward] >>>
- Goto
- Group
- Help
- Highlt (Highlight)
- Label
- If
- MA
- Macro
- Magic
- [Minus] -
- Move
- Next
- [Numeric keys]
- Off
- On
- Oops
- Page
- Page+
- Page-
- Pause
- Pause (Large)
- Please
- [Plus] +
- Preset
- Prev (Previous)
- Prvw (Preview)
- Select
- Set
- Setup
- Speed
- Store
- Thru
- Time
- Toggle
- Tools
- Up
- Update
- View [Eye]
- Views & Windows
- Control Elements
- Command Line
- Encoder Bar
- Executor Bar
- Preset Type Bar
- Title Bar
- View Bar
- Icons
- Add New Fixtures
- Backup
- Beam Preset Type
- Calculator
- Calibrate Screens
- Change Functions of Executor
- Choose Clone Method
- Choose Copy Method
- Choose Delete Method
- Choose Store Method
- Choose Update Method
- Clock
- Color Preset Type
- Command Line
- Configure Slot
- Control Preset Type
- Cues
- Dimmer Preset Type
- DMX
- Edit Cue Number(s)
- Effects
- Empty Executor
- Enter Name for
- Executor Bar
- Executor Pool
- Fixtures
- Fixture Schedule Overview
- Focus Preset Type
- Gobo Preset Type
- Global Settings
- Groups
- Help
- Import Fixture Type
- Key Backlight
- Leaving Patch & Fixture Schedule...
- Load Show
- Macros Pool
- Magic Speeds
- MIDI Configuration
- MIDI Monitor
- MIDI Show Control
- Network Interface
- Network Protocols Configuration
- Network Setup
- New Show
- Off...
- Oops
- Page Pool
- Patch and Fixture Schedule
- Position Preset Type
- Presets Pools
- Remote Inputs Configuration
- Save Show As...
- Select DMX Address...
- Select DMX Ports
- Select Fixtures ID(s)
- Select Fixture Type...
- Select Function for Remote Inputs Configuration
- Select Function of Executor
- Select Language...
- Select Session Number
- Select Station...
- Select Trig
- Select Type
- Select View
- Select View for External Screen
- Select Wing...
- Session Collision
- Settings of Executor
- Setup
- Shapers Preset Type
- Software Update via USB
- Sound Input Configuration
- Status and Messages
- System Clock
- System Information
- Time defaults
- Timecode Configuration
- Tools
- Video Preset Type
- Virtual Playbacks
- Window Settings
- Wings
- Wings & Nodes Diagnosis
- Control Elements
- Commands
- >>> [GoFastForward]
- <<< [GoFastBack]
- - [Minus]
- + [Plus]
- Assign
- At
- Black
- Blind
- Call
- Clone
- Copy
- Cue
- Default
- Delay
- Delete
- Dmx
- DmxUniverse
- Edit
- Effect
- Executor
- Fade
- Fix
- Fixture
- Flash
- Full
- FullHighlight
- Go
- GoBack
- Goto
- Group
- Help
- If
- IfOutput
- Invert
- Label
- Learn
- Macro
- MidiNote
- Move
- Off
- On
- OutDelay
- OutFade
- Page
- Park
- Pause
- Preset
- PresetType
- Preview
- Rate
- Record
- Release
- Remove
- Replace
- Select
- Selection
- SetIP
- SnapPercent
- Solo
- Stomp
- Store
- StoreLook
- SyncEffects
- Temp
- Thru
- Toggle
- Top
- Unpark
- Update
- View [Eye]
- Zero
- Hints for Operating
- Error Handling
- CrashLogCopy
- CrashLogDelete
- CrashLogList
- Error Messages
- Glossary
- dot2 Quick Start Guide
- dot2 3D
- dot2 Release Notes
Choose Clone Method Window
If you try to clone a fixture, the console ask to choose the clone method.
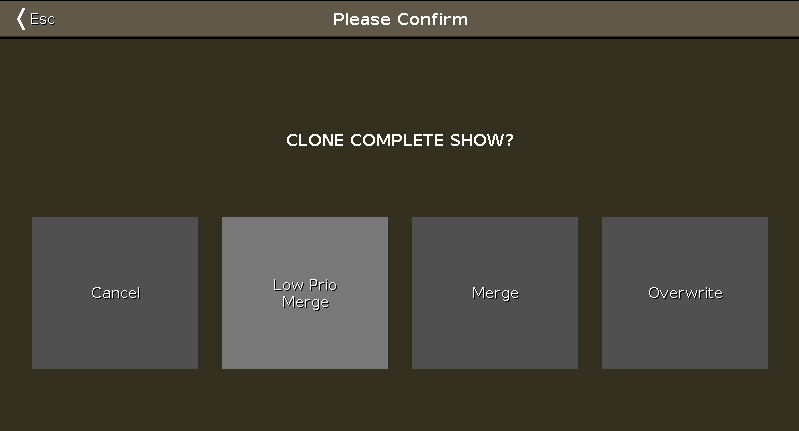
There are four options available.
Cancel:
Tap to cancel the clone command.
Low Prio Merge:
Tap to add the values from the source fixture to the destination fixture.
If the destination fixture has previous defined values, they will stay.
If the destination fixture has no previous defined values, the fixture will get the values from the source fixture.
Merge:
Tap to add values from the source fixture on the top of the destination fixture.
Overwrite:
Tap to overwrite the existing values from the destination fixture with the values from the source fixture.
Previous defined values will be deleted.
Example Low Prio Merge
Fixture 1 stored on executor 2 - cue 1, has a defined color red and a gobo.
Fixture 2 stored on executor 3 - cue 1, has a defined position pan and tilt.

Let´s assume, you will clone fixture 1 at 2 and you will keep the defined position of fixture 2.
1. Press  + Copy (= Clone) Fixture 1 At 2 Please.
The console will ask you to choose the clone method.
2. Tap Low Prio Merge.

Fixture 2 has now the same values as fixture 1 and the previous defined values (position).
Example Merge
| Cue | Fixture 1 | Fixture 2 |
|---|---|---|
| 1 | Dimmer open (entered value) | |
| 2 | Dimmer open (entered value) | Dimmer 50 % (entered value) |
| 3 | Dimmer open (tracked value) | Dimmer 50 % (entered value) |
Let´s assume, you will clone fixture 1 at fixture 2 and add only the previous defined values and not the tracked values.
1. Press + Copy (= Clone) Fixture 1 At 2 Please.
The console will ask you to choose the clone method.
2. Tap Merge.
| Cue | Fixture 1 (before merge) |
Fixture 2 (before merge) |
Fixture 2 (after merge) |
|---|---|---|---|
| 1 | Dimmer open (entered value) | Dimmer open | |
| 2 | Dimmer open (entered value) | Dimmer 50 % (entered value) | Dimmer open (because this was an entered value from fixture 1) |
| 3 | Dimmer open (tracked value) | Dimmer 50 % (entered value) | Dimmer 50 % (because this is a tracked value and clone method merge will not add tracked values) |
Example Overwrite
Fixture 1 stored on executor 2 - cue 1, has a defined color red and a gobo.
Fixture 2 stored on executor 3 - cue 1, has a defined position pan and tilt.
Let´s assume, you will clone fixture 1 at 2 and fixture 2 should make exactly the same like fixture 1.
1. Press + Copy (= Clone) Fixture 1 At 2 Please.
The console will ask you to choose the clone method.
2. Tap Overwrite.
Fixture 2 has now the exactly the same values as fixture 1. All previous defined values are deleted.
Fixture 1 and 2 are on executor 2. Fixture 2 does not exist anymore on executor 3.