

- dot2 User Manual
- dot2 Quick Start Guide
- 1 - Introduction
- 2 - Physical setup and layout
- 3 - Create a new empty show
- 4 - Adding and patching dimmers
- 5 - Controlling dimmers
- 6 - Fixture view
- 7 - The programmer
- 8 - Making and working with groups
- 9 - Store a cue and play it back
- 10 - Making more cues in the cue list
- 11 - Adding LED fixtures
- 12 - Working with colors
- 13 - Creating presets
- 14 - External screen
- 15 - Adding moving lights
- 16 - Controlling moving lights
- 17 - Making more groups and Presets
- 18 - More about cues and playback
- 19 - A look at Blind, Preview and DMX tester
- 20 - Fun with macros
- 21 - Building chasers
- 22 - Building dynamic effects
- 23 - Connect to onPC, 3D, Wings and Nodes
- 24 - Happy programming
- dot2 3D
- dot2 Release Notes
New help version
The help version you selected belongs to an older software version. You may want to view the latest help version.
Getting Started Guide - A look at the Blind, Preview and DMX tester functions
Table of contents of this topic
In this chapter we are going to try two functions of the console called Blind and Preview.
Sometimes you want to see the content of a cue or store something into a cue without changing the current output of the console.
There are two different functions that can help us with this.
Blind
Blind is function that effectively hides the programmer from the output. You toggle the blind function by pressing the Blind key
If you have content in your programmer when you enter blind, then this will not be a part of the output anymore. Likewise if you exit blind with something in your programmer, then it will be sent to the output.
DMX view
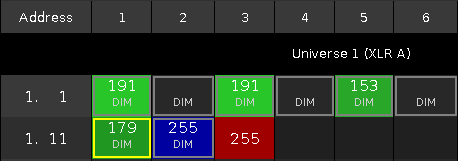
Before we try this, there is a view we haven't really talked about that I would like to properly introduce you to. It's called DMX view. It could look like this:

This view shows you the output from the console. It shows the actual DMX value of each DMX address. If an address have the value of 0 then it's not displayed. If there's something patched to a DMX channel then it'll have a gray frame around it. If it a fixture that uses more than one DMX channel then the frame will group the DMX channels that it uses.
I'm not going into many details about this view, but I'll give you the highlights.
The background of each address becomes more green as the value gets higher.
In the right corner of the title bar there's a button  that expands each cell so it not only show the value, but also what type of parameter it is.
The view scrolls to the selected fixture. Selected fixtures are shown with a yellow frame.
Parked channels have a blue background. DMX channels being under the control of the DMX tester have a red background. We'll look at parking and testing later in this chapter.
It can look like this:
If you press and hold the  key, then it will show the DMX address instead of the value.
Ok, enough about the DMX view.
Back to Blind
Try to have the following views visible: Fixture Symbol view, Fixture Sheet view and a DMX view.
Run cue 1 on the main cue list. This will turn on fixture 5 and 7 at 40% it's the same as a DMX value of 102.
Then select fixture 1 and give it a value of 50%. Now this should be visible on all screens. In both Fixture views and in the DMX view (a value of 128). Then toggle blind mode. Notice that you can still see the values in your programmer in the fixture sheet view, but the fixture symbol view will display the fixture at 0%. Just like the DMX view - here the value also disappears.
So programmer values can only be seen in the fixture sheet view. The other views shows you the actual output. Also notice the title bar of the two fixture sheets. The symbol view says "(Output)" and the sheet view says "(Blind)".
Notice that if you toggle blind again then your programmer values goes active again. This can be used to pre-load a look in your programmer and exit the Blind to put it live on stage.
Now you might be thinking "That's nice, but then it just snaps on, that might not look to good" - and you are right. Let me introduce you to the Program Time Master. This is one of the masters we can see in the Magic Speed view. It can be used to change the timing of the programmer. Press Store Time Prog Time and then one of the keys associated with executor number 4.
Now try to move the new fader up till it says 2.5 seconds and toggle the Blind key again. Notice how the values fades in and out. The two keys associated with the fader allows you to toggle the Program Time on and off without having to move the fader. This is really nice for live shows, where you want to set up the next look.
The down side of the Blind function is that you can't have anything in your programmer that you would like to keep live while you are working on something else in the background. This is where Preview helps us.
Preview
The other option for looking at something without actually outputting it is the Preview function.
With this we can look at and edit cues and we can test how the fade times look from one cue to another. All without actually outputting anything.
This might be best explained by a scenario. In our theater the designer is considering to add fixture 1 at 50% in the first cue.
So "Off" everything and run cue 1 now add fixture 1 at 50% in your programmer. So now he's sitting talking with the set designer about this change. But you really want to add the Hex7's with an orange glow in cue 3. But you can't go into blind, cause that would take out fixture 1. So what to do?
Try to press the Prvw key and then the big Go+ under the main executor. Now your fixture views get a red headline! This is to show you that they are currently showing you something that isn't the real output.
Notice that fixture number 1 is still active in the output. The DMX view is still showing the actual output of the console. But fixture 1 is not in our programmer. It's not in any of the Fixture views.
We are currently looking at cue number 1, both in real life and in Preview. But we want to edit cue 3.
Try to press the little Go+ in the command section (it's important not to press the big Go+ under the main executors) and then the Prvw. Now you can see the fade from cue 1 to 2 and the follow into cue 3. Now we can add the Hex7's just as we would normally do.
Fixture 21 thru 24 needs to go to 15% in an orange color. All this is currently in your preview programmer. Please notice that this is visible in both the Fixture views, but no value has changed in the DMX sheet.
Now press Update Please and tap Ok to update cue number 3. Clear your programmer and run the next cue in our previewer.
This is cue 4. Here we need to turn off the Hex7's and add this zero value to the cue. Please do this.
Now let's say the director and set designer are done talking and decided not to add fixture number 1. Now we can exit the preview mode. Press Esc. If you have something in your command line you might need to press it twice.
Now back in real world, we can run our cues to check what we have programmed in preview. Clear the programmer and run the cues.
The Preview function is a nice tool to work in the background and check fade times. If you want to preview other executors then you need to press Preview and then a key associated with that executor.
DMX Tester
In the beginning of this chapter I mentioned that DMX channels that was under the influence of the DMX tester has a red background in the DMX view. So let's have a look at the DMX tester.
Sometimes it's nice to be able to just test a DMX channel without having to patch anything. Or you might have some blue lights that should just always be on.
With a DMX view open try to press the following: DMX 1 3 At 5 0 Please. Notice that this DMX channel gets the red background and a value of 127 (DMX is a range from 0 to 255 - 50% equals a value of 127).
You can use this on any DMX channel. Patched or unpatched - doesn't matter. You can't see in any other views that you have this DMX channel under control - except the  icon next to the command line input on the left screen. The DMX tester have the highest priority. This means that you can't control the output of the DMX channel from the programmer, executor or by parking.
If you want to release a channel from the DMX tester then you can use off. Off DMX 1 3 Please.
If you want to release all channels under the influence of the DMX tester you have two options: Off DMX Thru Please or press Tools and then Turn DMX Tester off.
Be careful with the DMX tester. Use it only when appropriate. You can end up spending a lot of time trying to figure out why a fixture isn't doing what it's suppose to do, just to realize that it's the DMX tester that's keeping the control.
Fixture parking
We can choose to lock a fixture so we don't change its values by accident. This is called parking. Try to set your fixture number 1 at 50%. Now press  +Pause (gives you the Park command) Fixture 1 Please. Now clear your programmer. You can't see it in your fixture views, but the fixture is actually still at 50%. Have a look in the DMX view. Here you can see that the fixture is at a DMX value of 127. This values will not change no matter what your programmer or cues tell the fixture to do. It's even ignored by the grand master and blackout key.
There's also a small parking  icon next to your command line input.
To unpark the fixture again you can press +GO+ (the small one - this gives you the Unpark command) Fixture 1 Please. Now the fixture is back to normal operation.
Remember when we press the Tools key? One of the buttons in this menu says Unpark all DMX channels. This will unpark all the parked fixtures.
If fixtures are not responding to your commands, then you should look if there's a parking or DMX tester icon next to the command line.
In the next chapter we are going to look into macros.